Salesforce SAML SSO: A Step-by-Step Guide

This blog will cover an example use case for a SAML SSO solution, explore related concepts, and show how to implement it in the Salesforce platform.

The example use case is the following:

There are two orgs, Epic Innovations and Secure Ops, where the latter contains classified information that cannot leave the system for compliance reasons. Agents working on cases in the Epic Innovations org need some additional information available in the Secure Ops org to work on some of their cases.

Salesforce SAML SSO: A step-by-step guide


The requirements are:

  1. Password-Free Access

Agents should be able to log in to the Secure Ops org without re-entering their passwords.

  1. Conditional Access Control

Agents should be able to access the Secure Ops org only if they have open cases of type Classified assigned to them.

The subsequent sections are organized as follows: Section I reviews the relevant SAML SSO concepts, Section II, describes how the solution can be implemented in the Salesforce Platform, and Section III shows the implementation results.

1. SAML SSO Concepts

What is Single Sign-On?

Single sign-on (SSO) is an authentication method that enables users to access multiple applications with one login and one set of credentials [1].

SSO greatly simplifies the user experience by eliminating users needing to remember and enter different usernames and passwords for each application they use within a particular environment.

SSO is widely used in web applications and SaaS systems to streamline user authentication and improve overall security. It can be implemented using protocols such as OAuth, OpenID Connect, and SAML (Security Assertion Markup Language).

Identity Providers and Service Providers

An Identity Provider (IdP) is a trusted service that stores and verifies a user’s identity. SSO implementations use an IdP to verify the identity of the user attempting to log in. If their identity is verified, they’re given access to the system. Fig 1 shows an example of the X login page, where Google and Apple can be used as IdPs to verify a user’s identity.

Fig 1. x.com login page.

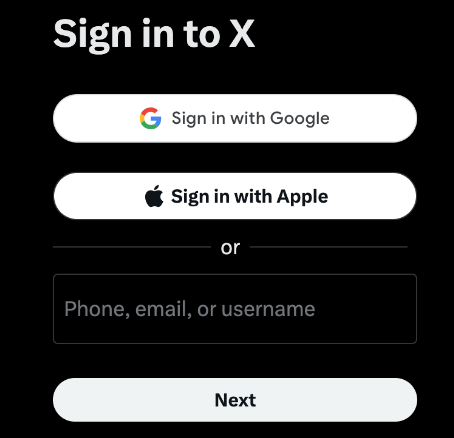
A Service Provider (SP) is an entity that provides resources or applications to an end user. In SSO, the SP relies on an IdP to verify a user’s identity. Going back to the X example, the X platform serves as an SP, providing access to the X web application, and relies on either Google or Apple to verify the user’s identity.

Salesforce is automatically enabled as an identity provider when a domain is created. After a domain is deployed, admins can add or change identity providers and increase security for their organization by customizing their domain’s login policy [2].

SAML SSO Flows

When setting up SAML SSO there are two possible ways of initiating the login process: from the identity provider or the service provider. The steps for each flow as outlined in the official Salesforce documentation [3] are described below.

Service Provider-Initiated SAML Flow

  1. The user requests a secure session to access a protected resource from the service provider. For instance, the user would like to access X, which can only be achieved by logging in.
  2. The service provider initiates login by sending a SAML request to the identity provider.
  3. The identity provider sends the user to a login page.
  4. The user enters their identity provider login credentials, and the identity provider authenticates the user.
  5. The identity provider now knows who the user is, so it sends a cryptographically signed SAML response to the service provider. The response contains a SAML assertion that tells the service provider who the user is.
  6. The service provider validates the signature in the SAML response and identifies the user.
  7. The user is now logged in to the service provider and can access the protected resource.

Identity Provider-Initiated SAML Flow

The IdP-Initiated flow is a shortened version of the SP-Initiated flow. In this case, a SAML request is unnecessary.

  1. The user logs in to the identity provider.
  2. The user clicks a button or link to access the service provider.
  3. The identity provider sends a cryptographically signed SAML response to the service provider. The response contains a SAML assertion that tells the service provider who the user is.
  4. The user is now logged in to the service provider and can access the protected resource.

II. Salesforce Implementation

Solution outline

In this blog post, the chosen solution for the sample use case involves implementing a service provider-initiated SAML SSO flow. A connected app for the Secure Ops organization will be configured within the Epic Innovations organization. This setup enables agents to be seamlessly redirected to the Secure Ops login page.

Upon reaching the Secure Ops login page, agents will be prompted to authenticate using their Epic Innovations credentials. Subsequently, the system initiates a verification process to check for any open cases of type Classified associated with the respective agent. If open cases are identified, the agents will be granted access. With open cases, they’re allowed access to the system.

Setting up Salesforce as a SAML Identity Provider

To let users access external systems and, in this case, the Secure Ops org, with their Epic Innovations credentials, the Epic Innovations org has to be enabled as an Identity provider.

To enable a Salesforce org as an IdP [4]:

  1. From Setup, in the Quick Find box, enter Identity Provider, then select Identity Provider.
  2. Click Enable Identity Provider.

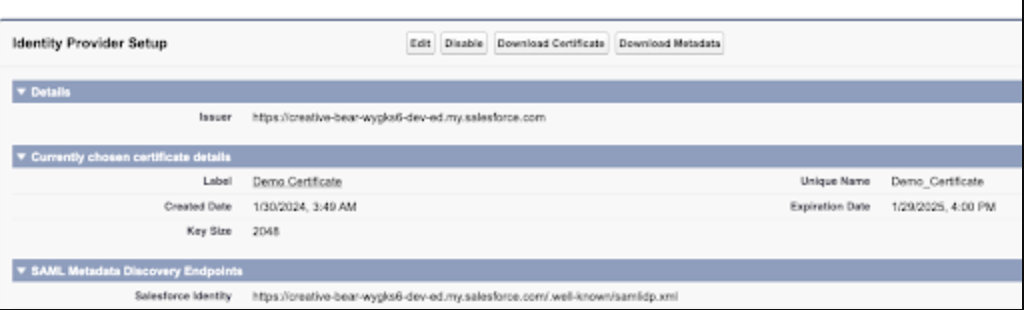
Once enabled, you can click Edit to choose a certificate, Download Certificate to download the certificate, and Download Metadata to download the metadata associated with your identity provider, which contains information such as the Entity ID, Name ID Format, and other relevant information that will be discussed in the following sections.

Fig 2. Identity Provider Setup in the Epic Innovations org.

Setting up Salesforce as a SAML Service Provider

The Secure Ops org can be configured as a service provider to facilitate access to the Secure Ops organization using Epic Innovations credentials. This is achieved by creating a SAML single sign-on (SSO) setting using some information from the identity provider.

To create a SAML Single Sign-On Setting [5]:

  1. From Setup, in the Quick Find box, enter Single, and then select Single Sign-On Settings.
  2. Click New; this option allows you to specify all the settings manually. You can also create a configuration with existing Metadata Files.
  3. Fill in the relevant information as shown in the picture below.
Fig 3. Single Sign-On settings in the Secure Ops org.

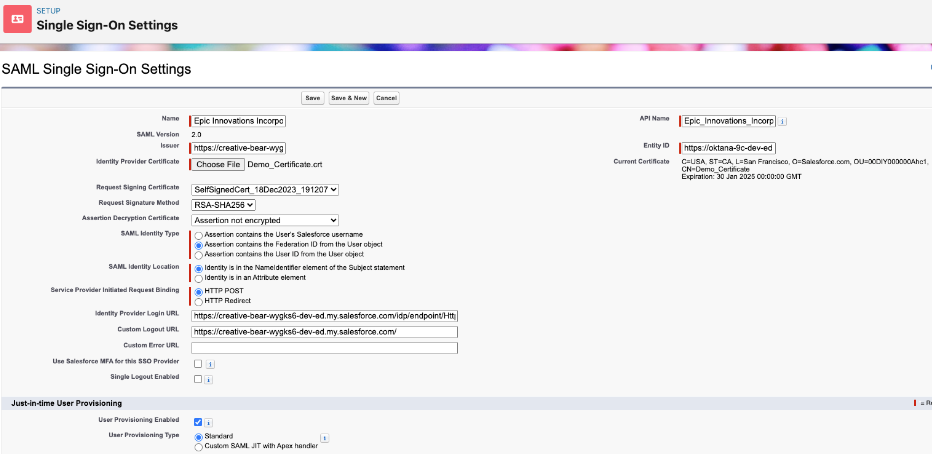
Next, some of the key fields are described:

Name: Epic Innovations incorporation. This is a name that easily references the configuration. This name appears if the identity provider is added to My Domain or an Experience Cloud login page.

Issuer: A unique URL that identifies the identity provider. This was taken from the Identity Provider Setup configured in the Epic Innovations org.

Entity ID: A unique URL that specifies who the SAML assertion is intended for, i.e., the service provider. In this case, the Secure Ops domain is filled in.

Identity Provider Certificate: The authentication certificate issued by the identity provider. This was downloaded from the Identity Provider Setup configured in the Epic Innovations org.

Request Signing Certificate: The request signing certificate generates the signature on a SAML request to the identity provider for a service provider-initiated login.

Request Signature Method: Hashing algorithm for signed requests, either RSA-SHA1 or RSA-SHA256.

Assertion Decryption Certificate: If the identity provider encrypts SAML assertions, the appropriate certificate should be selected for this field. In this case, the Epic Innovations org would not encrypt the assertion, so the Assertion not encrypted option can be selected.

SAML Identity Type: This is selected based on how the identity provider identifies Salesforce users in SAML assertions. In this case, the Federation ID will be used.

SAML Identity Location: This option is based on where the identity provider stores the user’s identifier in SAML assertions. In this case, we chose Identity in the NameIdentifier element of the Subject statement. When we set up a connected app, we’ll specify this in the Epic Innovations org.

Service Provider Initiated Request Binding: This is selected according to the binding mechanism that the identity provider requests from SAML messages. In this case, HTTP POST will be used.

Identity Provider Login URL: Since HTTP POST was chosen as the request binding, the URL with endpoint /idp/endpoint/HttpPost is used. This endpoint can be found in the Identity Provider’s metadata file. Also, the corresponding endpoint for HTTP Redirect is available in this file.

Custom Logout URL: This is a URL to which the user will be redirected once logged out. Here, the Epic Innovations’ My Domain was chosen.

Adding the Epic Innovations org to the Secure Ops login page

With the SSO Setting in place, it is time to add the Epic Innovations login option to the Secure Ops login page.

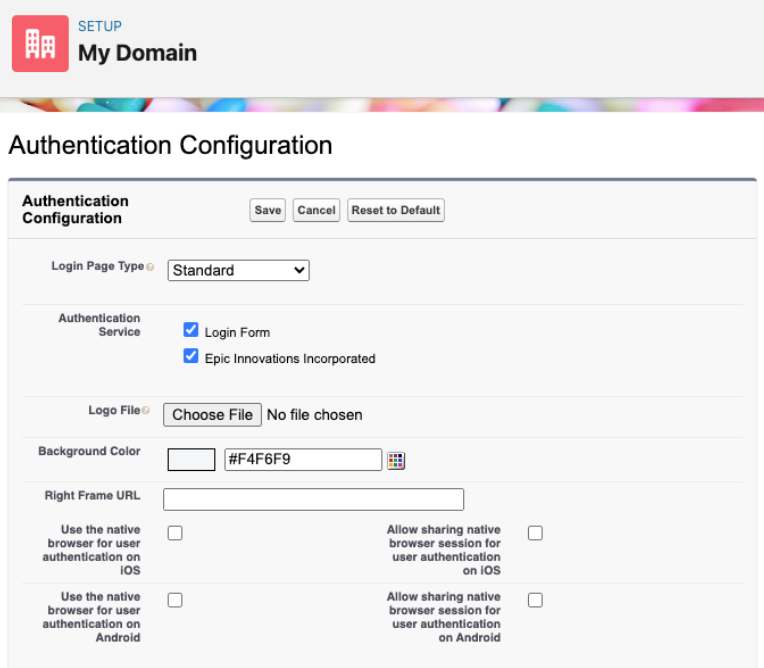
To add the Epic Innovations login option to the My Domain login page [5]:

  1. From Setup, in the Quick Find box, enter My Domain, and then select My Domain.
  2. Under Authentication Configuration, click Edit.
  3. Enable the Epic Innovations option.
  4. Save the changes.
Fig 4. My Domain Authentication Configuration in the Secure Ops org.

Specifying a Service Provider as a Connected App

A connected app that implements SAML 2.0 for user authentication can be set up to integrate a service provider with Epic Innovations org.

To set up the connected app [6, 7]:

  1. From Setup, in the Quick Find box, enter Apps, and then select App Manager.
  2. Click New Connected App
  3. Fill in the basic information section as appropriate.
  4. In the Web App Settings section, fill in the Start URL with the Secure Ops’ My Domain. This will redirect users to Secure Ops org when they access the connected app.
  5. Click Enable SAML; this will allow more information to be filled in.
  6. For Entity ID, fill in the Secure Ops’ My Domain.
  7. For the ACS URL, which stands for Assertion Consumer Service URL, fill in Secure Ops’ My Domain. The SP’s metadata file can provide this.
  8. For Subject Type, select Federation ID. Remember that the service provider set the Identity Type to Federation ID.
  9. For Name ID Format, select the one that matches the NameIDFormat in the SP’s metadata file.

Add the Connected App to the App Launcher

Since the created Connected App has the start URL set up, it can be added to the app launcher for easier access. To do this:

  1. From Setup, in the Quick Find box, enter App Menu, and then select App Menu.
  2. Then, search the Connected App and mark it as Visible in App Launcher.

Setting up conditional access control

As stated in the requirements, users should only be able to access the Secure Ops org whenever they have open cases marked as classified. A Connected App handler will be used to fulfill this requirement. Connected App handlers can be used to customize connected apps’ behavior when invoked.

A Connected App handler is an Apex class that extends the ConnectedAppPlugin class. Here is the entire implementation for this use case.

				
					global with sharing class SecureOpsAppPlugin extends Auth.ConnectedAppPlugin
{
        global override Boolean authorize(
Id userId,
Id connectedAppId,
Boolean isAdminApproved,
Auth.InvocationContext context
    ){
        // get the number of open cases the user has
        Integer i = [
SELECT COUNT() FROM Case
WHERE
Status!='Closed' AND Type='Classified' AND OwnerId=:userId
   ];
        
        // if the user has one or more cases open, authorize access
        return (i > 0);
    }
}


As mentioned earlier, the created class extends the ConnectedAppPlugin class. In this case, the authorized method is overridden. This method permits the specified user to access the connected app [8]. The method returns a boolean indicating whether the user is approved or not to access the connected app. A value true indicates the user is authorized, and a false indicates that it didn’t grant access.

Since the requirements indicate that access should be denied if there are no open cases, the code runs a COUNT query to check the number of Open cases of type Classified the user has. If the user has at least one case with those characteristics, the method returns true, granting access to the connected app. Otherwise, it returns false, denying access.

Managing Users

There’s one last task before diving into the results: user management. While configuring the Single Sign-On settings, it was established that the Federation ID would be the identifier for the user logging in.

Consequently, any user logging into the Secure Ops organization via the Epic Innovations login should have a corresponding user in the Epic Innovations organization with a matching Federation ID. If a matching Federation ID is not found, the user cannot log in.

To set the Federation ID for a user:

  1. From Setup, in the Quick Find box, enter Users, and then select Users.
  2. Find the user and click Edit.
  3. In the Single Sign On Information section, fill in the Federation ID field.


III. Results

To validate the implementation, let’s first try to access the Secure Ops org without any cases of type Classified open.

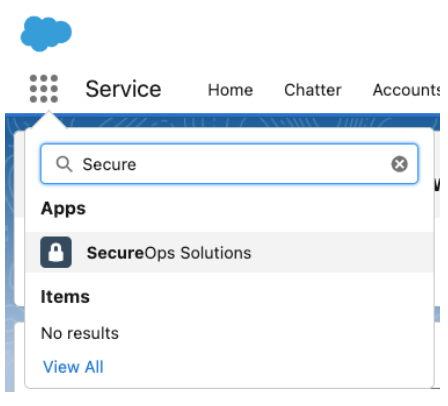
From the App Launcher, we select the Secure Ops Solutions connected app we created.

Fig 5. Secure Ops Connected App in the App Launcher.

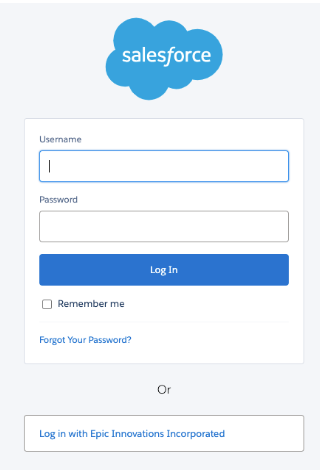
This redirects us to the Secure Ops organization where we have the option to log in with Secure Ops credentials or via Epic Innovations, we choose Epic Innovations.

Fig 6. Login options for the Secure Ops organization.

We get an insufficient privileges error because the Epic Innovations organization doesn’t have any open cases of type Classified. So, our application handler denies access to the Secure Ops organization.

Fig 7. Insufficient privileges error when trying to access the Secure Ops organization.

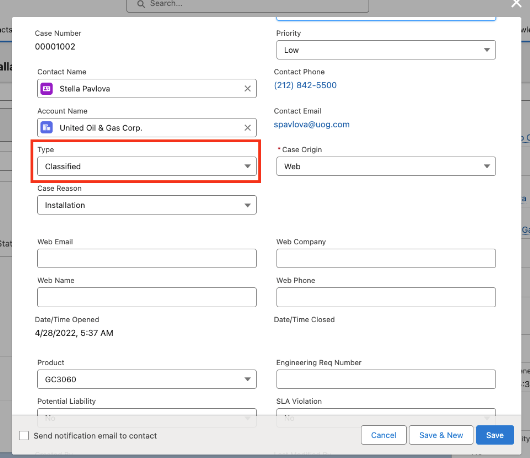
Now, let’s create a case and set the type to be Classified. Since we don’t have any other automation, the case is automatically assigned to our user. We can now try to access the Secure Ops org.

Fig 8. New case of type Classified in the Epic Innovations org.

If we attempt the same process, we can log in to the Secure Ops org.


Contact us to explore our services and discover how our extensive knowledge at Oktana can assist you in launching a successful project.

Mastering User Acceptance Testing: A Step-by-Step Guide for Business Analysts

If your role is accountable for the correct understanding and implementation of requirements, User Acceptance Testing (UAT) might become one of your best friends once the solution is built. In this post, we are exploring the importance of implementing UAT, as well as how to prepare and run it. Let’s dive in!

Once the development and QA phases are completed, User Acceptance Testing should be included in your process prior to release. This ensures that the end users, or the SMEs on their behalf, validate that the experience meets the expectations outlined in the requirements. It will be the moment to show “how” those needs are going to be addressed.

Usually, a Business Analyst (BA) is accountable for leading this activity, which requires careful preparation. Let’s break down the User Acceptance Testing process:

  1. Limit the scope: Be aware of the different paths you will be preparing and take into consideration that non-happy paths should be included to ensure different scenarios are being covered.
  2. Create your document: A spreadsheet could be enough, choosing a tool that you are familiar with will be helpful for you and the collaborating users. Construct a template containing some space for the user information, such as Name, Role, and Date. Second, and in order to organize UAT instructions some of the columns that could be used for the headers are: Step #, Step Description, Expected Result, Actual Result (Pass/Fail), and Feedback. Whereas the rows will contain the actual description of each column.
  3. Break it down into the different processes: Separate each process or scenario. Providing a short introduction about what will be covered, will help the users to understand where it begins, ends, and any nuances involved.  
  4. Delve into each step. At this point, you are probably eager to write down each step, so make sure that before getting started you grasp the end-to-end process. You should perform a walk through the entire process (and probably you will need to revisit it a couple of times) while describing each step and the expected result. Using the test cases built by the QAs could be tempting, but that is not a good practice. Don’t get me wrong, QA engineers do a terrific job while testing the solution, ensuring the quality of the development. However a UAT is not a copy/paste of the test cases, take into consideration that the perspective must be the user’s one (which mostly is non-technical), thus each step should be clear, concise, and avoid jargon. For instance, if the user should enter their credentials rephrase it to make it easy to understand, something like “Fill in the user name and the password field with the following information….” 
  5. Double-check the environment. UAT is an activity performed before a functionality hits production, then an environment such as staging is more appropriate (if you are using Salesforce, a Partial Copy Sandbox is a good choice). At this point, you are making sure that each UAT participant is able to access the environment (for Salesforce double-check that users are created in the sandbox and have the appropriate permissions granted)
  6. Verify data and links. Related to the last point, if the user is expected to interact with several interfaces or fill in some data such as passwords, tokens, IDs, etc.;  that information should be explicitly provided in the related step. Moreover, if an input is unique, that should be mentioned upfront, and an example per participant must be provided. It is a good idea to ask the devs or QA for a set of information and let them know it is going to be used in UAT only.
  7. Select the UAT users (including Subject Matter Experts) to join the activity. Be mindful to include people that will be interacting with the solution, where SMEs take an important role too since that can represent final users too. Once you have confirmation, make sure to copy your template accordingly, so that each person has their own.
  8. Set up the meeting and provide support. Explain the dynamic to the participants. Remember you are not the one executing the UAT, of course, to get started with the activity you can share your screen and use a couple of steps to show how each one should be reviewed and the template completed, but it is a hands-on activity for them. Pro tip: ask your participants to record their screen, if any bugs or questions are raised you will know where to refer.
  9. Bug’s prioritization. If any defect is reported, as a BA you should identify and capture it. Heads-up, UAT is not a space for new requirements, thus before reporting the bug to the team review the scope and the priority if, in fact, it is a bug.
  10. Sign off. Once the bugs have been corrected and retested, you are ready for the sign-off with a fully tested solution on both sides (IT team and SMEs)!

Following these 10 steps, User Acceptance Testing may look like a time-consuming activity, but conducting it as part of the development cycle adds value and assures users will have a seamless experience once the new solution hits production.

If you’re interested in BA content, check out our blog The Strategic Role of the Business Analyst in Salesforce Implementation.

How to Make Your Salesforce Org Secure

In our previous blog post, “One way to keep your org secure: Salesforce Health Check” we covered the built-in Salesforce Health Check tool, the benefits of running a health check, and why you and your company need one.

This blog will cover some in-depth steps you can follow as a guide if you are a Salesforce developer or Admin to make your org more secure. That being said, let’s get to it!

Salesforce org secure health check

The Lightning Platform has been migrating from Aura components to Lightning Web Components (LWC) for some years. Even though both are still supported and can coexist on the same page and even share information, Salesforce is focusing on LWC, and we should do the same. 

When you run your Health Check application, you have 3 moving parts involved:

  1. The Salesforce org
  2. The client (LWC)
  3. The backend code (Apex)


We have configurations available in Setup > Security, allowing us to configure how the app runs. I recommend turning on the following options: 

  • Require HttpOnly Attribute

Setting the HttpOnly attribute will change how an app communicates with the Salesforce server by increasing the security of each cookie the app sends. Since HttpOnly prevents cookies from being read by JavaScript, the browser can receive the cookie, but it cannot be modified in the browser. 

HttpOnly is an additional flag included in the Set-Cookie HTTP response header. Using the HttpOnly flag when generating a cookie helps mitigate the risk of a client-side script accessing the protected cookie.

  • Enable User Certificates 

This setting allows certificate-based authentication to use PEM-encoded X.509 digital certificates to authenticate individual users to your org.

  • Enable Clickjack Protection

You can set the clickjack protection for a site to one of these levels.

  • Allow framing by any page (no protection).
  • Allow framing by the same origin only (recommended).
  • Don’t allow framing by any page (most protection).

Salesforce Communities have two clickjack protection parts. We recommend that you set both to the same level.

  • Force.com Communities site (set from the Force.com site detail page)
  • Site.com Communities site (set from the Site.com configuration page)
  • Require HTTPS

This setting must be enabled in two locations. 

Enable HSTS for Sites and Communities in Session Settings.

Enable Require Secure Connections (HTTPS) in the community or Salesforce site security settings.

  • Session Timeout

It’s a good idea to set a short timeout period if your org has sensitive information and you want to enforce strong security.

You can set values, including: 

  • Timeout value
  • Force logout on session timeout
  • Disable the timeout warning popup
  • Enable Cross-Site Scripting (XSS) Protection

Enable the XSS protection setting to protect against reflected cross-site scripting attacks. If a reflected cross-site scripting attack is detected, the browser shows a blank page with no content. Without content, scripts cannot be used to inject attacks. 

  • Use the Latest Version of Locker

Lightning Locker provides component isolation and security, allowing code from many sources to execute and interact using safe, standard APIs and event mechanisms. Lightning Locker is enabled for all custom LWCs and automatically updates. If you’re using Aura, check your version for compatibility.

One more thing...

I want to spend more time discussing a feature that helps us run our application even more securely. And I am talking about Salesforce Shield. Salesforce Shield allows you to run your application more securely with some features like encryption and monitoring. It adds an extra layer of confidence, privacy, and security and lets us build a new level of trust, compliance, transparency, and governance.

Salesforce Shields is composed of 3 easy to use point and clicks tools, which are:

  1. Platform Encryption: It is designed to bring us state-of-the-art encryption while we do not lose access to key features such as search, validation rules, etc. It can derive the encryption keys from org-specific data or even import our encryption keys(adding an extra layer of control)
  2. Monitoring Events: We often need to track specific events in our orgs (who accesses a piece of data, how the encryption keys are, who is logging, and from where). Monitoring events is the tool for it allowing us to track and access all these events and more from the API and integrate it with the monitoring tool of our choice(New Relic, Splunk, others)
  3. Audit Trail: Some industries require us to keep track of changes in data. Turning on tracking specific fields and setting up an audit policy, we can store historical values for up to 10 years.

Conclusion

It is essential to consider security while developing apps and maintaining our Salesforce org secure. And even though it might seem complicated (and it is), incorporating the Health Check tool and salesforce shield in our development process will help us to keep our org in a good, healthy state.


You can also watch our on-demand Health Check Assessment webinar by my colleagues Zach and Heather, where they covered 4 simple steps to ensure the health of your Salesforce org. 

Harnessing the Power of ChatGPT and Salesforce

Boosting Sales and Customer Experience

In today’s highly competitive business landscape, companies constantly seek innovative ways to enhance their sales processes and provide exceptional customer experiences. Two powerful tools that have gained immense popularity in recent years are ChatGPT and Salesforce. ChatGPT, an AI-based language model, and Salesforce, a robust customer relationship management (CRM) platform, can work synergistically to revolutionize sales and take customer interactions to the next level. In this blog post, we will explore the benefits of integrating ChatGPT with Salesforce and delve into the various use cases that can maximize your sales efforts.

Personalized Customer Interactions:

One of the key advantages of combining ChatGPT and Salesforce is the ability to deliver highly personalized customer interactions. By integrating ChatGPT with Salesforce’s customer data, you can access detailed information about each customer, including their purchase history, preferences, and behavior patterns. This valuable data empowers your chatbots to provide tailored recommendations, answer queries, and offer relevant products or services. The result is a seamless, personalized customer experience that fosters trust and enhances satisfaction.

24/7 Availability:

Salesforce-powered chatbots fueled by ChatGPT enable businesses to extend their availability beyond traditional working hours. With automated chat capabilities, customers can engage with your brand anytime, anywhere. Whether it’s seeking product information, resolving issues, or placing orders, your chatbot can provide real-time assistance, reducing response times and ensuring round-the-clock support. This continuous availability strengthens customer loyalty and enhances the overall sales process.

Lead Generation and Qualification:

Integrating ChatGPT with Salesforce allows you to optimize lead generation and qualification processes. Chatbots can engage potential customers in conversations, gathering valuable data and qualifying leads based on predefined criteria. By seamlessly transferring qualified leads to Salesforce, your sales team can focus their efforts on high-priority prospects, increasing efficiency and conversion rates. The integration also enables lead nurturing and follow-up, ensuring a consistent and streamlined sales pipeline.

Real-time Sales Support:

ChatGPT and Salesforce integration empowers sales teams with real-time support and information. Sales representatives can leverage the chatbot’s capabilities to access product details, pricing information, and even real-time inventory updates. This immediate access to critical data allows sales professionals to provide accurate and up-to-date information to customers, making their interactions more impactful. The integration streamlines the sales process, reduces errors, and enhances productivity.

Embracing these technologies enables companies to stay ahead of the competition, nurture customer relationships, and drive revenue growth. Explore the possibilities of ChatGPT and Salesforce integration, and unlock the full potential of your sales process.

Image suggestion: An image showcasing a seamless connection between ChatGPT and Salesforce, symbolizing the integration’s potential and impact on sales.

The seamless integration of ChatGPT and Salesforce presents a significant opportunity for businesses to enhance their sales processes and deliver exceptional customer experiences. By ensuring that the chatbot conversations feel natural and undetectable, leveraging customer data for personalization, establishing a dynamic connection with Salesforce, and automating lead qualification, companies can achieve impressive results. Embrace the power of this integration to stay ahead of the competition, nurture customer relationships, and drive sales growth, all while maintaining an undetectable and authentic conversational experience.

The use of appropriate techniques and responsible AI practices is essential to maintain ethical standards and ensure that customers are aware when interacting with a chatbot rather than a human representative. Transparency about the nature of the interaction is crucial for building trust and maintaining ethical guidelines.

Can we create a fully functional conversational bot that leverages the power of a Large Language Model (LLM)? YES! Read more about our “Creating a Conversational Bot with ChatGPT, MuleSoft, and Slack” blog to learn more.

Salesforce Integration Best Practices

Index

What can we do to avoid a Salesforce integration failure?
THIS is the problem behind this article.

A lot of investment goes into a system integration, such as money, time, planning, and strong expectations. Salesforce has over 2,500 integrations and applications available to make your life (or your customer’s life) easier. So why not take advantage of it in the best way possible?

In this article, you will learn how to manage your integration in the best way possible by handling all major factors and acknowledging the Want to avoid a Salesforce integration failure? We will show you how to manage all factors behind Salesforce Integrations Best Practices.

Basics

First, let’s go back to basics. What is an integration?

A Salesforce integration happens when two or more systems come together through a process that facilitates functions or procedures that were once separate. By doing so, all their data is easier to handle by means of multiple, now connected, processes and systems running hand in hand.

Think about it for a second. It’s quite weird to find a system nowadays that is fully isolated.

Dealing with integrations is an essential part of a Salesforce technologist’s job. Hence, becoming skilled in this process means performing the integration faster, with little to no errors, while recognizing that the systems should stay ​​malleable and accessible to other future integrations.

Did you know?

An essential part of any integration is the famous API, an Application Programming Interface. The API is essential because it works as a software intermediary between the applications to communicate with each other.
Without it, there would be no interaction and integration between the systems.

In order to build a good integration and have it perform to the best of its ability, you need to consider all the factors that affect its proper functioning. There are many, but for this example, we will highlight timing. To put it simply, be certain that your processes run to a suitable clock. Whether you choose a synchronous or asynchronous one, would depend mainly on the integration type.

And to help you remember how they work here is a graphic to keep handy…

Security Comes First

As it should be, security is one of the most important factors when it comes to Salesforce integrations. Plenty of factors affect security, but what matters most is taking care of what may have undue access or even harm your integration pattern, your data, as well as your customer’s data. Security elements that typically manage firewalls, forward proxy, reverse proxy, encryptions, and the WS protocol, prevent your system from being invaded by harmful disruptions in the following ways:

  • Countering attacks
  • Managing your sensitive information
  • Protecting your online identity
  • Handling authentications
  • Throttling

Even with all their help, security measures are still number one in our list of best practices and should be counted as primary for each individual project. Brushing them aside as a routine step should be avoided at any cost. For more information, consult security considerations.

Salesforce Integration Patterns

Salesforce patterns and the requirements behind your project, go hand-in-hand. Therefore, patterns need to be carefully understood to handle them better. Makes sense, right? 

Before going ahead, think about timing, direction, security measures, and anything else that impacts their correct functioning. To learn more about patterns, their type, timing, and patterns to consider, consult the Salesforce Pattern Selection Guide.

Now that you have a better understanding of what patterns are, let’s go over some simple factors and the questions affecting each.

  • Since Salesforce needs to perform processes based on the response it receives, the first factor to consider is keeping track of transactions being followed.
  • Timing, as mentioned previously, is also an important factor. Check if it should be synchronous vs asynchronous. Do the processes need to be in real-time vs near real-time?
  • Ultimately, there are a few other elements to manage, such as integrating declaratively or not, the size of your message, how to protect against unforeseen situations (ex. your external system going down), and all matters related to the Salesforce contract.


The platform being used can also be a factor that alters patterns and integrations. We recommend using MuleSoft. You can design, build, customize, and integrate your APIs faster thanks to its one-in-all platform that also allows testing, grants you pre-build assets, and lets you discover more APIs to expand your reach. There are other resources like Informatica and Jitter that should also work nicely. However, MuleSoft is a formidable contender in terms of data management, customization, and customer experience. You won’t be disappointed.

Common Mistakes

From not handling the scope of your project, to losing sight of all the requirements –  it’s human to miss the beat and lose track of what is really at stake. Keeping track of things can save you time, money, and stress. We know you know this, but it’s never a bad idea to have some useful reminders. 

Here you’ll find some tips to make your life easier and avoid common yet foreseeable mistakes… 

Check your to-do list.

  • Before getting started, be mindful of activating and deactivating the corresponding components. Improper activation may disturb both your implementation and your team’s workflow.
  • Pay attention to workflows, triggers, as well as conflicts and discrepancies with mapping data fields, types, and structures. 
  • Be careful not to duplicate worthless data. Do the dishes! Have everything neat and ready before and after integrating your systems. 
  • Choose the right system architecture. Take your time to select the right system since it is a crucial decision that may cost you more in the long run. 
  • Check if you need to consider any future customizations that will influence key decisions, such as the integration type, pattern, security measures, and others specific to your implementation. 

Don’t lose track of things.

  • This may sound obvious, but having a clear idea of what you’re about to implement will always be the first step to take into account.
  • Be mindful of objectives and priorities that may save you from having to go back and start over from scratch. 
  • We recommend asking for help from a consultant if necessary. Help is never a bad idea.
  • Whoever is responsible for implementing the integration needs to be mindful of every activity, commit, and comma –  in order to avoid serious problems in the long run. 
  • Whenever there is a need to change or customize your work, be sure to keep things in order and your documentation will become a lifesaver. 
  • Keep in mind that Rome wasn’t built in a day. Your integration will go through phases that can be thwarted by early avoidable mistakes.

Summary

After understanding the importance of what an integration really is, and the role of the API behind it, we know that security comes first. The security elements that typically manage tools like firewalls and proxies have a crucial role to play and shouldn’t be left aside. 

Choosing the right pattern, architecture, and platform is also important. They all influence each other. Any integration is different in itself and should be respected as such. 

Finally, remember that checking your to-do list and keeping track of things will save you lots of headaches down the road. Try to maintain everything as neat and sorted as you can, from activating and deactivating components, to managing documentation and your integration’s lifecycle.

At Oktana, we’re both Salesforce and MuleSoft partners, skilled at Salesforce integrations, including Heroku and Slack. With certifications across a wide range of Salesforce products, in addition to products like Informatica and MuleSoft, we can connect any app or system to the Salesforce ecosystem.

If you’re in need of a consultant to help expand your current resources and augment your team, don’t hesitate to contact us. Our team of Salesforce experts is here to help support your project.

Further resources

Integrate all your teams with Salesforce Customer 360 Platform

What is the Customer 360 Platform? 

Salesforce Customer 360 is the core Salesforce Platform that connects your marketing, sales, commerce, service, and IT teams with a single view of your customer data, helping you grow relationships with your customers and your employees. It includes a full range of Salesforce products that help your company keep everything connected in one system.

INTEGRATE ALL YOUR TEAMS WITH A SINGLE VIEW PLATFORM

Discover what you can do with the Customer 360 Platform

Salesforce Customer 360 Platform is built to work with countless applications to provide a seamless customer experience that allows you to run your organization smoothly. 

One of the ways you can integrate the Customer 360 Platform with other programs is by using Salesforce Appexchange, a marketplace for apps that can be installed easily into your Salesforce org. Integration can also be done with MuleSoft Anypoint Platform, you can connect any system, application, data, and device to unleash the full power of Customer 360.

Customer 360 has a solution for every phase of your customer’s journey. The more teams you unite, the more you know, and the better you grow.

So, what are the teams you can unite under this scalable CRM platform? Sales Cloud, Service Cloud, Marketing Cloud, Experience Cloud, Slack, and Commerce Cloud just to name a few. 

Customer 360 gives everyone in your company the ability to access crucial data and make smarter, faster decisions.

Discover what you can do with the Customer 360 Platform

We have helped our customers take full advantage of Customer 360 Platform, integrating it with over 30 different technologies. Here are some of the success stories:


External API developer community

Our customer, a large installer of interior finishes for US homebuilders, needed help to grow their external API developer community to promote integrations with builders, suppliers, and vendor partners.

In order to create a new community to support the growth of API for buyers and prepare the way for future APIs, we used MuleSoft Anypoint API Community Manager. Our team worked closely with the customer to create a developer portal that showcases the API with technical and business documentation, and a mocking service to allow developers to try the API on the site. 

Through the Experience Cloud, we were able to customize the community theme to ensure it remains consistent with the overall brand. Using Salesforce CMS cards throughout, we could simplify management of the site’s content and provide a space to showcase APIs in development (i.e. “Coming soon”).  

Results

  • Launched the developer portal and gave access to builders which reduced their onboarding time by 80%

Streamlines Data Management with Salesforce

Our customer, a Professional services company specializing in Salesforce digital transformations, identified an opportunity to create an abstraction layer on Salesforce to simplify and streamline data entry and management for their clients.

Our client partnered with us to build a new application using Visualforce, React, ts-force, and TypeScript to give their clients a better interface to manage events, opportunities, leads, and comments. This new Salesforce application provides a simplified user interface, unifying management for all 4 object types on one page (translated in both English and Japanese). 

Results

  • The key partners and customers will start using the product as soon as the MVP of the product launches. 
  • Companies who use Salesforce to create meeting minutes, action items, input their sales activities and customer details, saved more than 50% of their time.

If you are interested in reading more about our success stories, we recommend you check out Oktana’s Success Stories. 

Oktana achieved ‘Expert’ status for the Customer 360 Platform specialization


In 2022 Oktana achieved ‘Expert’ status for the Customer 360 Platform specialization in the Salesforce Partner Navigator program, the highest level for the category. 

As a software development company that helps customers innovate, 100% of our Salesforce projects use at least one of the Customer 360 specializations. Most of these projects require implementation of other Salesforce clouds that we have vast expertise, such as Experience Cloud, Service Cloud, and MuleSoft. 

The Customer 360 Salesforce Specialization requires demonstrated and validated expertise in eight Salesforce Customer 360 areas. Through our customer projects, established demonstrated knowledge and expertise in AppBuilder, Heroku, Integration Services, JavaScript Designer, Mobile, Platform, Process Automation and Security & Privacy.

Did you know we are also Salesforce Summit Partners? Check out how we achieved Summit (previously known as Platinum).