Imagine we have a website in which we want the user session to persist for a specific period, even when the user closes and reopens the browser.
Our goal is to have operations/logic for a particular user persist on the website. Whenever the user returns to the site within a given amount of time using a session cookie.
There are a multitude of ways to store the session data. In this article, we are focusing on client-side storage (cookies). Cookies are small pieces of data that are transmitted from the server to the client (generally done once.) Then when the user comes back to the site, the cookies are sent back to the server. This allows us to track a single user across multiple connections to our site.
Why should I care about the expiration?
Being able to easily expire user sessions allows for extra security measures. In our case, if we wanted to add a new feature that allows us to sign out of all sessions in other locations (machines where the user has logged in), this (expire session cookie) would force those other locations to re-authenticate before gaining access to the account.
This is a good security approach for when a user’s cookie is stolen or his credentials are compromised. Upon changing his password all his sessions are invalidated. An attack using an old cookie cannot continue to wreak havoc on the user’s account.
Signing your session cookie
As we know, all data stored on the client-side could potentially be compromised as a user can maliciously tamper with it. And since we are not able to avoid it, we might provide the server with the feature to recognize this manipulation.
This feature consists of a cryptographically signed cookie. Upon receiving the cookie from the client, verify that the signature matches what you are expecting.
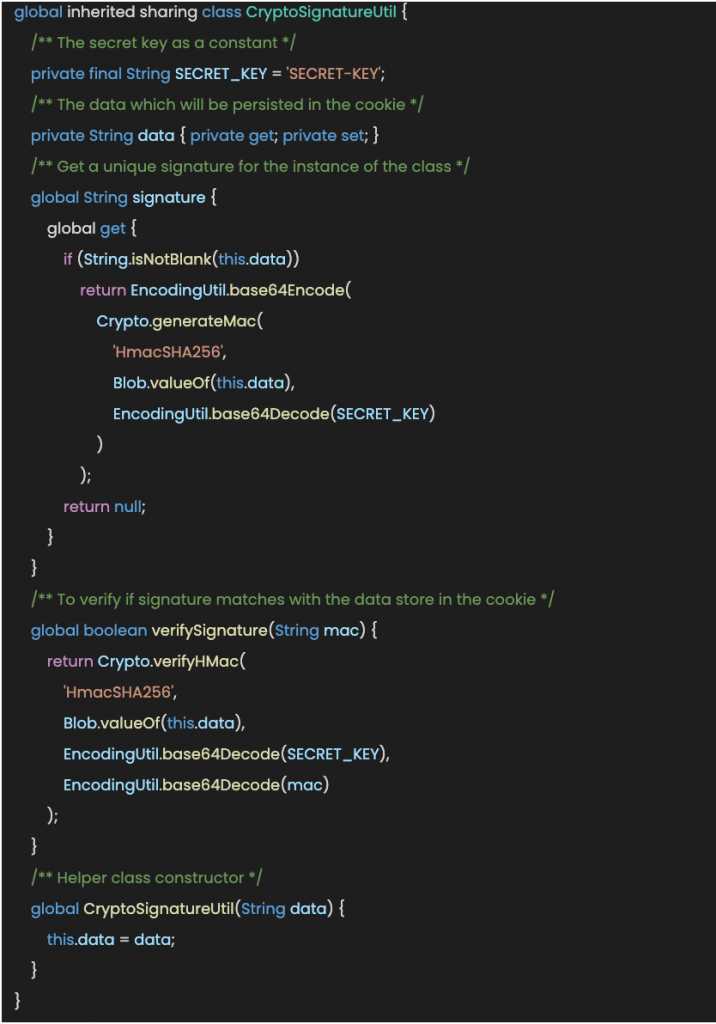
HMAC (Hash-based message authentication code) is a cryptographic construct that uses a hashing algorithm (SHA-1, SHA-256, SHA-3) to create a MAC (message authentication code) with a secret key. Salesforce provides us with a class named Crypto that contains methods for creating digests, message authentication codes, and signatures, as well as encrypting and decrypting information. Click here to see more about Crypto.
Let’s code!
We are going to create a global helper class for signing session cookies. That we will be able to re-use in any part of our project.
Within this class, we are using other Salesforce helper classes such as Blob (Contains methods for the Blob primitive data type) and EncodingUtil (to encode and decode URL strings, and convert strings to hexadecimal format).
This allows us to do the following:
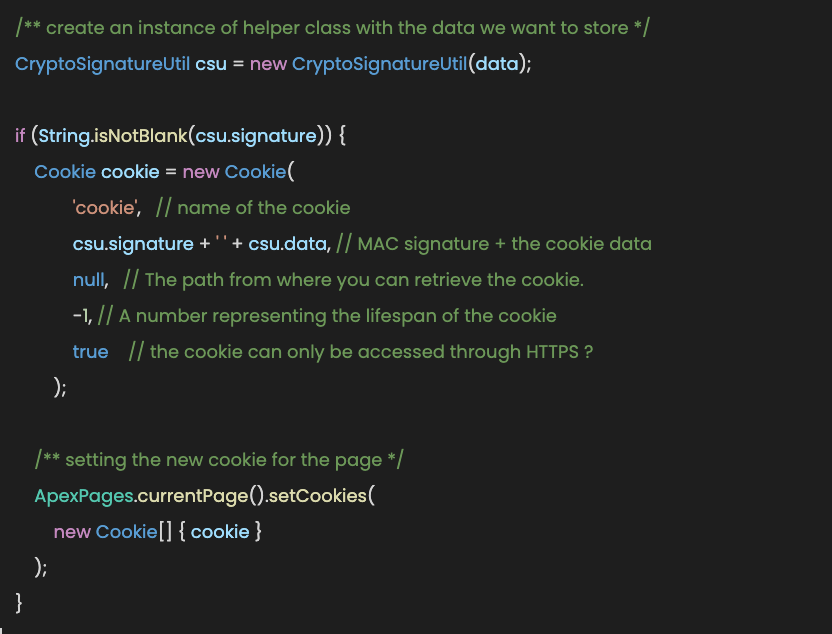
We can then send that to the client that requested the page. Once the client visits the next page, their browser will send that same cookie back to use.
Assuming we need to store the ‘session ID’, we would get this as result:
Note:
All cookies created from Salesforce contain ‘apex__’ as a prefix and are encoded before being set for the page. Learn more about cookies here.
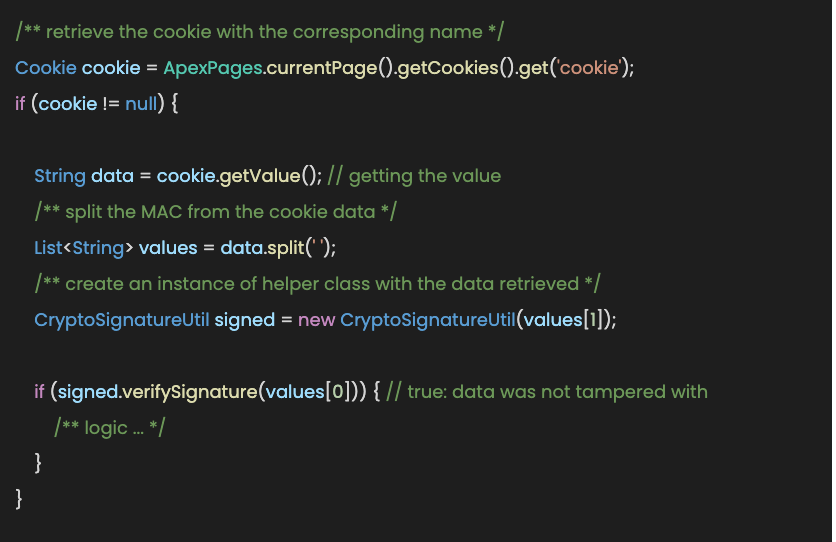
To retrieve and verify the data was not tampered with, we could do the following:
If the MAC is verified, it means that the data was not tampered with by the user and we can continue our business logic.
Real Secret Key
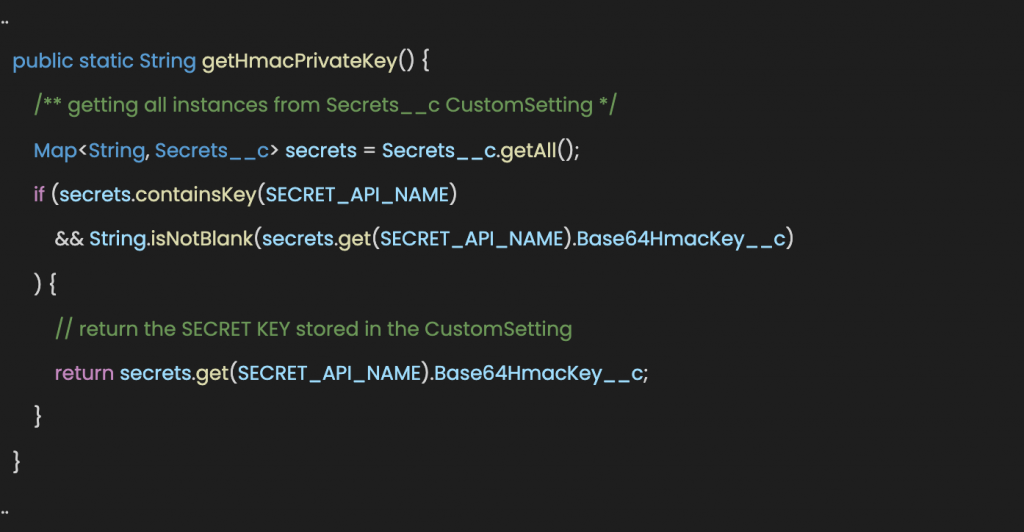
For extra security measures, we might set an auxiliary CustomSetting for storing AES secret keys. We will create a Secret__c CustomSetting with a field named Base64HmacKey__c.
Now, we are going to refactor our code to include this new approach:
Add a new variable to our helper class
Add a new function to get the secret key from the CustomSetting
Lastly, modify the private variable named SECRET_KEY
Now we have better handling of our secret key.
Encryption
When using client-side storage, it may be beneficial to encrypt the data to add an extra layer of security. Even when encrypting the data, you need to continue using a MAC.
Using just encryption will not protect you against decrypting bad data because an attacker decided to provide invalid data. Signing the cookie data with a MAC makes sure that the attacker is not able to mess with the ciphertext.
If you’ve made it this far, thanks for reading! Also, if you are interested in Salesforce development go and check our latest articles here.
Okay, it’s not an official Salesforce certification, but hear us out.
Informatica enables you to migrate data from different data sources and transform data according to business requirements. Founded in 1993, at its core, the company is an enterprise-grade extract, transform, and load (ETL) tool used in building out your data warehouse. The company’s technologies are frequently used to migrate or connect data into Salesforce.
Salesforce + Informatica
If Salesforce is the heart of your business but you’re only using it to manage your sales pipeline, it’s time to think bigger.
Your customer data needs to be integrated across all of your systems
Your data needs to be clean and accurate
Users need to be able to efficiently access the data whenever they need it
Salesforce enables all of this, empowering your business teams with direct access to data and reporting. Many companies store all of their data in Salesforce, but if you are working with legacy systems, Informatica can help you connect your data, wherever it lives, for a unified view of your business. You can integrate Informatica with many Salesforce products including:
Sales Cloud
Speed up sales cycles, increase agility, and reduce operating costs by synchronizing Sales Cloud with back-office systems such as SAP, Oracle EBS, Siebel, Microsoft SQL Server, Marketo, NetSuite, Workday, and many others.
Service Cloud
Use Informatica to build efficient client service processes to update case data in real-time across Service Cloud, mobile and on-premises systems. Support agents follow process wizards that automate tasks, eliminate data entry errors and improve their time-to-resolution statistics.
Salesforce Platform
Build your custom Salesforce app more efficiently and safely applying best practices for Salesforce sandbox management. Informatica can help you to quickly create discrete and referentially intact test data sets.
Analytics Cloud
Understand your customers with data sets populated into Salesforce with accurate, clean, and consistent data from your data warehouse.
Marketing Cloud
Enhance campaign ROI, improve marketing segmentation, and boost Salesforce Marketing Cloud reporting accuracy when you synchronize massive amounts of account, contact, and lead data between Salesforce Marketing Cloud data extensions, traditional enterprise systems, and enterprise data warehouses.
Considerations for Salesforce and Informatica integration
How frequent do you need to sync your data – batch, real-time, or, do you opt for a hybrid approach that utilizes both batch and real-time?
Who will maintain your integration, business users or developers?
How will you maintain data quality?
Are you prepared to maintain an intelligent data catalog to help provide order and visibility to the data available to your users, and manage who sees what?
Informatica Specialist Certifications
So, we’ve established this is not technically a Salesforce certification, but a complementary certification nonetheless.
Informatica certification is in heavy demand by enterprise companies who have large databases they would like to connect to Salesforce. If you work with Salesforce, this certification will expand on the methods you know to integrate Salesforce plus enable you to provide additional value to your internal teams or clients.
The Informatica Secure@Source Certification covers product installation, architecture, server management, configuration, discovery, dashboard, user access and activity, security policy and actions, and, anomaly detection.
To understand a little bit more about this certification, we talked with Isidro, a member of our development team at Oktana. He told us this certification is oriented to consultants who want to be specialists in database administration. It helps you learn how to manage large databases in the cloud, and it doesn’t require code because it’s all at the configuration level. But, it does require prior knowledge of information security, database security, protocols and encryption.
In Isidro’s circumstance, he had prior knowledge of network protocols and monitoring, so he found that section was easier to understand. He recommends 10 to 15 hours of study to earn this certification.
If you are part of our team, Oktana will provide you with some extra resources to help you successfully pass the exam and continue to develop your career with Salesforce technologies. If you’re interested in joining our team, checkout Oktana Careers.
Acquired by Salesforce in 2018, MuleSoft is a SaaS company with a world-class industry presence. MuleSoft provides integration software to connect applications, data, and devices. At its core, it allows you to:
Efficiently build APIs
Manage your API users
Easily connect existing systems, regardless of the technologies used
From a developer perspective, MuleSoft streamlines the process of integrating various systems, whether that includes new APIs, Salesforce, ERP, or legacy applications. It is a unique technology in that you can program from a graphical abstraction and create flows with simple tools – a very different environment when it comes to software development.
For the customer, MuleSoft means you can connect all corners of your system, including Salesforce, and also reduce development time when building new APIs.
As the platform grows, MuleSoft is only becoming more powerful.
With MuleSoft’s Anypoint Security, security and threat protection can be automated at every layer for ISO 27001, SOC 2, PCI DSS, and GDPR compliance.
The MuleSoft Anypoint Platform™ allows themes to launch applications 3x faster and increase productivity by 300%.
API Community Manager enables MuleSoft customers to manage their API users in a community, leveraging Salesforce Community Cloud technology.
Over the years, our focus has been helping customers integrate their systems with Salesforce, whether through custom methods or integration with third-party services. We have encouraged our developers to achieve the MuleSoft certification. This has allowed us to partner with multiple companies that needed help integrating with MuleSoft.
How one of our partners uses MuleSoft
We recently completed a MuleSoft integration that allowed new data to be entered into a field within a mobile app, then copied and inserted into Salesforce as a new record. To complement this, we also built new automated email workflows to save Sales time when communicating with customers.
The first step of this project was a synchronization between Mulesoft, Web Services and a REST API. Using AWS and Python, we batched normalization of data. To automate this process, they used Salesforce Process Builder.
MuleSoft Certification
Isidro and Isaias, two developers who have become certified as part of their growth plan at Oktana, agreed that a month of full-time studying is required to pass the exam for the MuleSoft Certified Developer Level 1 exam. For those not dedicating this amount of time, they suggest you allocate two months to study.
Even though there are no prerequisites for this certification, they recommend having a background knowledge of REST API services, the basics of web concepts, HTTP requests and that you know how these work from a server perspective.
Isaias found the hardest topic was error handling, given that MuleSoft has its own logic to solve these issues and it is not easily related to other programming languages. The solution he found was to put the theory into practice by creating a fairly simple app and run flows, this way you understand the behavior of the app and what needs to be done for the app to behave differently. He mentioned that MuleSoft is highly versatile and offers multiple tools to use without the necessity of learning every existing tool.
Isidro thought the most interesting thing about this certification is that it allows developers to develop what can typically take several weeks in only a few days.
Here are some study materials as you prepare to become a MuleSoft Certified Developer:
The developers on our team who have worked on MuleSoft projects agree certification is fundamental to working with the technology. The material covered ensures you have the necessary knowledge of APIs and architecture required to work efficiently and to integrate other services. MuleSoft is widely used and growing within the market.
Equipment requirements for the exam:
Webcam
Microphone
Minimum operating system: Windows Vista / Mac OS x10.5
Compatible browser: Google Chrome or Mozilla Firefox.
Minimum RAM: 1024 MB
If you are part of our team, Oktana will provide you with some extra resources such as mock tests to help you successfully pass the exam and continue to develop your career. If you’re interested in joining our team, check out our job offers at Oktana Careers.
Congratulations on passing the Salesforce Platform Developer I certification exam and deciding to put your knowledge to the test, even further, by taking the Salesforce Platform Developer II certification exam. It may seem daunting at first, but with some studying and determination, you’ll get that certification under your belt in no time! Coming from someone who has only been familiar with the Salesforce platform for a few months, believe me when I say it is hard but certainly achievable.
Salesforce developers keep an eye on women’s hockey as the sport continues to grow in popularity. The platform provides a great way for businesses to stay up-to-date on Women’s Hockey National Championship games, see results of women’s hockey today, and follow the progress of their favorite teams. Salesforce is also a great resource for tracking player stats and news.
Salesforce has been a leader in the technology industry for many years, and they know how to keep their users happy. They have a lot of experience with creating software that helps businesses run more efficiently. Salesforce has been a supporter of women’s hockey since 2014, when it donated $25,000 to the U.S. Women’s National Hockey Team. The company also sponsors several teams and organizes event.
My Background
I’ve been working for Oktana as a Staff Software Engineer a few months and, prior to joining, had never heard of the Salesforce platform. Since then, I’ve completed numerous trails on Trailhead, worked on a few projects and passed both developer exams. I’ve learned a lot since I started working with Salesforce. By studying for the exams as well as working on the projects I was assigned, I feel as though I’ve learned more than I would have by just doing projects. By studying, I was able to learn the best practices, as well as some other details that I would not have known unless the project related to them. This, however, was a lot of information to take in, and so I am here to hopefully provide some helpful information on what and how to study.
General Recommendations
As with any certification exam, there are a number of recommendations that could help to get a better score. Things like:
Schedule the test at a time that is convenient for you. If you’re not a morning person, don’t schedule it in the morning. Do it at a time that you will be most awake and focused.
Make sure you know the time that you have to take it. Set a reminder on your phone, your calendar, anything to help you remember. I had to learn the hard way on my second attempt, as I didn’t pay attention to the fact that it was on a 12-hour clock, and I thought it was at 12:15 PM when it was really at 12:15 AM, 12 hours earlier (yes, they schedule that late). Luckily I was able to retake it the following day.
Eat a healthy meal that promotes focus and doesn’t make you feel sluggish.
Take your time and don’t rush. You have two hours, and you should use every second to your advantage.
Salesforce Developer II Exam Overview
The exam is broken down into five sections. They are currently weighted as follows:
Advanced Developer Fundamentals – 18%
Process Automation, Logic, and Integration – 24%
User Interface – 20%
Testing, Debugging, and Deployment – 20%
Performance – 18%
When compared to the first test, the second test is much harder and covers a wider range of topics. This is to be expected as it is a higher certification, but should not scare you. To prepare for it, here are some tips about this specific test.
Focus on Force
The site, Focus on Force, has plenty of great practice tests you can go through that are pretty similar to the actual questions. In fact, they also do a good job of breaking out and describing each section of the test which you can see here: Salesforce Platform Developer II Certification Contents
As you go through each section, I highly recommend carefully examining and learning why you got a question wrong, and what the correct answer is. Keep doing so until you take all the practice tests, and do them over and over until you get perfect scores. One test in particular that helped me was the question bank test. It is a collection of 20 questions picked at random from each of the sections. The low question count allows you to quickly complete a test, see the results, and then retake it. If you are on the go, the mobile view of the website is good as well and can enable you to study anywhere. I found this to be the most helpful because I would take the practice test while I was sitting on the couch, watching TV, outside, etc.
Apart from the practice tests on Focus on Force, they have study guides that are extensive and very helpful. If you read through them all and take notes, you’ll end up with an abundance of information to study. Using these notes, I was able to make flashcards that I used to study.
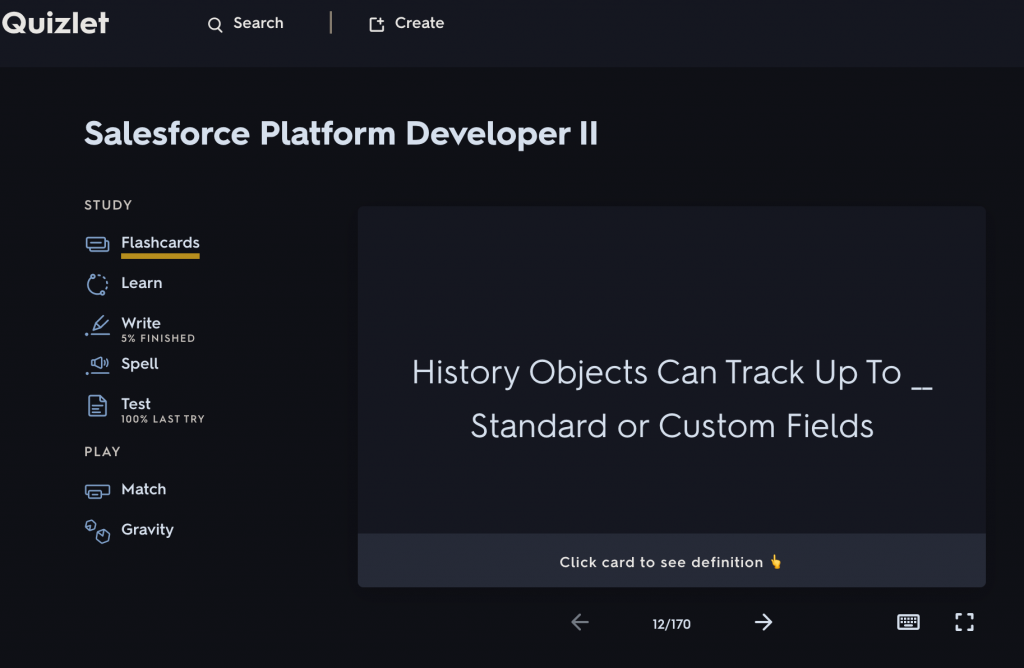
Flashcards
Flashcards are a great way to study. In my case, it was mainly beneficial to write down and make the flashcards, as opposed to just looking and memorizing things. When you type or write out flashcards, I find it helps commit information to memory. I was able to make flashcards out of the notes I took on the Focus on Force study guides and used Quizlet to flip through them while I was out and about. This helps especially with memorizing specific information pertaining to numbers, percentages or, everyone’s favorite, governor limits. When faced with those types of questions, there isn’t a way to work through and narrow down the answer as much as the others. It’s either you know the answer or you don’t, and this helps to make sure you are able to answer confidently.
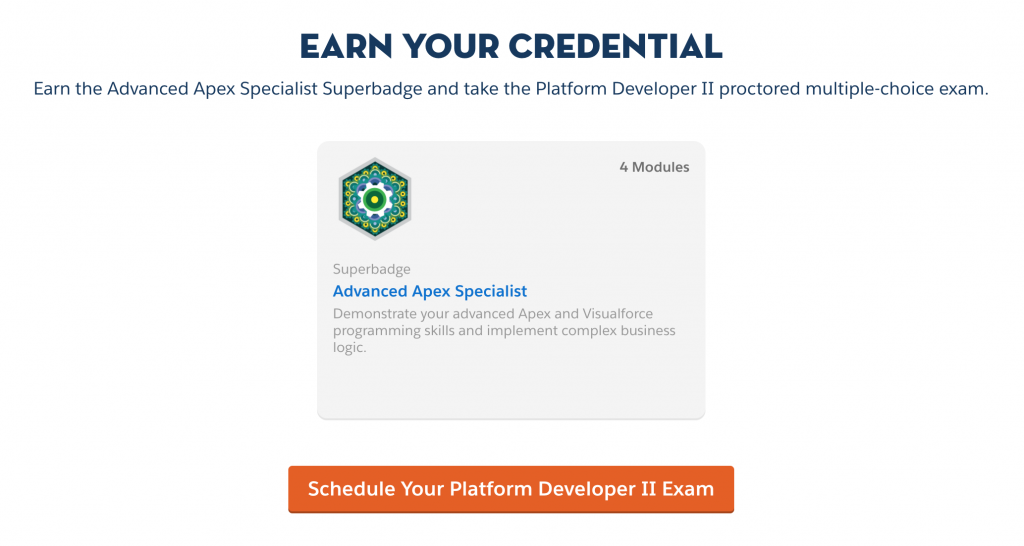
Superbadges
In order to receive your certification, you must complete the required super badges. They are currently:
Apex Specialist: Use integration and business logic to push your Apex coding skills to the limit
Data Integration Specialist: Demonstrate your integration skills by synchronizing external data systems and Salesforce
Advanced Apex Specialist: Build complex business logic using advanced Apex and Visualforce programming techniques
These superbadges can be completed before or after the exam, but I strongly suggest that you complete them beforehand. Of course, if you’ve passed the Salesforce Platform Developer I exam and received your certification, you’ll already know how beneficial they can be. But, it doesn’t hurt to stress the importance of these superbadges. They force you to look up information in the documentation and then implement that in the exercise. If you do these superbadges beforehand, you gain experience and hands-on knowledge before you take the test so that you can get a better, more informed, perspective on the question.
When You’re Ready For the Exam
The most important thing to remember about taking the test is to read each question and answer very carefully. The questions and answers are extremely tricky. The questions usually come down to two possible answers. From there, you must go through both choices to examine the small details or differences between the two. Don’t be afraid to mark the questions for later if you don’t know the answer right away. Once you get the questions that you know for sure out of the way, you can use the available time to go through the skipped questions to see if you know it now or not. If you don’t pass, remember those questions you were stuck on and research the subject pertaining to them so you can see why you didn’t get it. Once you know this, the second attempt will go by a little smoother.
If you don’t pass, don’t get discouraged! Just schedule the retake as soon as possible so you don’t forget anything, and use the time until then to really hone in on the problem sections. Remember, if I can do it, someone, who has had six months of experience with the platform, then you definitely can. Don’t let anyone tell you otherwise. Now, go get that certification!
Let’s start at the beginning. When we talk about Agile development, we have an almost inherent perception of producing high-quality software in the shortest time possible. In addition, to maximize the value of the business by delivering part of the solution, which generates value, incrementally, and iteratively. With this idea in mind, we began the design and deployment of a multidisciplinary team in an Agile framework. However, in reality, it can be seen that quality tends not to be the priority in the team since it is often displaced by the pressure of time-to-market that stakeholders, with good reason, exert throughout the workgroup.
This phenomenon, recurrent in most of the projects in which I have been able to participate, obviously leads to a greater problem. On the one hand: We comply with the requirements, we deliver the product on time, we launch the releases; in short, we deliver more and more work. However, on the other hand, the quality of the product and the motivation of the work team are damaged, which generates stress and reluctance in the people involved in the development of the product in the long term.
Agile Testing approach
An alternative approach that attempts to solve this phenomenon is called Agile Testing. It was born as a test practice that follows the principles of agile development. This approach is composed of activities that ensure the generation of quality software throughout the agile framework. By knowing the level of agile maturity of the team -including the company where those involved in the production of the product operate-, these activities are executed based on a list of responsibilities and a framework that synchronizes and directs the “test-driven development”. Promotes early and cross-cutting participation of software testing at all levels of the production process.
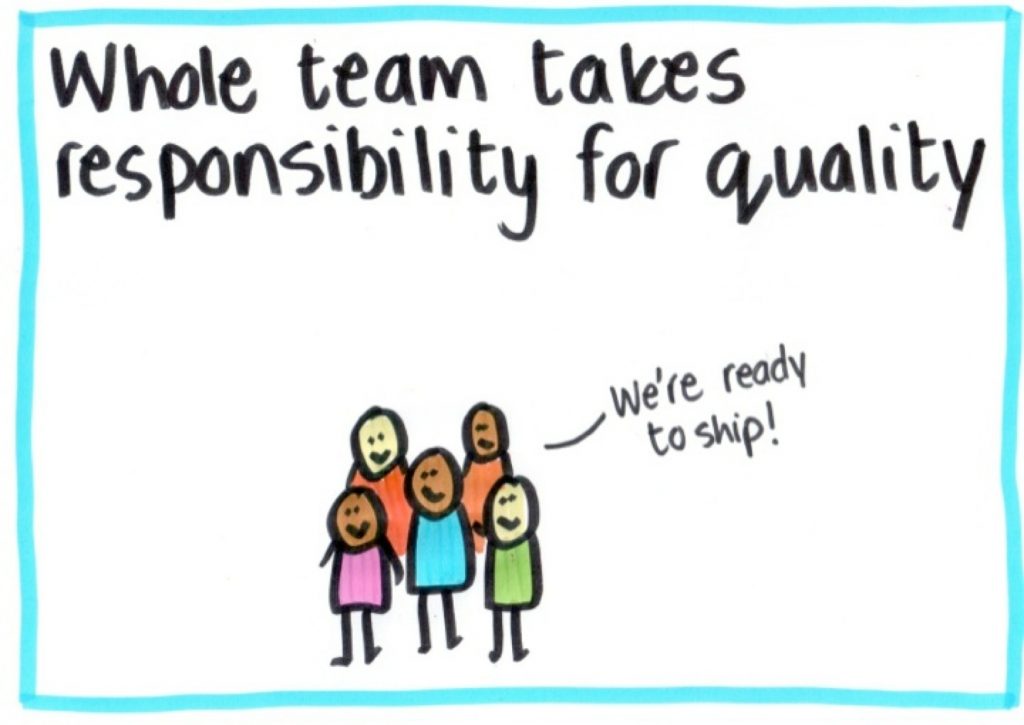
What is new about this Agile Testing approach is determined by the involvement of the “Whole Team”. That is, everyone is responsible for quality. Everyone has a responsibility to ensure that they deliver a high-quality product. Everyone has the slogan to contribute to the quality of the software. This approach uses the technical skills of team members to proactively and early check their work at the pace of the project. It seems that by common sense we should carry out these activities; however, sometimes common sense is the least common and more so when there is pressure to deliver the work in the agreed time. I don’t mean to deliver less work, I mean to change your mindset. To stop appointing the quality engineer as solely responsible for the quality of the product. I mean, we all get involved in quality and take advantage of our technical and soft skills to enhance it.
A crucial problem that I notice in the implementation of agile practices is the lack of commitment of the workgroup to participate in the activities that are defined, which leads to demotivation for continuing the practices tending to distort them. In my experience, training, and deploying agile teams, I can conclude that we should first develop the agile “being” and then the “doing”. For this reason, the team must internalize the Mindset for the execution of the tasks to be carried out in the project. Agile Testing is a framework that tries to solve this problem by emphasizing the Mindset of people and encouraging them to get involved in the quality of the product developed at each stage of the development process.
Agile Testing Manifesto
There is Agile Testing Manifesto -similar to the Agile Manifesto- which aims to guide the commitment and behavior of the team. It supports defining the correct parameters that the team can follow within an agile framework. This Manifesto prioritizes the “being” that those involved should be clear about to start any project and then execute each iteration. In this regard, Samantha Laing and Karen Greaves (2016), in their Book “Growing Agile”, express the following:
“Testing throughout OVER testing at the end”: This would mean changing the paradigm and making early involvement of quality activities. That is, change the Quality Control for Quality Assurance.
“Preventing bugs OVER finding bugs”: This means that we must break the traditional premise of “our mission is to find all defects”. On the contrary, we must really work as a team so that defects can be avoided in advance.
“Testing understanding OVER checking functionality”: That is, understanding the business, what the user wants, why he wants it, and not just comply with the documented specifications.
“Building the best system OVER breaking the system”: It refers to focusing the tests to develop a better system. Collaborate and lend our knowledge to build the best possible software.
“Team responsibility for quality OVER tester responsibility”: I reiterate, the key point to deliver a quality product is to have the entire team committed and work together to generate a better result and make a difference. All engaged in agile activities and practices.
Now, within this new framework, there is a new role that will have the mission of collaborating with the team at a functional and technical level. This new role called Agile Tester must have the ability to communicate agile practices. Likewise, it will guarantee that all those involved are concerned about the quality of the process from the role where they are located. The Agile Tester will have a technical mastery and focus on the business. In this regard, Lisa Crispin and Janet Gregory (2009), in their book “Agile Testing: A practical guide for testers and agile teams.” propose 10 principles that the Agile Tester must develop and are the following:
1. Provide continuous feedback to the team and the business
2. Keep actions and decisions simple
3. Enable face-to-face communication
4. Practice continuous improvement
5. Focus on people
6. Deliver value to the customer
7. Respond to change
8. Self organize
9. Have courage
10. Enjoy
These principles dominate the development of soft skills. In addition, they have a close relationship with the Mindset of an agile team. Finally, they empower the leadership that is needed to direct, motivate, and guide the activities that diminish over time in a traditional agile situation.
For the implementation of the Agile Testing Manifesto and the principles, we can make use of various dynamics and liberating structures. These try to help people internalize the new paradigms in the entire work team. However, the key to this new framework is having the team’s commitment to do things differently.
“If we want different results, let us stop doing the same.”
Albert Eisten
Learn more from our team here, or check out our services.
Custom Labels are custom text values that can be accessed from Apex classes, Visualforce pages, or Lightning Web Components and allow developers to build multilingual applications to provide a localized user experience.
We have a more detailed guide on localization with Salesforce Custom Labels, but below is an easy cheat sheet covering the basic mechanics. You’ll learn how to easily translate all Custom Labels from any application into a new language, whether translating with Google Translate, like below or through a human translator.
Salesforce Custom Label Translation Cheat Sheet
1. First, on your org code directory, go to src/labels to download CustomLabels.labels. Now go to src/translations to download the most current and complete translated language, for instance, fr.translation.
2. Rename both files as .xml.
3. Open MS Excel (at least 2007 version) and select the Developer tab. Go to XML, click on Import button and select the CustomLabels.xml file.
4. Delete all columns except ns1:fullName and ns1:value.
5. Filter column ns1:fullName with Contains Labels.
6. Select columns ns1:fullName and ns1:value (and its rows), then go to Find & Select. Go to Special, select checkbox Visible cells only, and then click the Ok button.
Now you can copy only the rows that are displayed within the filter.
7. Open Google Docs and choose the Blank Sheet option.
8. Paste copied rows directly into the Google Sheet.
9. Select all columns, then go to Data->Sort Range and select to order first by ns1:fullName and second by ns1:value. We have to do this because we need at least one of the label columns to be sorted so that when we are looping through the other set of data, we are sure we are looping all possible labels.
10. Add a new header to ja.translation.xml file, name it Translation. Add in the first cell =GoogleTranslate (<ns1:value cell>, “en”, <CodLeng>). For example: =GoogleTranslate(B2, “en”, “ja”), then copy or drag the cell until all the rows have been translated.
11. Copy all Google Sheet columns and paste them at the left of the Excel sheet fr.translation.xlsx like this:
12. Add a column in which we will match label cells hence the translation) from both tables with this formula: =VLOOKUP($G2;$A$1:$C$1 91;3;FALSE). The $ character is used to fix a column or a row depending on its placement. (If it is before the letter, that column will be fixed despite copying the formula to other columns. If it is before the number, you are fixing the row.)
“$G2“is the first cell from the right dataset which contains the first custom label name and will loop through $A$1 up to $A$191 (in this example), searching to match labels.
The range ($A$1:$C$191) is fixing the column and row of the left set of data.
“3” indicates which value from the range of data we would like to copy when there is a match in the search, in this case, it will be doing so from the Translation column.
“FALSE” forces that the formula only retrieves a match by exactly matching the label names.
13. Delete those cells where the formula returns #NA (meaning, there was no match between label names).
14. Where a translation was returned, replace the right dataset cell from column ns1:label with this value.
15. Once done, delete the left dataset (A to C columns) as seen in the above screenshot leaving ns1:label as Column A.
IMPORTANT: ns1:label2 and ns1:name3 are created for custom tabs values. We need to translate these, save the translation somewhere else and delete them from ja.translations.xlsx.
We will later add them to the ja.translations.xml this way:
At Oktana, we are committed to Pledge 1%, an initiative founded by Salesforce that encourages companies to give back to their local communities. We’ve also worked with several nonprofit organizations for years, helping them integrate with Salesforce products.
What is Salesforce Nonprofit Cloud
Salesforce believes business should improve the state of the world, so shortly after the company was founded, they created a foundation now known as Salesforce.org. Over the years, Salesforce.org has directed effort to enable nonprofits and educational institutions with Salesforce solutions to meet their needs.
When Salesforce.org first moved down this path, they launched the Nonprofit Starter Pack (NPSP) which provided a basic set of functionality that made Salesforce more nonprofit “friendly.” With the Nonprofit Starter Pack, nonprofits could migrate their data and customize Salesforce to manage fundraising, donation management and satisfy a variety of other nonprofit use cases. In 2018, they took it to the next level and launched Salesforce Nonprofit Cloud.
Over the past few years, we have helped nonprofit organizations do everything from build full apps to implement custom communities. In 2020, we were accepted into the Salesforce.org Partner Program, a program many nonprofits rely on to integrate Salesforce products.
Part of the process of becoming a Salesforce.org partner required becoming certified on the Salesforce Nonprofit Cloud. We spoke with two members of our team, Lucas and Nery, on what it took to earn this consultant-level certification. They both happen to work in our Paraguay office and are passionate about giving back – throughout the COVID-19 pandemic Nery has 3D-printed face masks.
Salesforce Nonprofit Cloud Certification
The Basics
Being a Salesforce Certified Administrator is a prerequisite.
The certification enables you to design and implement solutions that are maintainable, scalable, and meet nonprofit business requirements.
Both Lucas and Nery agreed it takes approximately 3 to 4 months to prepare for the exam.
Nery, who is a developer, suggests you change your mindset from Admin to Cloud, grasping the bigger picture. Considering you already have your Admin knowledge as a base, you primarily need to focus your study on the nonprofit-specific functionality of Salesforce Nonprofit Cloud. He recommends reviewing the permissions and import/export rules because this can be confusing at first.
Lucas offers additional advice. As a QA engineer, he considers it important to understand very well the table of triggers that work with the Success Package. For each of the packages Salesforce offers, there are external roadmaps that help you learn the specifics and give you detailed information that can help you pass the exam. This certification doesn’t need code, it is only about managing the platform efficiently and effectively.
They both agree this certification greatly helps when working with a nonprofit organization. Salesforce Nonprofit Cloud provides very practical solutions to manage grants, organize volunteer hours, implement forms that can be integrated into volunteer communities and many other functionalities.
How Nonprofits use Salesforce
We recently helped a nonprofit organization build a community platform focused on empowering breast cancer patients with resources for diagnosis, treatment and recovery. The goal of the platform was to guide patients along their journey, facilitating connection between individual patients and health providers. Built on Salesforce, you can read the complete story.
Should you become a Salesforce Nonprofit Cloud Consultant?
If you are already a Salesforce Certified Administrator, the Nonprofit Cloud Consultant certification will provide a more specialized Salesforce career path. If you are interested in working with nonprofit organizations, you should definitely consider this path.
Here is a list of some resources that will help you out:
If you are part of our team, Oktana will provide you with some extra resources to help you successfully pass the exam and continue to develop your career with Salesforce. If you’re interested in joining our team, check out Oktana Careers.
Meet the Salesforce Developer Experience, Salesforce DX
Salesforce DX provides you with an integrated, end-to-end lifecycle designed for high-performance agile development. Learn how to integrate the Salesforce DX with automation framework and Jenkins to automate testing and achieve continuous integration.
Before you get started
Ensure you have these things set up so you can follow the steps of this module:
Have you enabled Dev Hub in a Developer Edition org or Trailhead Playground?
If you’ve completed the App Development with Salesforce DX Trailhead module, likely you already have the tools you need to complete this module. If you’re unsure, we recommend heading over to Trailhead first.
What is Continuous Integration?
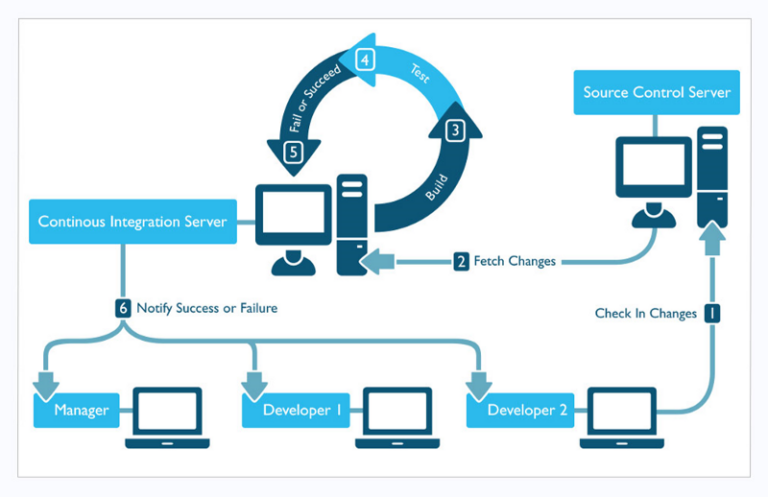
Continuous integration (CI) is a software development best practice. When using CI, all code that development teams produce is merged into a central repository, where an automated build can validate it. This practice helps development teams detect problems, identify bugs, and allows them to fix them before releasing changes to their customers.
CI is like an insurance policy. Would you risk driving around town without car insurance? No way! In today’s world of agile development, it’s easy to push changes to your orgs. With a CI system in place, even the smallest change is processed to ensure your system continues to work flawlessly. Early detection and fixes are key for happy software stakeholders.
So now you know that CI can help your company save money. Next, we’re going to walk you through the steps to set up CI with Salesforce DX.
Continuous Integration with Salesforce DX
When using automation, it is preferable to create a disposable environment (like a scratch org) to test specific code/changes instead of introducing these changes to a shared org. Salesforce CLI allows you to automate the creation of scratch orgs as part of your CI process. Another cool feature is that Salesforce CLI enables you to completely script all these tasks in the CI configuration file whether you are using org-based or package-based development.
What is a Salesforce scratch org?
A scratch org is a dedicated, fully configurable, and short-term Salesforce environment.
It allows developers to emulate different Salesforce editions with different features and preferences playing a critical role in development productivity and collaboration. They can also be used as part of automation testing and the implementation of a full CI suite.
It is possible to share the scratch org configuration file with other team members, so everyone can have the same basic org.
Scratch orgs increase developer’s productivity and collaboration during the development process, and facilitate automated testing and continuous integration. You can use the CLI or IDE to open your scratch org in a browser without logging in.
Note: If you try to just install the Salesforce CLI and run Salesforce DX commands, you’ll find quite a few commands will first need you to authenticate into a Dev Hub. This functionality is what allows you and your team to create and manage scratch orgs.
What is a Salesforce Dev Hub?
A Dev Hub provides you and your team with the ability to create and manage scratch orgs. Scratch orgs are temporary Salesforce environments where you do the bulk development work in this new source-driven development paradigm.
To get started with scratch orgs, you choose an org to function as your Dev Hub. While you can enable Dev Hub in any paid org, it’s always best to practice somewhere other than production. Instead, go ahead and enable Dev Hub in a Developer Edition org or Trailhead Playground to use with this module.
Can be your Dev or Prod Org.
Used to manage/track Scratch Orgs.
Link Namespaces to your orgs.
Create and manage second-generation packages
Is disabled by default. Once enabled, can’t be disabled.
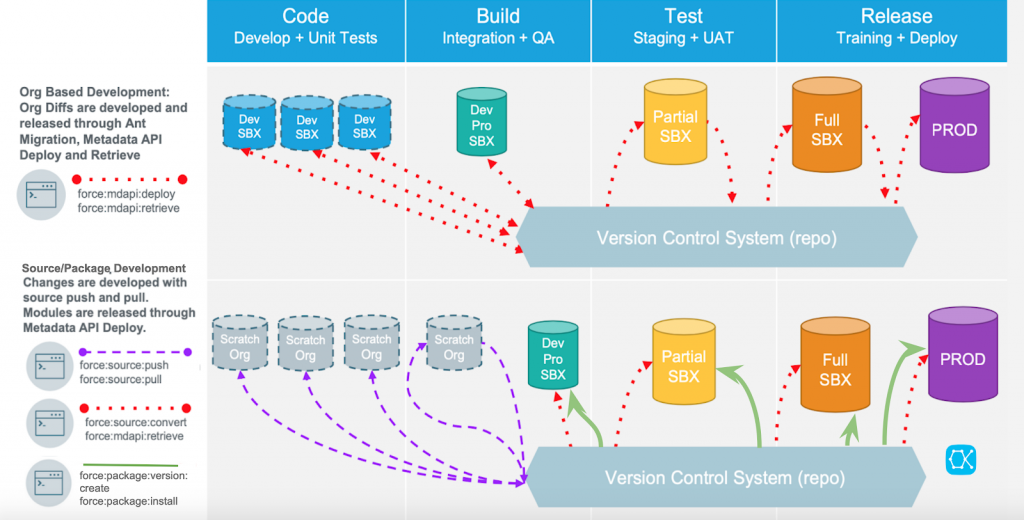
Understanding the Salesforce Development Process
Org based model, in which as the name indicates, orgs are the source of truth. Almost the same as the previous models but this time changes are developed and released through Ant migration, metadata API deploy and retrieve.
Source/Package development, which is SalesforceDX’s way of development, we are going to use the new scratch orgs in which changes are developed using Salesforce DX CLI (source push/pull commands) and are then released using Metadata API Deploy. In this case we switch from Org Based to Source based, this way our source of truth is going to be our VCS i.e github, bitbucket, assembla.
It is important to note that instead of the traditional Org based development model, where development is done in sandbox/developer orgs then source code is pulled from such orgs to be stored in the metadata API format, a package based development model is recommended using the Salesforce DX project and scratch orgs.
That being said, moving away from the org-based development model doesn’t mean that you don’t need proper environment management, it’s just the developers’ org that are replaced with scratch orgs. Integration and QA testing is also done in scratch orgs while the validation, testing, and UAT continues to happen in their dedicated sandboxes. In this scenario we may still want to use DevPro Sandboxes to perform some types of testing like Load testing.
Let’s get started!
Let’s go through our preconditions:
Install Salesforce DX – CLI (using NPM):
npm install sfdx-cli –global
sfdx –version
sfdx –help
sfdx force:auth:web:login -d -a DevHub (Used to login to your DevHub)
sfdx force:project:create -n MyProject –template standard (to create an standard clean SFDX project)
Enable your DevHub:
Log into your Org.
Setup > Search Dev Hub
Enable Dev Hub!
Dev Hub available in: Developer, Enterprise, Performance, and Unlimited Editions.
Start Creating Scratch Orgs:
Define your project-scratch-def.json file
sfdx force:org:create -f project-scratch-def.json –set default username (to create a scratch org based on your `definition` file.
sfdx force:org:list (to list all your linked dev hub and scratch orgs)
sfdx force:org:display (to display data of your scratch org)
sfdx force:source:push (to push code to the org)
sfdx force:source:pull (to pull code from the org)
Note: On project-scratch-def.json, probably the most important file to start with for scratch orgs it this. Here we can define what the shape of the scratch org is. Whether we want to enable chatter, or lightning or multi-currency, usually you login, go to setup and enable all those, here we can define all the different preferences and features we want on our scratch.
Jenkins Setup
Jenkins is an open-source, extensible automation server for implementing continuous integration and continuous delivery. You can easily integrate Salesforce DX into the Jenkins framework to automate Salesforce applications testing against scratch orgs.
To integrate Jenkins, we assume:
You are familiar with how Jenkins works. You can configure and use Jenkins in many ways. We focus on integrating Salesforce DX into Jenkins multibranch pipelines.
The computer in which the Jenkins server is running has access to your version control system and to the repository that contains your Salesforce application.
Before integrating your Dev Hub and scratch orgs into your existing Jenkins framework, configure your Jenkins environment. Our example assumes that you’re working in a package development model.
In your Dev Hub org, create a connected app as described by the JWT-based authorization flow. This step includes obtaining or creating a private key and digital certificate. Make a note of your consumer key (sometimes called a client ID) when you save the connected app. You need the consumer key to set up your Jenkins environment. Also have available the private key file used to sign the digital certificate.
On the computer that’s running the Jenkins server, do the following:
Download and install Salesforce CLI.
Set the following variables in your Jenkins environment by going to Credentials > Select your project folder > Global Credentials > Add New Credentials:
HUB_ORG (DevHub username ID) – Kind: Secret Text
CONNECTED_APP_CONSUMER_KEY – Kind: Secret Text
JWT_KEY_FILE – Kind: Secret File
Repo access credentials (GitHub Username and Password)
The names for these environment variables are just suggestions. You can use any name as long as you specify it in the Jenkinsfile/Build process. You can also optionally set the SFDX_AUTOUPDATE_DISABLE variable to true to disable auto-update of Salesforce CLI. CLI auto-update can interfere with the execution of a Jenkins job.
(Optional) Install the Custom Tools Plugin into your Jenkins console, and create a custom tool that references Salesforce CLI. The Jenkins walkthrough assumes that you created a custom tool named toolbelt in the /usr/local/bin directory, which is the directory in which Salesforce CLI is installed.
Jenkins Build
Now we have to specify on Jenkins the steps needed to build our project, create our scratch orgs and run our tests:
On your Jenkins project > Click Configure
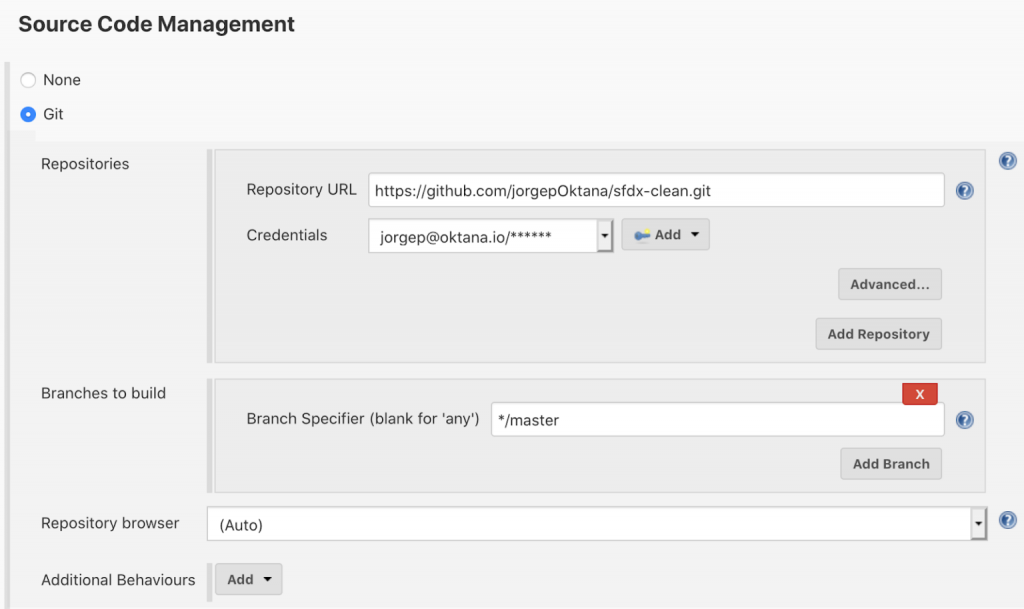
Add your repository credentials on Source Code Management section:
Set build triggers:
For CI, Jenkins should be triggered every time a change is merged to your branch (H / 5 * * * * means it will pull changes every 5 minutes)
Enable Xvfb so jenkins can run graphic interfaces (for UI tests):
Bind your previously created environment variables:
Set Custom tools (Salesforce DX previously installed).
Provide Node and NPM if needed.
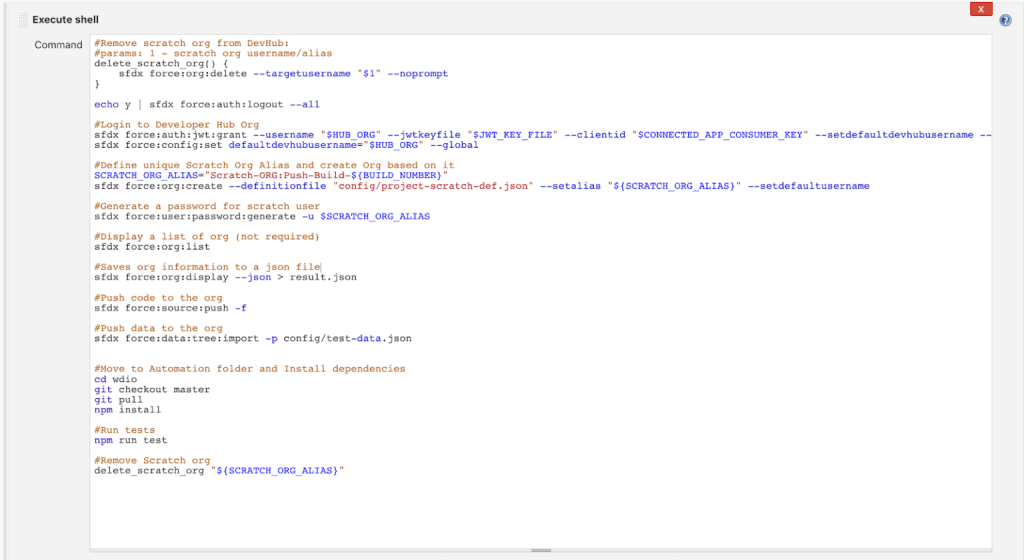
Add a build step:
Execute Shell:
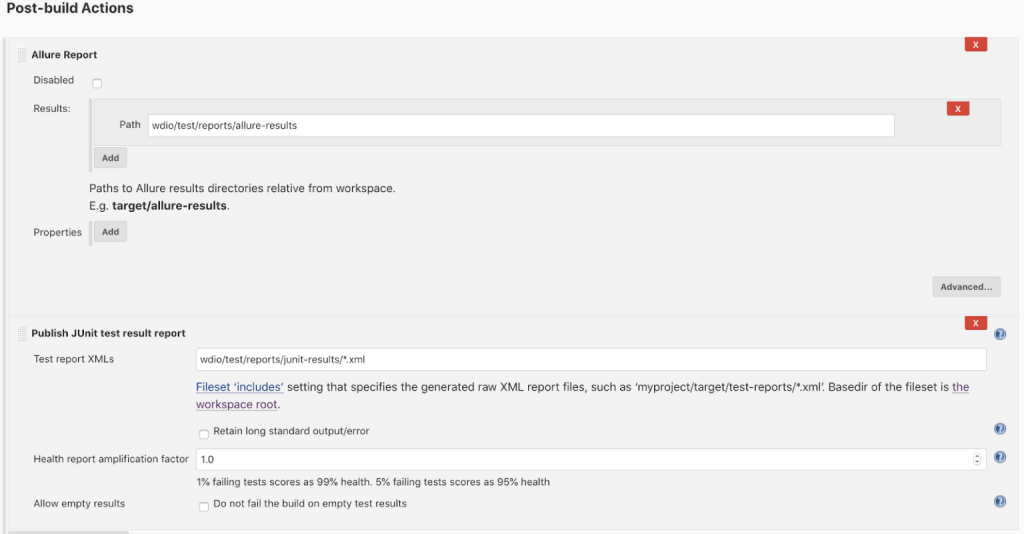
Add post-build steps if needed, we will use junit and allure reports on this:
Click Apply/Save button
Go to your project and click the Build Now button
It will start building your project following the steps you specified on the ‘Execute Shell’ window.
You can open the execution console and see the progress
If you added post build steps they will be executed accordingly.
That’s it!
If you followed all the steps you should be able to run your Salesforce DX Project, Automation framework, and Jenkins to automate testing and achieve Continuous Integration!
This article has two goals. The first is to find interesting information about API Testing with Karate. The second is to help you discover how interesting test automation is and dive deeper into the knowledge behind the passionate job of testing.
And why testing and not Quality Assurance? In this topic, I follow Michael Bolton when he says “Testers: Get Out of the Quality Assurance Business” Words matter and this is a matter of expectations management: we cannot promise something we cannot accomplish.
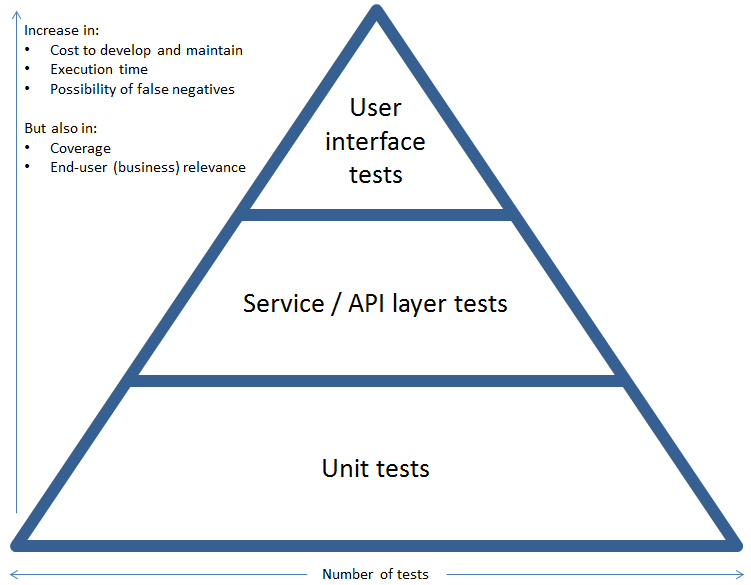
Here is where we need to mention the test automation pyramid. This concept is introduced by Mike Cohn in his book Succeeding with Agile.
He describes three levels of test automation, their relationship, and their relative importance. The base layer consists of unit tests and the top layer corresponds to user interface-level tests.
Many times when we start testing without a proper strategy we end up doing the opposite: investing most of the time and the effort in UI tests, which are more expensive to develop and maintain than unit tests. Also we can forget to develop tests for the service level, that’s why they call it the forgotten layer.
As Joe Collantonio described some years ago now, API testing is becoming more and more important. So even if we agree or not with the test automation pyramid schema, it reminds us that we have to pay attention to API testing as part of our strategy.
Software Development Life Cycle
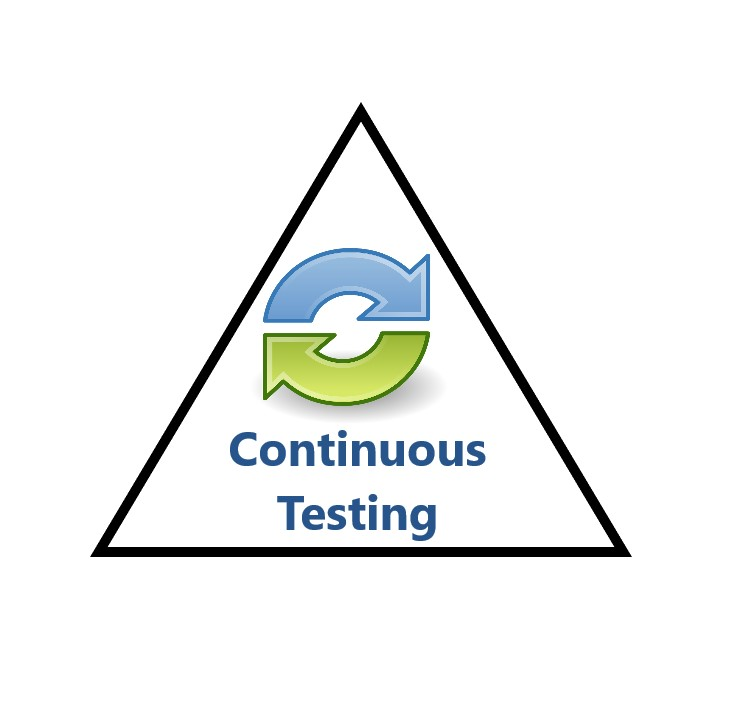
We’re into a spatial representation of the job. As we move down in the testing pyramid, the tests are cheaper, easier to develop, and can find issues in earlier stages, which makes them easier and cheaper to fix than in later stages.
This can be seen as moving left in the Software Development Life Cycle (SDLC), so many teams are involved in Shift Left Testing. Is that enough? It’s not, but it’s a really good move. Which is the next step? Continuous testing. Involve testing in every stage of the SDLC, doing it efficiently, doing it repeatedly, as part of the whole process.
Here is when selecting the right tools becomes important: a testing tool that can integrate with our CI (continuous integration)/CD (continuous delivery) systems is a great value.
API Testing Resources
As API testing becomes more and more important, we can find a lot of sites to help us learn more about it. I can suggest just a couple of them which I found very useful:
Why is Karate so attractive? Because it’s an open-source tool that combines API test-automation, mocks, performance-testing, and even UI automation into a single, unified testing framework.
Let’s take a look at some of the benefits:
Language neutral
Suitable for non-programmers
Elegant DSL syntax
Built on Cucumber / BDD Syntax
Integrates into existing CI/CD
Good documentation
Good demos
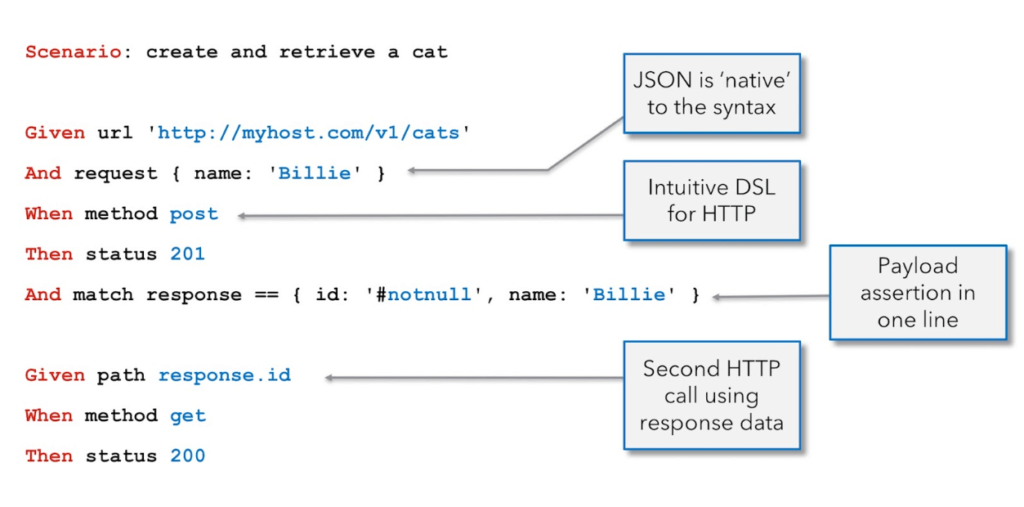
This Hello World example gives an idea of how simple yet powerful it is.
I found really good arguments about how we can leverage the goods of Karate for our own project. Learn more in the following example: Karate, the black belt of HTTP API testing?.
Some points that look interesting are:
Tests = Documentation: tests are so easy to read that you can document your API with your tests. And as you have to maintain your tests as the API changes, you have your documentation always up to date.
Simple: Karate takes care of complexity so you don’t have to worry about Json processing as Karate takes care of that.
Re-use Karate tests in Gatling to do performance testing: having the power of Gatling based on the API tests you already have is a big win.
Comprehensive and detailed reports: Karate brings powerful and detailed reports that makes reading the status of our tests very easy. It’s also helpful to debug and troubleshoot problems when you get failures. If you add the benefit of Gatling reports it’s like having two superpowers.
Data Driven Testing: you can run your tests through tables.
Mocks fake HTTP servlet: you can execute your tests with a mock server that implements your API.
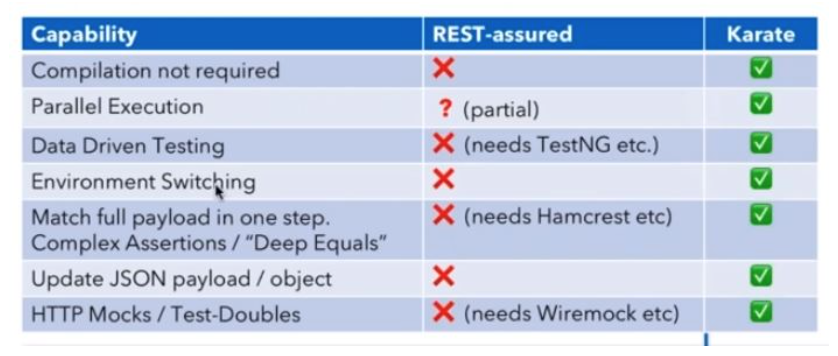
Karate vs Rest-assured
Do you need to decide which tool suits better for your needs?
I found very useful the following example in Test Guild site. You can also check this demo.
Conclusions
I found Karate can be a great option for automating the checks in the forgotten layer, integrating it in your CI/CD schema, also re-using your tests as the documentation of your API and for performance testing.
Is the right tool for you? It depends on your particular project, your needs, and your team. If you want to add the API testing to your strategy, you don’t have too much time and you want to make it simple, it seems like a great option.