Meet the Salesforce Developer Experience, Salesforce DX
Salesforce DX provides you with an integrated, end-to-end lifecycle designed for high-performance agile development. Learn how to integrate the Salesforce DX with automation framework and Jenkins to automate testing and achieve continuous integration.
Before you get started
Ensure you have these things set up so you can follow the steps of this module:
- Have you installed the Salesforce CLI?
- Have you enabled Dev Hub in a Developer Edition org or Trailhead Playground?
If you’ve completed the App Development with Salesforce DX Trailhead module, likely you already have the tools you need to complete this module. If you’re unsure, we recommend heading over to Trailhead first.
What is Continuous Integration?
Continuous integration (CI) is a software development best practice. When using CI, all code that development teams produce is merged into a central repository, where an automated build can validate it. This practice helps development teams detect problems, identify bugs, and allows them to fix them before releasing changes to their customers.
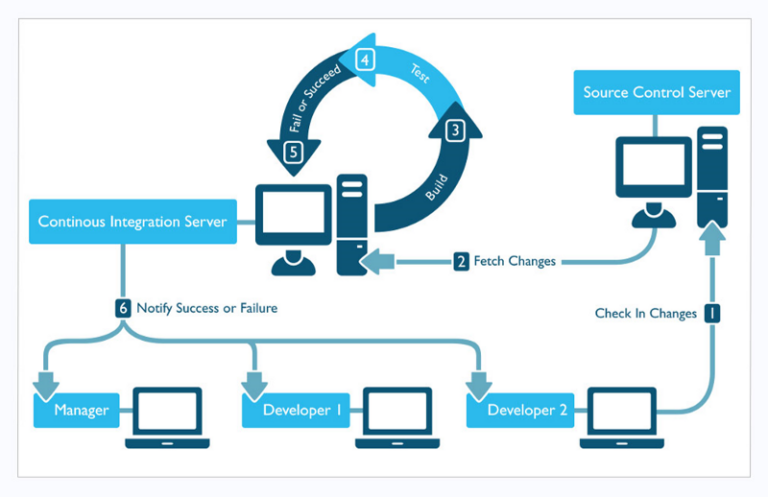
CI is like an insurance policy. Would you risk driving around town without car insurance? No way! In today’s world of agile development, it’s easy to push changes to your orgs. With a CI system in place, even the smallest change is processed to ensure your system continues to work flawlessly. Early detection and fixes are key for happy software stakeholders.
So now you know that CI can help your company save money. Next, we’re going to walk you through the steps to set up CI with Salesforce DX.
Continuous Integration with Salesforce DX
When using automation, it is preferable to create a disposable environment (like a scratch org) to test specific code/changes instead of introducing these changes to a shared org. Salesforce CLI allows you to automate the creation of scratch orgs as part of your CI process. Another cool feature is that Salesforce CLI enables you to completely script all these tasks in the CI configuration file whether you are using org-based or package-based development.
What is a Salesforce scratch org?
A scratch org is a dedicated, fully configurable, and short-term Salesforce environment.
It allows developers to emulate different Salesforce editions with different features and preferences playing a critical role in development productivity and collaboration. They can also be used as part of automation testing and the implementation of a full CI suite.
It is possible to share the scratch org configuration file with other team members, so everyone can have the same basic org.
Scratch orgs increase developer’s productivity and collaboration during the development process, and facilitate automated testing and continuous integration. You can use the CLI or IDE to open your scratch org in a browser without logging in.
Note: If you try to just install the Salesforce CLI and run Salesforce DX commands, you’ll find quite a few commands will first need you to authenticate into a Dev Hub. This functionality is what allows you and your team to create and manage scratch orgs.
What is a Salesforce Dev Hub?
A Dev Hub provides you and your team with the ability to create and manage scratch orgs. Scratch orgs are temporary Salesforce environments where you do the bulk development work in this new source-driven development paradigm.
To get started with scratch orgs, you choose an org to function as your Dev Hub. While you can enable Dev Hub in any paid org, it’s always best to practice somewhere other than production. Instead, go ahead and enable Dev Hub in a Developer Edition org or Trailhead Playground to use with this module.
- Can be your Dev or Prod Org.
- Used to manage/track Scratch Orgs.
- Link Namespaces to your orgs.
- Create and manage second-generation packages
- Is disabled by default. Once enabled, can’t be disabled.
Understanding the Salesforce Development Process
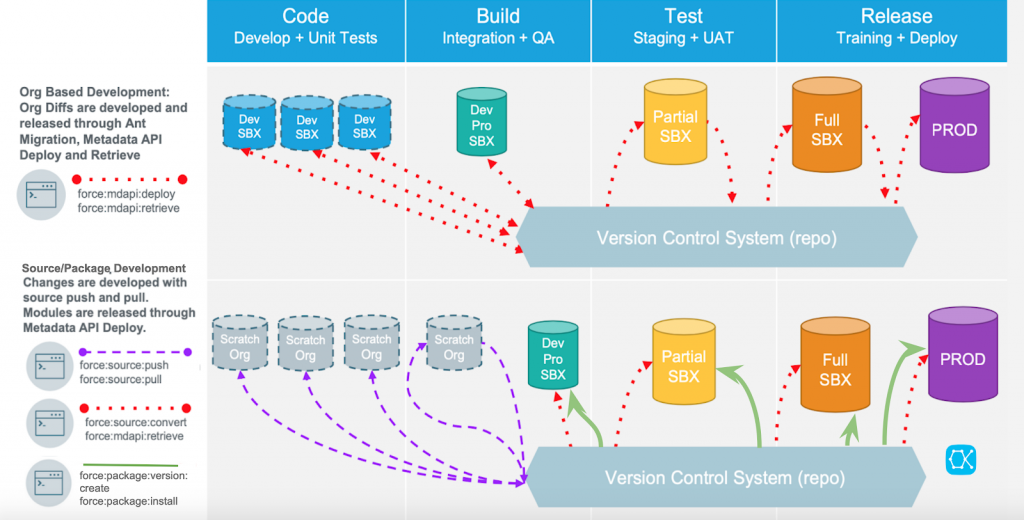
- Org based model, in which as the name indicates, orgs are the source of truth. Almost the same as the previous models but this time changes are developed and released through Ant migration, metadata API deploy and retrieve.
- Source/Package development, which is SalesforceDX’s way of development, we are going to use the new scratch orgs in which changes are developed using Salesforce DX CLI (source push/pull commands) and are then released using Metadata API Deploy. In this case we switch from Org Based to Source based, this way our source of truth is going to be our VCS i.e github, bitbucket, assembla.
It is important to note that instead of the traditional Org based development model, where development is done in sandbox/developer orgs then source code is pulled from such orgs to be stored in the metadata API format, a package based development model is recommended using the Salesforce DX project and scratch orgs.
That being said, moving away from the org-based development model doesn’t mean that you don’t need proper environment management, it’s just the developers’ org that are replaced with scratch orgs. Integration and QA testing is also done in scratch orgs while the validation, testing, and UAT continues to happen in their dedicated sandboxes. In this scenario we may still want to use DevPro Sandboxes to perform some types of testing like Load testing.
Let’s get started!
Let’s go through our preconditions:
- Install Salesforce DX – CLI (using NPM):
- npm install sfdx-cli –global
- sfdx –version
- sfdx –help
- sfdx force:auth:web:login -d -a DevHub (Used to login to your DevHub)
- sfdx force:project:create -n MyProject –template standard (to create an standard clean SFDX project)
- Enable your DevHub:
- Log into your Org.
- Setup > Search Dev Hub
- Enable Dev Hub!
- Dev Hub available in: Developer, Enterprise, Performance, and Unlimited Editions.
- Start Creating Scratch Orgs:
- Define your project-scratch-def.json file
- sfdx force:org:create -f project-scratch-def.json –set default username (to create a scratch org based on your `definition` file.
- sfdx force:org:list (to list all your linked dev hub and scratch orgs)
- sfdx force:org:display (to display data of your scratch org)
- sfdx force:source:push (to push code to the org)
- sfdx force:source:pull (to pull code from the org)
Note: On project-scratch-def.json, probably the most important file to start with for scratch orgs it this. Here we can define what the shape of the scratch org is. Whether we want to enable chatter, or lightning or multi-currency, usually you login, go to setup and enable all those, here we can define all the different preferences and features we want on our scratch.
Jenkins Setup
Jenkins is an open-source, extensible automation server for implementing continuous integration and continuous delivery. You can easily integrate Salesforce DX into the Jenkins framework to automate Salesforce applications testing against scratch orgs.
To integrate Jenkins, we assume:
- You are familiar with how Jenkins works. You can configure and use Jenkins in many ways. We focus on integrating Salesforce DX into Jenkins multibranch pipelines.
- The computer in which the Jenkins server is running has access to your version control system and to the repository that contains your Salesforce application.
Before integrating your Dev Hub and scratch orgs into your existing Jenkins framework, configure your Jenkins environment. Our example assumes that you’re working in a package development model.
- In your Dev Hub org, create a connected app as described by the JWT-based authorization flow. This step includes obtaining or creating a private key and digital certificate.
Make a note of your consumer key (sometimes called a client ID) when you save the connected app. You need the consumer key to set up your Jenkins environment. Also have available the private key file used to sign the digital certificate. - On the computer that’s running the Jenkins server, do the following:
- Download and install Salesforce CLI.
- Set the following variables in your Jenkins environment by going to Credentials > Select your project folder > Global Credentials > Add New Credentials:
- HUB_ORG (DevHub username ID) – Kind: Secret Text
- CONNECTED_APP_CONSUMER_KEY – Kind: Secret Text
- JWT_KEY_FILE – Kind: Secret File
- Repo access credentials (GitHub Username and Password)
- The names for these environment variables are just suggestions. You can use any name as long as you specify it in the Jenkinsfile/Build process.
You can also optionally set the SFDX_AUTOUPDATE_DISABLE variable to true to disable auto-update of Salesforce CLI. CLI auto-update can interfere with the execution of a Jenkins job.
- (Optional) Install the Custom Tools Plugin into your Jenkins console, and create a custom tool that references Salesforce CLI. The Jenkins walkthrough assumes that you created a custom tool named toolbelt in the /usr/local/bin directory, which is the directory in which Salesforce CLI is installed.
Jenkins Build
Now we have to specify on Jenkins the steps needed to build our project, create our scratch orgs and run our tests:
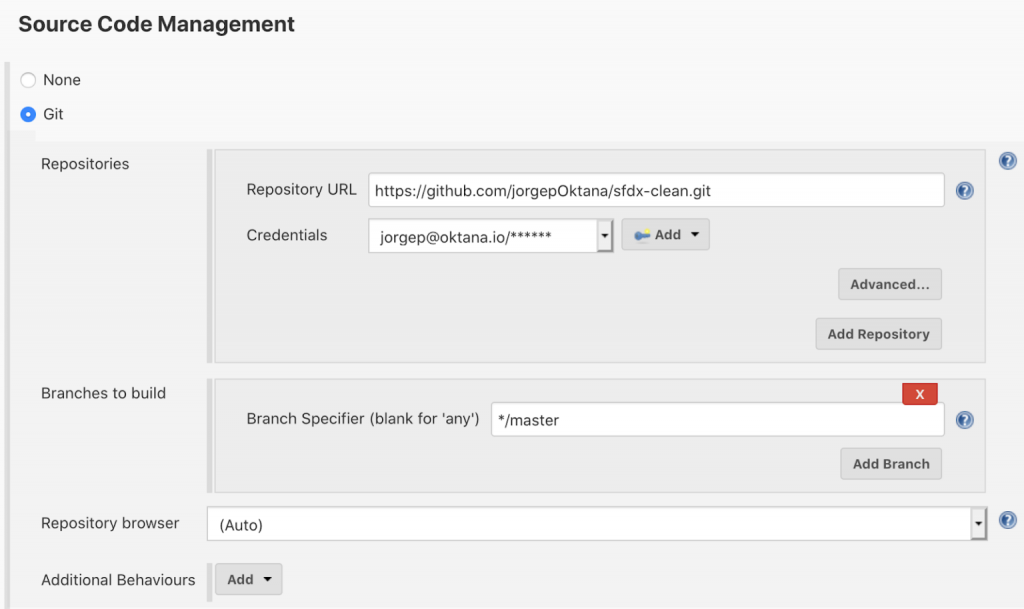
- On your Jenkins project > Click Configure

- Add your repository credentials on Source Code Management section:
- Set build triggers:
- For CI, Jenkins should be triggered every time a change is merged to your branch (H / 5 * * * * means it will pull changes every 5 minutes)
- Enable Xvfb so jenkins can run graphic interfaces (for UI tests):
- Bind your previously created environment variables:
- Set Custom tools (Salesforce DX previously installed).
- Provide Node and NPM if needed.
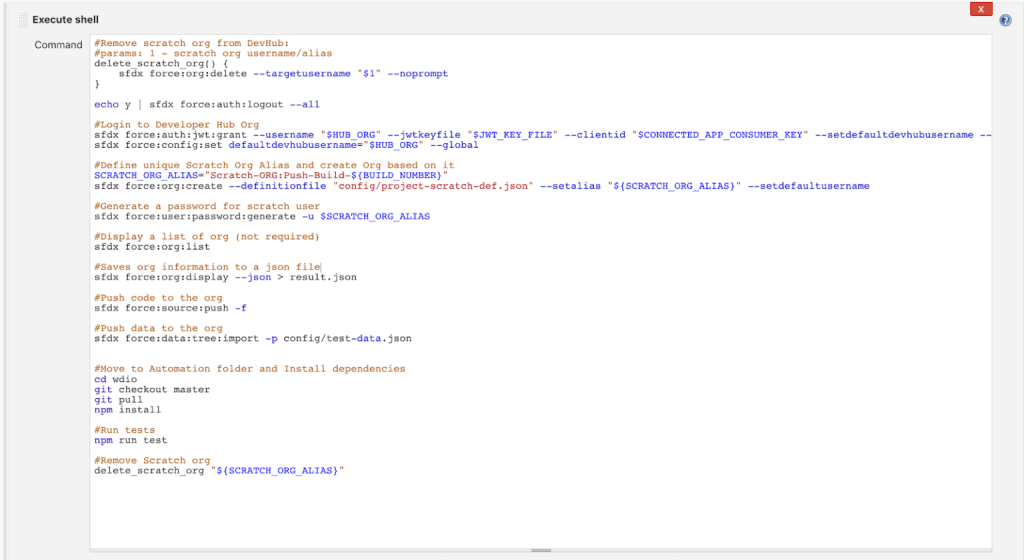
- Add a build step:
- Execute Shell:
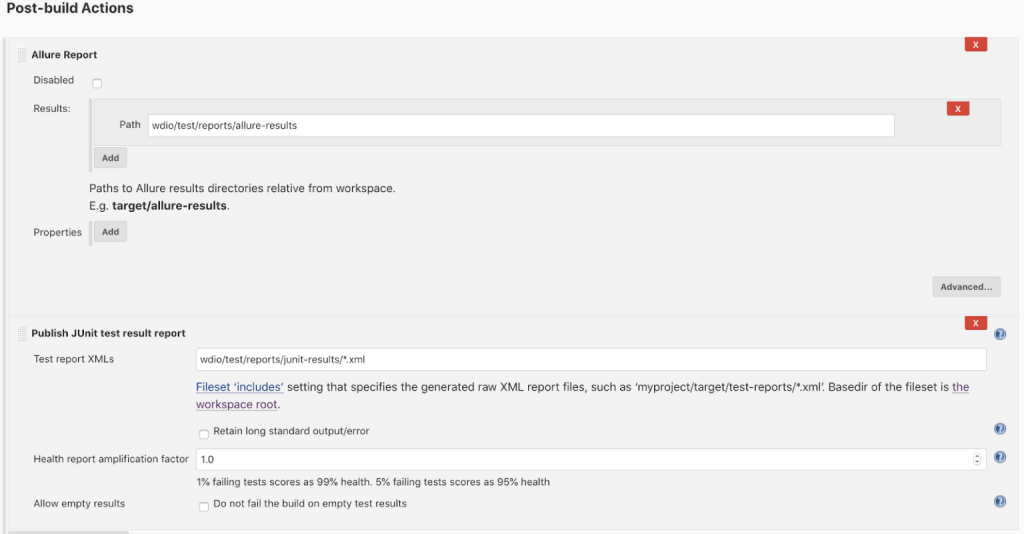
- Add post-build steps if needed, we will use junit and allure reports on this:
- Click Apply/Save button
- Go to your project and click the Build Now button
- It will start building your project following the steps you specified on the ‘Execute Shell’ window.
- You can open the execution console and see the progress
- If you added post build steps they will be executed accordingly.
That’s it!
If you followed all the steps you should be able to run your Salesforce DX Project, Automation framework, and Jenkins to automate testing and achieve Continuous Integration!
Learn more about Salesforce development from our team, or check out our testing services.