Rethink AI Agents: Explore our Demo

It’s time to rethink AI Agents in your business strategy. The conversation around AI agents is shifting—and fast. The current resistance won’t last. As enterprise organizations explore how AI fits into their operations, one thing is becoming increasingly clear: it’s no longer a question of if AI agents will be part of your IT ecosystem, but when. And more importantly, how.

ai agents

AI Agents represent a strategic transformation in how businesses approach productivity, scalability, and data security. These can reason, learn from interactions, and execute complex workflows with minimal supervision. In practical terms, that means fewer routine tasks for human teams, faster response times, and smarter automation.

The Data Behind the Movement

Data trends couldn’t be clearer – here is some data from the latest Gartner report:

  • By 2026, over 20% of enterprises will have employees actively collaborating with AI agents.

  • By 2028, 15% of daily business decisions will be made autonomously.

  • By 2030, AI is projected to handle 80% of all customer interactions.

Three Pillars Driving the Decision

If you’re in a leadership role, these shifts should be flashing red on your radar. Because when adoption reaches a tipping point, lagging behind will mean more than just operational inefficiencies—it’ll mean losing ground in competitiveness and innovation.

ai agents

1. Sales ROI & Operational Optimization

According to the Agentforce ROI Calculator, companies see:

  • 25% reduction in time spent on manual outreach.
  • 30% cut in support costs, as projected by Gartner.
  • 20–30% increase in CSAT (Customer Satisfaction) scores.

2. Rapid Payback in Weeks, Not Months

Time to value is critical. With AI agents like Agentforce, impact is immediate. Organizations typically report a 20–30% increase in CSAT (Customer Satisfaction) scores as they deliver faster, smarter responses. This isn’t a long-haul investment—it’s a short-term payoff with long-term benefits.

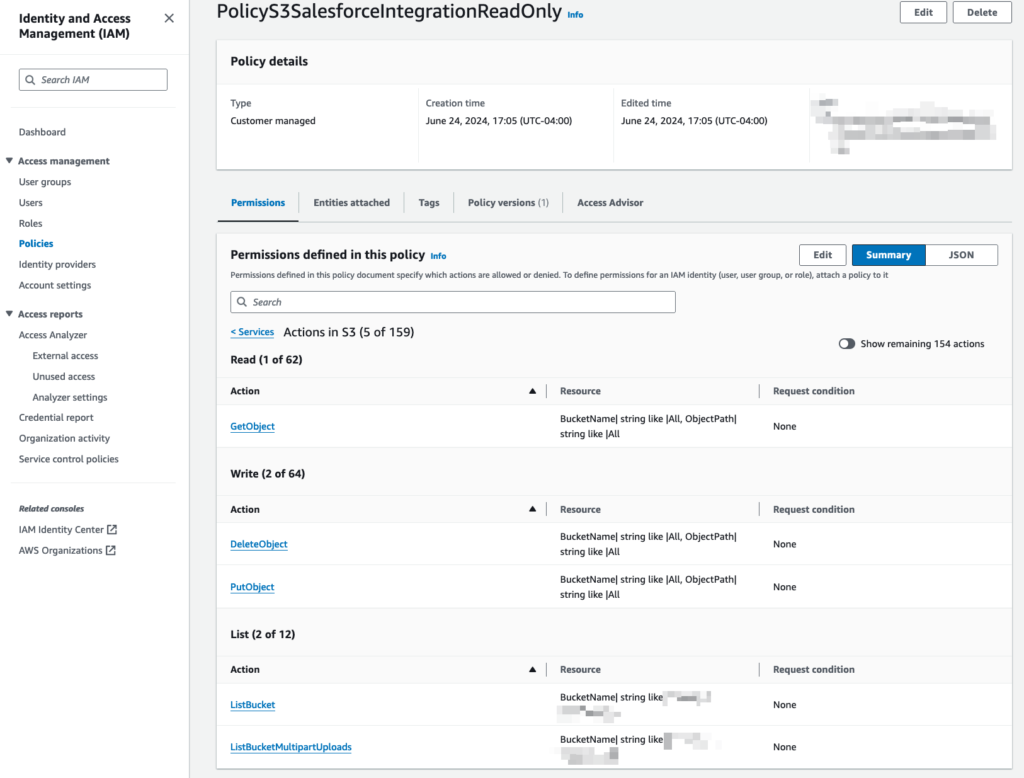
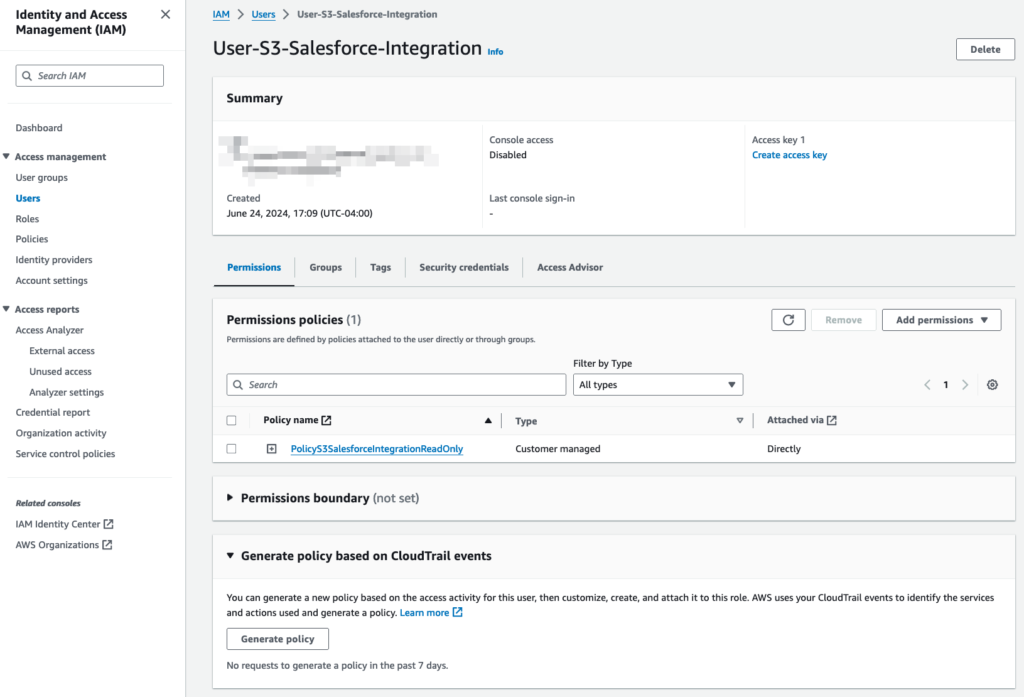
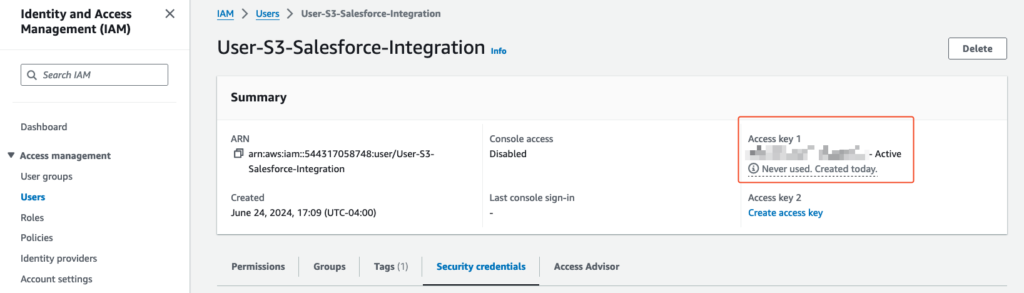
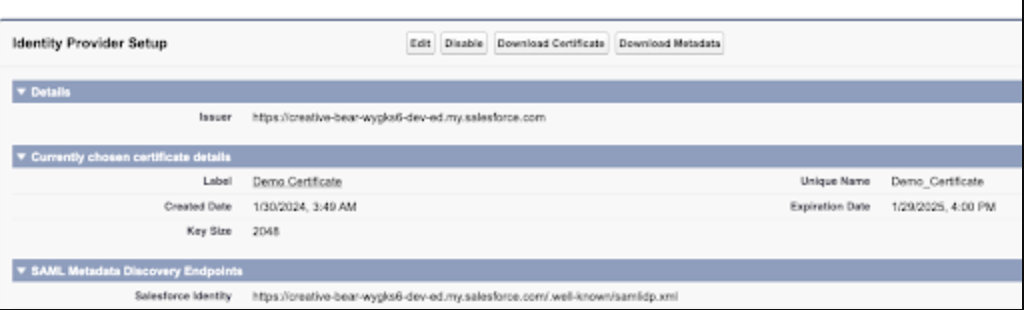
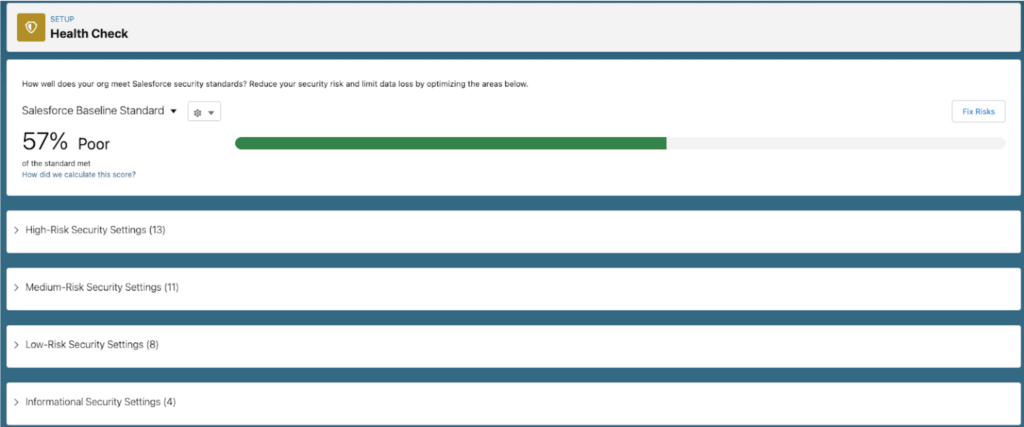
3. Security Matters—Data Privacy Is Non-Negotiable

In an era of increasing scrutiny over data practices, security is not negotiable. With Agentforce running inside Salesforce’s Einstein Trust Layer, your data stays governed by the same permissions, sharing rules, and compliance standards you already trust. And with over 40 certifications, including HIPAA and FedRAMP, your AI implementation meets the highest security benchmarks—without additional integration headaches.

Interact with our Demo

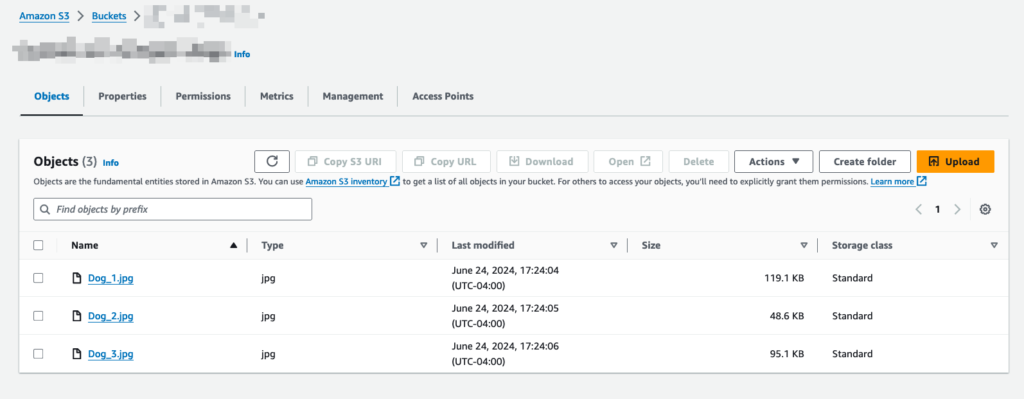
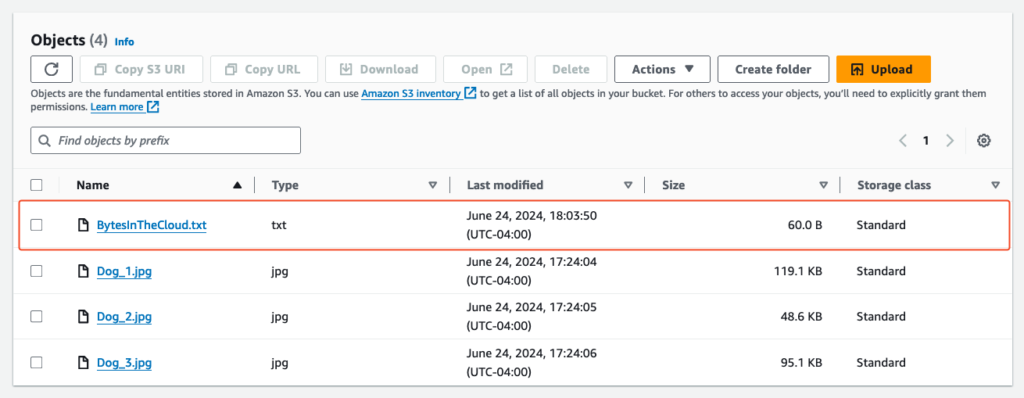
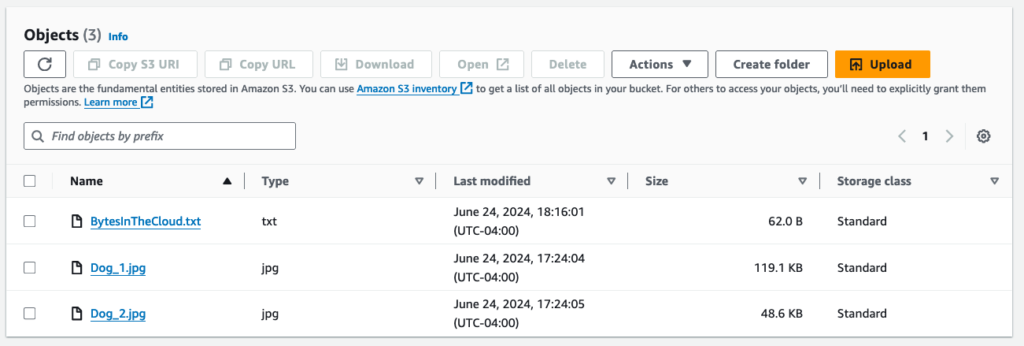
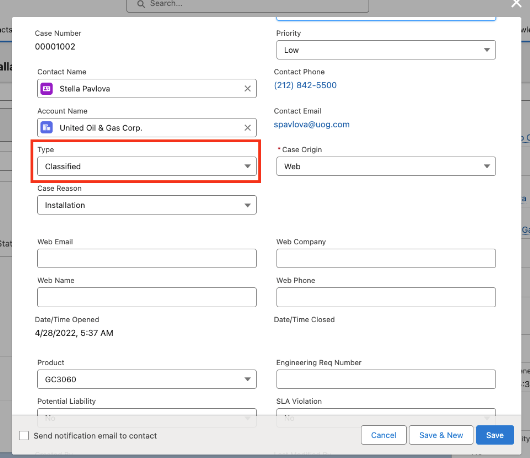
Despite being low-code and natively integrated into Salesforce, deploying AI agents still requires strategy. You need to ensure prompt quality, integrate with legacy systems, and optimize for your unique data structures.

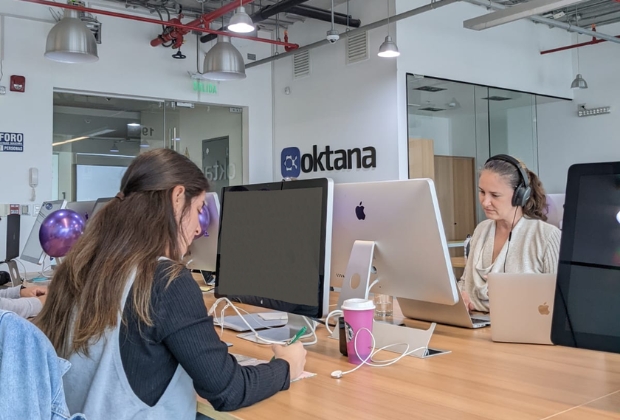
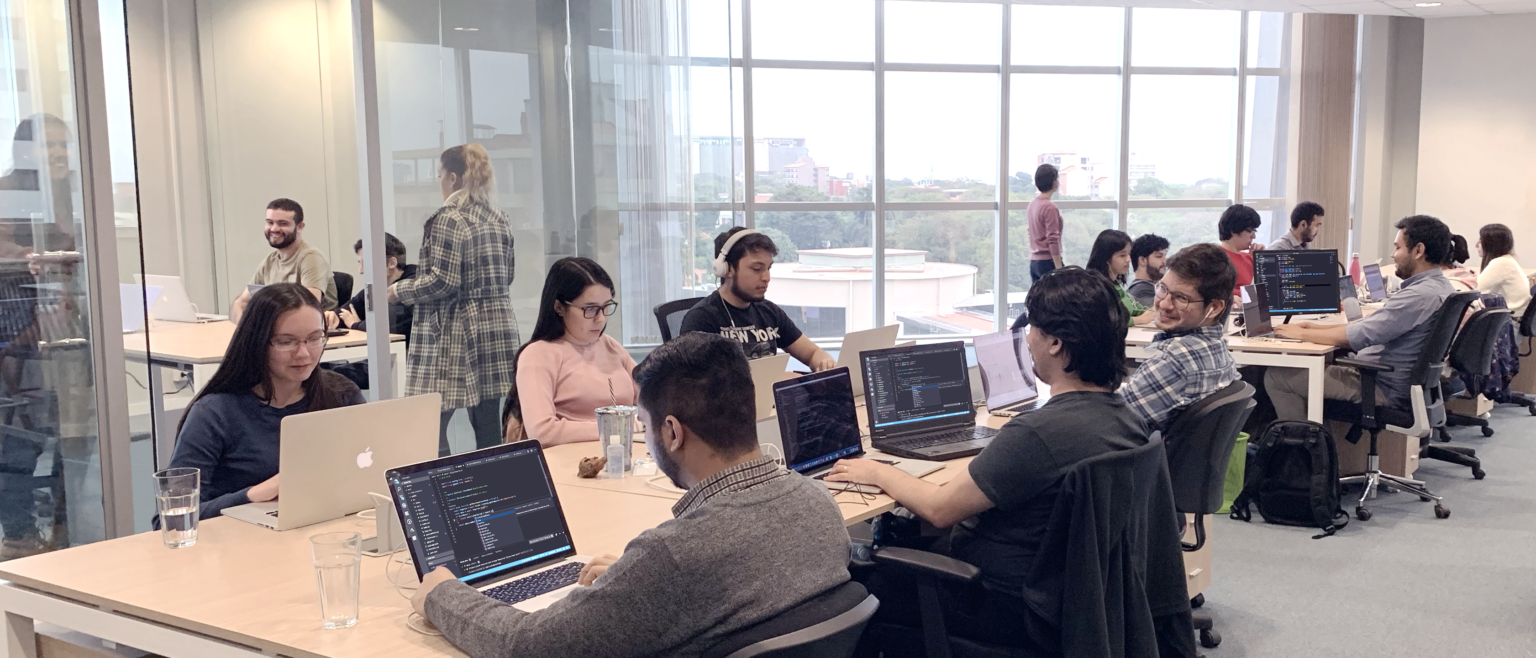
We’ve helped customers build and launch AI agents across sales, support, and internal operations. Whether it’s syncing workflows in Slack, calibrating prompts in multilingual support portals, or integrating with Salesforce Flows and Apex, we bring real implementation experience to the table.

Our approach goes beyond tech. We focus on alignment—with your data, your teams, and your business goals.

Let’s talk! Contact us to book a free 30-minute assessment and explore how Agentforce can reshape your business operations.

Advantages of Partnering with a Nearshore Technology Company

Collaborating with a nearshore technology company is an informed strategic choice, particularly for organizations navigating complex technological projects. Expertise in platforms like Salesforce, MuleSoft, Snowflake, and full-stack development has become increasingly critical for success in the world of technological entrepreneurship. 

Nearshore partnerships address these needs through practical and efficient solutions, offering operational flexibility and access to specialized talent while allowing customers to maintain control over project execution. 

This article explores seven key benefits of nearshore partnerships and their tangible value to organizations.

1. Collaborative Work Hours

One of the most consistent challenges in outsourcing is managing time zone differences. Nearshore partnerships eliminate this obstacle by aligning work hours closely with those of their North American customers. With overlapping schedules, nearshore teams are available during the same working hours, making communication efficient and reducing delays.

This proximity ensures that discussions, feedback loops, and issue resolutions happen promptly. There’s no need to schedule midnight calls or send an email only to wait an entire day for a response. Instead, questions are answered quickly, and decisions are made in real time.

Why It Matters

Aligned work hours enhance productivity and reduce project downtime. Teams stay in sync, and projects maintain their momentum without disruptions caused by communication lags.

2. Flexible Team Composition Tailored to Your Needs

Unlike traditional outsourcing models, nearshore partnerships allow for the customization of teams to meet specific project requirements. Customers can select professionals based on their technical needs, including developers, architects, data engineers, UX/UI designers, and QA specialists. This approach ensures the team is purpose-built for the project at hand.

Moreover, team sizes can be adjusted as projects evolve. Initial phases might require a small, focused group, while later stages could necessitate scaling up with additional resources to meet increased demands.

Why It Matters

Customizing the team composition optimizes resource allocation, ensuring that expertise matches the complexity and goals of the project without overstaffing or under-resourcing.

3. Transparent Communication and Full Project Visibility

Effective communication and project transparency are essential for maintaining trust and ensuring project success. Nearshore companies prioritize customer involvement by providing access to project management tools, frequent updates, and detailed documentation. Customers can track progress, review deliverables, and provide input as needed without being excluded from the process.

This transparency fosters accountability and identifies potential issues early, allowing for proactive course corrections. Nearshore companies also encourage regular meetings and status reviews, which provide additional opportunities for collaboration.

Why It Matters

Transparency reduces the risk of misunderstandings and ensures that customers remain informed and in control, leading to better alignment with project goals.

nearshore technology company

4. Adaptable Project Management Methodologies

Every project is unique, and nearshore companies recognize the importance of tailoring their approach to fit specific needs. Whether a project requires agile development for iterative improvements or a structured waterfall methodology for large-scale deployments, nearshore partners adapt to the customer’s preferred framework.

Additionally, they offer flexibility to accommodate shifting project scopes or priorities. If new features are required mid-project, nearshore teams can pivot efficiently without compromising timelines or quality standards.

Why It Matters

Adaptability ensures that projects remain aligned with business objectives, even as those objectives evolve.

5. Cost Efficiency Without Quality Compromises

One of the strongest incentives for choosing a nearshore partner is cost efficiency. Nearshore companies provide access to highly skilled professionals at competitive rates, often lower than those charged by onshore providers. This affordability is achieved without sacrificing the quality of deliverables. Adding to this, nearshore partnerships reduce hidden costs often associated with offshoring, such as those arising from miscommunication.

Transparent pricing models also allow customers to plan budgets more effectively. By working on a time and materials basis, customers only pay for the resources and time they need, avoiding unnecessary expenses.

Why It Matters

Cost efficiency ensures that organizations can achieve high-quality results while optimizing their financial resources for other strategic priorities.

The Strategic Value of Nearshore Partnerships

Nearshore technology companies offer more than just technical expertise—they provide a partnership grounded in collaboration, transparency, and adaptability. These qualities make them uniquely suited to meet the needs of modern organizations navigating complex projects.

By aligning work hours with customers, offering deep expertise in specialized technologies, and enabling tailored team compositions, nearshore partnerships bridge the gap between cost efficiency and high-quality execution.

For organizations working with platforms like Salesforce, MuleSoft, Snowflake, and full-stack systems, nearshore partnerships, like Oktana’s, deliver measurable benefits. They support both immediate project goals and long-term scalability, making them a practical and strategic choice for businesses seeking sustainable growth.

Heroku Application Development: The Underrated Star For Devs

If Heroku were a person, it’d be that genius friend who’s always five steps ahead, casually solving complex problems while the rest of us are still figuring out where to start. Sure, you’ve heard about Heroku, maybe you even know what it does (kind of) and have heard about Heroku Application Development. 

But do you really know why it’s the real deal? 

Let’s dive into why Heroku application development is the secret sauce your tech company has been looking for, all with a dash of humor, and some solid examples.

What Makes Heroku Application Development Useful?

Let’s address the elephant in the room: Yes, Heroku is a Platform as a Service (PaaS). But if that phrase makes your eyes glaze over, here’s the TL;DR: Heroku takes your application code and makes it production ready with fewer headaches than a well-written JavaScript function.

Think of it as the IKEA of cloud application deployment. Sure, you could hand-build your app’s infrastructure in AWS or Google Cloud. But do you really want to? Heroku Application Development gives you the flat-pack furniture equivalent: prem assembled, efficient and extremely good looking.

Case Study: Slack

You know Slack, the thing you spend 90% of your workday on? It started on Heroku. In its early days, Slack relied on Heroku’s simplicity and scalability to focus on perfecting its app, not wrangling servers.

By the time Slack became the workplace sensation it is today, Heroku had done its job—letting them scale and migrate seamlessly when the time came.

heroku application development

Why Developers Actually Love Heroku (Yes, Love)

Developers don’t typically gush about platforms. They usually have a thing or two they would change. Yet Heroku has managed to inspire affection and borderline devotion among its users. Why? Because it takes care of the grunt work so you can focus on building things people care about.

1. Deployment: One Fast Push, and You’re Done with Heroku Application Development

Heroku’s deployment process is so simple, it almost feels wrong. Push your code to a Git repository, and Heroku does the rest. No messing with configurations. No late-night calls to your DevOps team. Just push and watch the magic happen.

Example: A FinTech Startup’s MVP

Picture this: A fledgling FinTech startup wants to launch a minimum viable product (MVP) fast. They could spend weeks setting up AWS or Azure, or they could deploy on Heroku in a single afternoon.

They go with Heroku, spend the time saved on refining their app’s features and attract their first big investor. Efficiency pays off, literally.

2. Add-Ons: Your App’s Swiss Army Knife

Heroku’s add ons marketplace is the tech equivalent of a candy store, offering integrations for everything from databases (PostgreSQL, anyone?) to analytics tools. Need Redis for caching? Done. Want New Relic for performance monitoring? Easy.

Example: An E-Commerce Platform

An e-commerce startup on Heroku uses the ClearDB add-on for MySQL and the Papertrail add-on for log management. They track performance with New Relic and send real-time updates via a Twilio integration. In less than a week, they’ve built a fully functional platform with all the bells and whistles—no backend panic attacks required.

Scaling: Heroku Doesn’t Break a Sweat

Ah, scalability. The Achilles’ heel of many promising apps. Heroku handles scaling with something it calls “dynos.” Don’t let the name scare you; it’s basically a fancy term for virtualized containers. Need more capacity? Just spin up more dynos. It’s so smooth, you might forget scaling was supposed to be stressful.

Case Study: The Election Data Tracker

During the 2020 U.S. election, a data visualization app was needed to handle massive traffic spikes as millions of people checked real-time results. Hosting on Heroku allowed them to scale dynamically, adding dynos on the fly without crashing under the load. Try pulling that off with a homemade server setup.

But Is Heroku Too Simple for Serious Tech?

Critics sometimes claim Heroku is “just for startups” or “too expensive for large-scale use.” Let’s unpack that.

Sure, Heroku isn’t designed for managing 100,000 microservices in a hyperscale environment (looking at you, Kubernetes). But for 99% of applications, its simplicity saves time and money in the long run.

Example: SaaS Company Migration

A mid-sized SaaS company ran their app on Heroku for five years, during which they grew from 10 to 200 employees. When they outgrew Heroku’s capacity, the transition to AWS was straightforward — thanks to the groundwork Heroku had laid. No regrets, just growth.

Who Should Use Heroku?

1. Startups

When it comes to rapid deployment and prototyping, Heroku is a no-brainer. Its user-friendly platform allows you to quickly build, test and deploy applications with minimal setup and configuration, making it ideal for projects that require fast iteration and quick go-to-market timelines.

2. Small to Mid-Sized Teams:

If you don’t have a dedicated DevOps team (or if your current team is perpetually swamped with tasks), Heroku is the perfect solution to keep things moving smoothly. Its powerful platform simplifies deployment, monitoring, and scaling, allowing your team to focus on development rather than infrastructure management.

3. Enterprise Experiments:

Big companies can leverage Heroku for a variety of purposes, from side projects and proof-of-concepts to internal tools. Heroku’s flexibility and ease of use make it an ideal platform for quickly bringing ideas to life without the complexity of managing infrastructure. 

But Wait, What About Oktana?

If you’re sold on Heroku’s application development potential but wondering how to wield it like a pro, that’s where Oktana comes in. Whether you’re deploying your first app or optimizing a complex architecture, we bring the expertise to make Heroku work for your specific needs.

We’ve partnered with tech companies across industries to build and scale apps using Heroku. From crafting tailored solutions to ensuring smooth migrations, our team takes the platform’s power and makes it your competitive advantage.

Ready to see what Heroku can really do? Check out Oktana’s Heroku application development expertise.

Step-by-Step Guide: Integrating Salesforce with AWS S3

In today’s data-driven world, efficient data management and seamless platform integration are paramount. This article will walk you through the step-by-step process of configuring Salesforce and AWS S3 to work in harmony. This will enable industry professionals to create, read, update, and delete objects with ease, ensuring smooth data operations and enhanced productivity.

AWS Configuration

Creating AWS S3 Policy

1. Log in to AWS Console.

2. Navigate to IAM (use the search bar).

3. Click on Policies (on the left side of the screen).

4. Click on Create policy.

5. Click Choose a service then select S3.

6. Provide the following permissions under:

  • Read Section: GetObject
  • Write Section: DeleteObject and PutObject
  • List Section: ListBucket and ListBucketMultipartUploads

7. Then in the Resources section click on Add ARN next to “bucket”.

  • Bucket Name: bucket-s3-<your initials>-<favorite animal>
  • Check Any checkbox for Object Name.

8. Enter PolicyS3SalesforceIntegrationReadOnly as a name for the new policy. 

9. Click Create Policy.

Creating AWS S3 User

1. Click on Users (on the left side of the screen).

2. Click on Create user.

3. Type User-S3-Salesforce-Integration in the Name field then click Next.

4. Click Attach policies directly.

5. Select the PolicyS3SalesforceIntegrationReadOnly policy to add.

6. Click Next and review the Summary Details.

7. Click Create User.

Generating AWS IAM User Access & Secret Key

1. Click on Users (on the left side of the screen).

2. Open the recently created user User-S3-Salesforce-Integration.

3. Click on the Security Credentials tab.

4. Click on Create access key (top right of the screen).

5. Select Other then click Next.

6. Provide Key-S3-Salesforce-Integration_<CurrentYear>_<CurrentMonth> as a description.

7. Click Create access key.

8. Click on Download .csv file.

9. Securely store the keys, they will be used at a later point in this guide.


Creating AWS S3 Bucket & Objects

1. Navigate to S3 (use the search bar).

2. Click on Create bucket.

3. Provide the following as bucket name: bucket-s3-<your name initials>-<favorite animal>

Note: Use the same bucket name provided while creating the IAM Policy.

4. Click on Create bucket.

5. Open the newly created bucket.

6. Upload a couple of files or images.

Salesforce Configuration

Storing AWS S3 Access & Secret Key in Salesforce

1. Log in to Salesforce (Trailhead Playground or Salesforce Developer Org).

2. Navigate to Setup > Named Credentials then click on External Credentials tab.

3. Click on New.

4. Provide the following information:

  • Label: AWS S3 Credential
  • Name: AWS_S3_Credential
  • Authentication Protocol: AWS Signature Version 4
  • Service: s3
  • Region: us-east-1 (or the one where you created the s3 bucket)
  • AWS Account ID: <your AWS account ID>

5. Click Save.

6. Click New on the Principals section.

7. Provide the following information:

  • Parameter Name: AWS S3 Principal
  • Sequence Number: 1
  • Access Key: generated in AWS IAM
  • Access Secret: generated in AWS IAM

8. Go back to the Named Credentials tab.

9. Click on New.

10. Provide the following information:

  • Label: AWS S3
  • Name: AWS_S3
  • URL: https://<your-bucket-name>.s3.<your-bucket-region>.amazonaws.com
  • Enabled for Callouts: Yes
  • External Credential: AWS S3 Credential
  • Generate Authorization Header: Checked

11. Click Save.

Providing access to Credentials in Salesforce

1. Navigate to Setup > Permission Sets.

2. Click on New.

3. Provide the following information:

  • Label: AWS S3 User
  • API Name: AWS_S3_User

4. Click Save.

5. Click on Object Settings.

6. Search for and open User External Credentials then click on Edit.

7. Provide Read access.

8. Go back to Permission Set Overview and click on External Credential Principal Access.

9. Add the AWS_S3_Credential – AWS S3 Principal.

10. Assign the Permission Set to the user that you would like to provide access.

Testing Integration

Listing Bucket Objects

This code retrieves all objects stored in the S3 bucket using an HTTP GET request to the S3 endpoint.

				
					HttpRequest request = new HttpRequest();
request.setMethod('GET');
request.setEndpoint('callout:AWS_S3' + '/');
Http http = new Http();
HttpResponse res = http.send(request);

//Checkpoint
Assert.areEqual(200,res.getStatusCode());

//The following section processes the XML result and formats the data for better readability.
String namespace = 'http://s3.amazonaws.com/doc/2006-03-01/';
Dom.Document doc = res.getBodyDocument();
Dom.XMLNode root = doc.getRootElement();

String bucketName = root.getChildElement('Name', namespace).getText();

System.debug('Bucket Name: ' + bucketName);
System.debug('The following objects are stored in the bucket: ');

for (Dom.XMLNode node : root.getChildElements()) {
	if (node.getName() == 'Contents' && node.getNamespace() == namespace) {
    	String key = node.getChildElement('Key', namespace).getText();
    	String lastModified = node.getChildElement('LastModified', namespace).getText();
    	String storageClass = node.getChildElement('StorageClass', namespace).getText();

    	System.debug('Key: ' + key);
    	System.debug('StorageClass: ' + storageClass);
    	System.debug('LastModified: ' + lastModified);   	 
    }
}


Adding Objects

This code uploads a text file to the S3 bucket using an HTTP PUT request, with the file content included in the request body.

Note: If you want to upload binary data, you can use setBodyAsBlob(…) instead of setBody(…).

				
					String fileNameToCreate = 'BytesInTheCloud.txt';
String fileContent = 'Greetings from the cloud! Your data is safe and sound in S3.';

HttpRequest request = new HttpRequest();
request.setMethod('PUT');
request.setBody(fileContent);
request.setEndpoint('callout:AWS_S3/' + fileNameToCreate);

Http http = new Http();
HttpResponse res = http.send(request);

//Checkpoint
Assert.areEqual(200,res.getStatusCode());


As you can see in the screenshot below, the BytesInTheCloud.txt file has been added.

Updating Objects

This code updates the content of an existing file in the S3 bucket using an HTTP PUT request with the new content in the request body.

				
					String fileNameToUpdate = 'BytesInTheCloud.txt';
String fileNewContent = 'Data update complete! Your bytes are now even more awesome.';

HttpRequest request = new HttpRequest();
request.setMethod('PUT');
request.setBody(fileNewContent);
request.setEndpoint('callout:AWS_S3/' + fileNameToUpdate);

Http http = new Http();
HttpResponse res = http.send(request);

//Checkpoint
Assert.areEqual(200,res.getStatusCode());


As you can see in the screenshot below, the BytesInTheCloud.txt file has been updated.

Deleting Object

This code deletes a specified file from the S3 bucket using an HTTP DELETE request. As you can see in the screenshot below, the Dog_3.jpg file has been deleted.

				
					String fileNameToDelete = 'Dog_3.jpg';

HttpRequest request = new HttpRequest();
request.setMethod('DELETE');
request.setEndpoint('callout:AWS_S3/' + fileNameToDelete);

Http http = new Http();
HttpResponse res = http.send(request);

//Checkpoint
Assert.areEqual(204,res.getStatusCode());


As you can see in the screenshot below, the Dog_3.jpg file has been deleted.

Conclusion

Integrating AWS S3 with Salesforce brings together two powerful platforms, enabling efficient and streamlined data management. By following the steps outlined in this article, you’ve successfully configured AWS and Salesforce, securely stored and accessed credentials, and tested the integration by performing various object operations. This seamless integration not only simplifies your data management tasks but also opens up new possibilities for automating and enhancing your workflows.

As you continue to explore and expand on this integration, you’ll find numerous ways to optimize your processes, improve data accessibility, and boost overall productivity. Remember, the key to successful integration lies in thorough testing and continuous learning. Embrace the power of Salesforce and AWS S3. Happy integrating!

FAQ

How do I find my bucket region?

  • Navigate to the S3 console.
  • Select your bucket.
  • The region is displayed in the bucket details.

How do I find my AWS account Id?

  • Go to the AWS Management Console.
  • Click on your account name (top right corner).
  • Copy the Account ID.

How do I assign a Permission Set to my user?

  • Log in to Salesforce.
  • Go to Setup > Permission Sets.
  • Select the desired Permission Set.
  • Click Manage Assignments.
  • Click Add Assignments and select the user(s) you want to assign the Permission Set to.
  • Click Assign.

Salesforce SAML SSO: A Step-by-Step Guide

This blog will cover an example use case for a SAML SSO solution, explore related concepts, and show how to implement it in the Salesforce platform.

The example use case is the following:

There are two orgs, Epic Innovations and Secure Ops, where the latter contains classified information that cannot leave the system for compliance reasons. Agents working on cases in the Epic Innovations org need some additional information available in the Secure Ops org to work on some of their cases.

Salesforce SAML SSO: A step-by-step guide


The requirements are:

  1. Password-Free Access

Agents should be able to log in to the Secure Ops org without re-entering their passwords.

  1. Conditional Access Control

Agents should be able to access the Secure Ops org only if they have open cases of type Classified assigned to them.

The subsequent sections are organized as follows: Section I reviews the relevant SAML SSO concepts, Section II, describes how the solution can be implemented in the Salesforce Platform, and Section III shows the implementation results.

1. SAML SSO Concepts

What is Single Sign-On?

Single sign-on (SSO) is an authentication method that enables users to access multiple applications with one login and one set of credentials [1].

SSO greatly simplifies the user experience by eliminating users needing to remember and enter different usernames and passwords for each application they use within a particular environment.

SSO is widely used in web applications and SaaS systems to streamline user authentication and improve overall security. It can be implemented using protocols such as OAuth, OpenID Connect, and SAML (Security Assertion Markup Language).

Identity Providers and Service Providers

An Identity Provider (IdP) is a trusted service that stores and verifies a user’s identity. SSO implementations use an IdP to verify the identity of the user attempting to log in. If their identity is verified, they’re given access to the system. Fig 1 shows an example of the X login page, where Google and Apple can be used as IdPs to verify a user’s identity.

Fig 1. x.com login page.

A Service Provider (SP) is an entity that provides resources or applications to an end user. In SSO, the SP relies on an IdP to verify a user’s identity. Going back to the X example, the X platform serves as an SP, providing access to the X web application, and relies on either Google or Apple to verify the user’s identity.

Salesforce is automatically enabled as an identity provider when a domain is created. After a domain is deployed, admins can add or change identity providers and increase security for their organization by customizing their domain’s login policy [2].

SAML SSO Flows

When setting up SAML SSO there are two possible ways of initiating the login process: from the identity provider or the service provider. The steps for each flow as outlined in the official Salesforce documentation [3] are described below.

Service Provider-Initiated SAML Flow

  1. The user requests a secure session to access a protected resource from the service provider. For instance, the user would like to access X, which can only be achieved by logging in.
  2. The service provider initiates login by sending a SAML request to the identity provider.
  3. The identity provider sends the user to a login page.
  4. The user enters their identity provider login credentials, and the identity provider authenticates the user.
  5. The identity provider now knows who the user is, so it sends a cryptographically signed SAML response to the service provider. The response contains a SAML assertion that tells the service provider who the user is.
  6. The service provider validates the signature in the SAML response and identifies the user.
  7. The user is now logged in to the service provider and can access the protected resource.

Identity Provider-Initiated SAML Flow

The IdP-Initiated flow is a shortened version of the SP-Initiated flow. In this case, a SAML request is unnecessary.

  1. The user logs in to the identity provider.
  2. The user clicks a button or link to access the service provider.
  3. The identity provider sends a cryptographically signed SAML response to the service provider. The response contains a SAML assertion that tells the service provider who the user is.
  4. The user is now logged in to the service provider and can access the protected resource.

II. Salesforce Implementation

Solution outline

In this blog post, the chosen solution for the sample use case involves implementing a service provider-initiated SAML SSO flow. A connected app for the Secure Ops organization will be configured within the Epic Innovations organization. This setup enables agents to be seamlessly redirected to the Secure Ops login page.

Upon reaching the Secure Ops login page, agents will be prompted to authenticate using their Epic Innovations credentials. Subsequently, the system initiates a verification process to check for any open cases of type Classified associated with the respective agent. If open cases are identified, the agents will be granted access. With open cases, they’re allowed access to the system.

Setting up Salesforce as a SAML Identity Provider

To let users access external systems and, in this case, the Secure Ops org, with their Epic Innovations credentials, the Epic Innovations org has to be enabled as an Identity provider.

To enable a Salesforce org as an IdP [4]:

  1. From Setup, in the Quick Find box, enter Identity Provider, then select Identity Provider.
  2. Click Enable Identity Provider.

Once enabled, you can click Edit to choose a certificate, Download Certificate to download the certificate, and Download Metadata to download the metadata associated with your identity provider, which contains information such as the Entity ID, Name ID Format, and other relevant information that will be discussed in the following sections.

Fig 2. Identity Provider Setup in the Epic Innovations org.

Setting up Salesforce as a SAML Service Provider

The Secure Ops org can be configured as a service provider to facilitate access to the Secure Ops organization using Epic Innovations credentials. This is achieved by creating a SAML single sign-on (SSO) setting using some information from the identity provider.

To create a SAML Single Sign-On Setting [5]:

  1. From Setup, in the Quick Find box, enter Single, and then select Single Sign-On Settings.
  2. Click New; this option allows you to specify all the settings manually. You can also create a configuration with existing Metadata Files.
  3. Fill in the relevant information as shown in the picture below.
Fig 3. Single Sign-On settings in the Secure Ops org.

Next, some of the key fields are described:

Name: Epic Innovations incorporation. This is a name that easily references the configuration. This name appears if the identity provider is added to My Domain or an Experience Cloud login page.

Issuer: A unique URL that identifies the identity provider. This was taken from the Identity Provider Setup configured in the Epic Innovations org.

Entity ID: A unique URL that specifies who the SAML assertion is intended for, i.e., the service provider. In this case, the Secure Ops domain is filled in.

Identity Provider Certificate: The authentication certificate issued by the identity provider. This was downloaded from the Identity Provider Setup configured in the Epic Innovations org.

Request Signing Certificate: The request signing certificate generates the signature on a SAML request to the identity provider for a service provider-initiated login.

Request Signature Method: Hashing algorithm for signed requests, either RSA-SHA1 or RSA-SHA256.

Assertion Decryption Certificate: If the identity provider encrypts SAML assertions, the appropriate certificate should be selected for this field. In this case, the Epic Innovations org would not encrypt the assertion, so the Assertion not encrypted option can be selected.

SAML Identity Type: This is selected based on how the identity provider identifies Salesforce users in SAML assertions. In this case, the Federation ID will be used.

SAML Identity Location: This option is based on where the identity provider stores the user’s identifier in SAML assertions. In this case, we chose Identity in the NameIdentifier element of the Subject statement. When we set up a connected app, we’ll specify this in the Epic Innovations org.

Service Provider Initiated Request Binding: This is selected according to the binding mechanism that the identity provider requests from SAML messages. In this case, HTTP POST will be used.

Identity Provider Login URL: Since HTTP POST was chosen as the request binding, the URL with endpoint /idp/endpoint/HttpPost is used. This endpoint can be found in the Identity Provider’s metadata file. Also, the corresponding endpoint for HTTP Redirect is available in this file.

Custom Logout URL: This is a URL to which the user will be redirected once logged out. Here, the Epic Innovations’ My Domain was chosen.

Adding the Epic Innovations org to the Secure Ops login page

With the SSO Setting in place, it is time to add the Epic Innovations login option to the Secure Ops login page.

To add the Epic Innovations login option to the My Domain login page [5]:

  1. From Setup, in the Quick Find box, enter My Domain, and then select My Domain.
  2. Under Authentication Configuration, click Edit.
  3. Enable the Epic Innovations option.
  4. Save the changes.
Fig 4. My Domain Authentication Configuration in the Secure Ops org.

Specifying a Service Provider as a Connected App

A connected app that implements SAML 2.0 for user authentication can be set up to integrate a service provider with Epic Innovations org.

To set up the connected app [6, 7]:

  1. From Setup, in the Quick Find box, enter Apps, and then select App Manager.
  2. Click New Connected App
  3. Fill in the basic information section as appropriate.
  4. In the Web App Settings section, fill in the Start URL with the Secure Ops’ My Domain. This will redirect users to Secure Ops org when they access the connected app.
  5. Click Enable SAML; this will allow more information to be filled in.
  6. For Entity ID, fill in the Secure Ops’ My Domain.
  7. For the ACS URL, which stands for Assertion Consumer Service URL, fill in Secure Ops’ My Domain. The SP’s metadata file can provide this.
  8. For Subject Type, select Federation ID. Remember that the service provider set the Identity Type to Federation ID.
  9. For Name ID Format, select the one that matches the NameIDFormat in the SP’s metadata file.

Add the Connected App to the App Launcher

Since the created Connected App has the start URL set up, it can be added to the app launcher for easier access. To do this:

  1. From Setup, in the Quick Find box, enter App Menu, and then select App Menu.
  2. Then, search the Connected App and mark it as Visible in App Launcher.

Setting up conditional access control

As stated in the requirements, users should only be able to access the Secure Ops org whenever they have open cases marked as classified. A Connected App handler will be used to fulfill this requirement. Connected App handlers can be used to customize connected apps’ behavior when invoked.

A Connected App handler is an Apex class that extends the ConnectedAppPlugin class. Here is the entire implementation for this use case.

				
					global with sharing class SecureOpsAppPlugin extends Auth.ConnectedAppPlugin
{
        global override Boolean authorize(
Id userId,
Id connectedAppId,
Boolean isAdminApproved,
Auth.InvocationContext context
    ){
        // get the number of open cases the user has
        Integer i = [
SELECT COUNT() FROM Case
WHERE
Status!='Closed' AND Type='Classified' AND OwnerId=:userId
   ];
        
        // if the user has one or more cases open, authorize access
        return (i > 0);
    }
}


As mentioned earlier, the created class extends the ConnectedAppPlugin class. In this case, the authorized method is overridden. This method permits the specified user to access the connected app [8]. The method returns a boolean indicating whether the user is approved or not to access the connected app. A value true indicates the user is authorized, and a false indicates that it didn’t grant access.

Since the requirements indicate that access should be denied if there are no open cases, the code runs a COUNT query to check the number of Open cases of type Classified the user has. If the user has at least one case with those characteristics, the method returns true, granting access to the connected app. Otherwise, it returns false, denying access.

Managing Users

There’s one last task before diving into the results: user management. While configuring the Single Sign-On settings, it was established that the Federation ID would be the identifier for the user logging in.

Consequently, any user logging into the Secure Ops organization via the Epic Innovations login should have a corresponding user in the Epic Innovations organization with a matching Federation ID. If a matching Federation ID is not found, the user cannot log in.

To set the Federation ID for a user:

  1. From Setup, in the Quick Find box, enter Users, and then select Users.
  2. Find the user and click Edit.
  3. In the Single Sign On Information section, fill in the Federation ID field.


III. Results

To validate the implementation, let’s first try to access the Secure Ops org without any cases of type Classified open.

From the App Launcher, we select the Secure Ops Solutions connected app we created.

Fig 5. Secure Ops Connected App in the App Launcher.

This redirects us to the Secure Ops organization where we have the option to log in with Secure Ops credentials or via Epic Innovations, we choose Epic Innovations.

Fig 6. Login options for the Secure Ops organization.

We get an insufficient privileges error because the Epic Innovations organization doesn’t have any open cases of type Classified. So, our application handler denies access to the Secure Ops organization.

Fig 7. Insufficient privileges error when trying to access the Secure Ops organization.

Now, let’s create a case and set the type to be Classified. Since we don’t have any other automation, the case is automatically assigned to our user. We can now try to access the Secure Ops org.

Fig 8. New case of type Classified in the Epic Innovations org.

If we attempt the same process, we can log in to the Secure Ops org.


Contact us to explore our services and discover how our extensive knowledge at Oktana can assist you in launching a successful project.

We Build Salesforce AppExchange Apps

Our team of Salesforce experts can help you develop a new AppExchange app from scratch, help your business migrate your existing products to AppExchange, provide support services for the apps developed, and more.

A couple of years ago, we created Tok. A flagship Salesforce app designed to help keep organizations in close contact at all times. Our app was built on Salesforce Chatter, allowing instant messaging, team messaging, and groups to connect within Salesforce. That way, conversations were safe, secure, and archived within your Salesforce instance. Your team never had to leave Salesforce to talk and collaborate. This app was our star project, used internally in daily communication and widely used by other companies. 

With Tok’s success in the market, and as our team grew, so did our internal product development team; we developed more than 13 ready-to-install Appexchange apps with over 1500 downloads.

Here is a list of some of the latest apps designed by our team:

  • Oktana Account Map gives your users a clear view of where their customers are. See your contacts’ location, local time, and even birthday on the account page. With the ability to filter by birthdays, contacts you own, and new contacts this week – you can control how many customers are placed on the map.
  • Oktana Calculator & Currency Converter gives your users access to standard calculations and the ability to convert between 170 different currencies without ever needing to leave your Salesforce org. Leveraging the Alpha Vantage API, this component can be embedded in any Salesforce page.
  • Oktana Calendar can take your team beyond the default Salesforce Calendar component, allowing them to quickly add, edit, delete, and even color-code certain events from within any home page (or app page) in your org. Based on a responsive design, this calendar keeps up with your busy users by sending automated reminders, ensuring they’ll never miss an event. Leverage the Salesforce Calendar to help manage your team’s time more efficiently.
  • Oktana Contact QR quickly generates a QR code to add contacts to your phone easily. You can set the QR code to redirect to the contact record in the org or download it directly, allowing you to choose what fields to include. Leverage this component to make importing contacts easier for you and your team.
  • Oktana Location Map lets you quickly look up a location visually on the map; then, it automatically stores the latitude and longitude in the location record for you. This component even allows users to share their location by grabbing a Google Maps link.
  • Oktana Org Limits Monitor makes it easy to track org usage for developers and admins. They are easily customized to show only what’s important to you. Our developers have experienced losing track of org limits, so they designed a component that can be used anywhere.
  • Oktana RSS Feed brings your favorite news sources right into your org. This mobile-friendly component can be personalized with up to five RSS feeds. And most importantly, the admin retains control by setting the default feed and determining which sources are appropriate to access.
  • If a picture is worth a thousand words, a video is worth a million. The Oktana YouTube component lets you embed your video without any code. Admins can choose whether to embed a specific video by YouTube ID or allow users to search for videos.  Every user has their viewing history stored, making it easier to locate previously watched videos.
  • With the Oktana Credflow component, you can now check financial account applicants’ credit scores or criminal background history in just two steps. No coding or design is required; just build flows directly as desired and obtain near-instant results.

These apps are FREE, and you can fully use these solutions without payment. If you need a custom app for your organization, we can build it for you from scratch. Check out our services.

How to Make Your Salesforce Org Secure

In our previous blog post, “One way to keep your org secure: Salesforce Health Check” we covered the built-in Salesforce Health Check tool, the benefits of running a health check, and why you and your company need one.

This blog will cover some in-depth steps you can follow as a guide if you are a Salesforce developer or Admin to make your org more secure. That being said, let’s get to it!

Salesforce org secure health check

The Lightning Platform has been migrating from Aura components to Lightning Web Components (LWC) for some years. Even though both are still supported and can coexist on the same page and even share information, Salesforce is focusing on LWC, and we should do the same. 

When you run your Health Check application, you have 3 moving parts involved:

  1. The Salesforce org
  2. The client (LWC)
  3. The backend code (Apex)


We have configurations available in Setup > Security, allowing us to configure how the app runs. I recommend turning on the following options: 

  • Require HttpOnly Attribute

Setting the HttpOnly attribute will change how an app communicates with the Salesforce server by increasing the security of each cookie the app sends. Since HttpOnly prevents cookies from being read by JavaScript, the browser can receive the cookie, but it cannot be modified in the browser. 

HttpOnly is an additional flag included in the Set-Cookie HTTP response header. Using the HttpOnly flag when generating a cookie helps mitigate the risk of a client-side script accessing the protected cookie.

  • Enable User Certificates 

This setting allows certificate-based authentication to use PEM-encoded X.509 digital certificates to authenticate individual users to your org.

  • Enable Clickjack Protection

You can set the clickjack protection for a site to one of these levels.

  • Allow framing by any page (no protection).
  • Allow framing by the same origin only (recommended).
  • Don’t allow framing by any page (most protection).

Salesforce Communities have two clickjack protection parts. We recommend that you set both to the same level.

  • Force.com Communities site (set from the Force.com site detail page)
  • Site.com Communities site (set from the Site.com configuration page)
  • Require HTTPS

This setting must be enabled in two locations. 

Enable HSTS for Sites and Communities in Session Settings.

Enable Require Secure Connections (HTTPS) in the community or Salesforce site security settings.

  • Session Timeout

It’s a good idea to set a short timeout period if your org has sensitive information and you want to enforce strong security.

You can set values, including: 

  • Timeout value
  • Force logout on session timeout
  • Disable the timeout warning popup
  • Enable Cross-Site Scripting (XSS) Protection

Enable the XSS protection setting to protect against reflected cross-site scripting attacks. If a reflected cross-site scripting attack is detected, the browser shows a blank page with no content. Without content, scripts cannot be used to inject attacks. 

  • Use the Latest Version of Locker

Lightning Locker provides component isolation and security, allowing code from many sources to execute and interact using safe, standard APIs and event mechanisms. Lightning Locker is enabled for all custom LWCs and automatically updates. If you’re using Aura, check your version for compatibility.

One more thing...

I want to spend more time discussing a feature that helps us run our application even more securely. And I am talking about Salesforce Shield. Salesforce Shield allows you to run your application more securely with some features like encryption and monitoring. It adds an extra layer of confidence, privacy, and security and lets us build a new level of trust, compliance, transparency, and governance.

Salesforce Shields is composed of 3 easy to use point and clicks tools, which are:

  1. Platform Encryption: It is designed to bring us state-of-the-art encryption while we do not lose access to key features such as search, validation rules, etc. It can derive the encryption keys from org-specific data or even import our encryption keys(adding an extra layer of control)
  2. Monitoring Events: We often need to track specific events in our orgs (who accesses a piece of data, how the encryption keys are, who is logging, and from where). Monitoring events is the tool for it allowing us to track and access all these events and more from the API and integrate it with the monitoring tool of our choice(New Relic, Splunk, others)
  3. Audit Trail: Some industries require us to keep track of changes in data. Turning on tracking specific fields and setting up an audit policy, we can store historical values for up to 10 years.

Conclusion

It is essential to consider security while developing apps and maintaining our Salesforce org secure. And even though it might seem complicated (and it is), incorporating the Health Check tool and salesforce shield in our development process will help us to keep our org in a good, healthy state.


You can also watch our on-demand Health Check Assessment webinar by my colleagues Zach and Heather, where they covered 4 simple steps to ensure the health of your Salesforce org. 

What is a Salesforce Health Check

You got your Salesforce org – a shiny, brightening, brand-new org– ready to keep and maintain the most important information your company has: your customers’ information. Also, you start digging into the AppExchange to get those apps we love to provide a better service to your customer or the people who provide service to them. You could have needed to customize your org so it fitted with your business flow or integrate it with that legacy system which is the most important piece in your selling workflow.

As time passes, as all of us, our orgs get bigger, with more data, apps, customizations, and maybe more integrations. We are happy with all this growth as it means that our business gets bigger with more satisfied customers and more sales – in other words, more money. But it also means that our beloved org may have more security concerns that we need to focus on, and as it gets bigger and bigger, the more difficult to track the issues.

Fortunately, Salesforce provides us with a safety inspector that guides us through reviewing our security flaws and getting them fixed. So let’s understand this tool and why it is so useful to any company using Salesforce.

How does the Salesforce Health Check work?

I am not talking about Homer Simpson (we all know that if he is capable of securing a power plant, he would be an excellent Salesforce Admin). 

power plant health check homero
Source: miro.medium.com

I am talking about the Health Check tool. This automated tool lets us review in a dashboard all the issues our org has and guides us through the process of fixing them.

First, you have to be a System Administrator and go to:

Setup > Health Check > Wait a few seconds (I do not suggest going for a coffee yet)

Finally, after that wait, you will see a screen similar to this one:

On this page, you will see an overall score calculated by a Salesforce proprietary algorithm. The higher this number, the better.

Below, you’ll find the issues classified as High Risk, Medium-Risk, Low-Risk, and Informational.

For each issue, Salesforce will provide a description with the classification (critical, compliance, etc.) and either a way to fix it or informational links about how to fix it. 

With all this information, you can fix Security Issues in your org more efficiently.

Watch our on-demand webinar and learn how you can improve the overall performance of your Salesforce Org by doing an Org Health Assessment

Benefits of doing a Salesforce Health Check

Optimal System Performance

A health check evaluates your Salesforce instance’s performance and identifies any bottlenecks or areas of inefficiency. Addressing these issues ensures your system operates smoothly and responds promptly to user interactions.

Data Integrity and Quality

Review the quality and accuracy of the data stored in your Salesforce system. You can maintain reliable data supporting informed decision-making by identifying and rectifying inconsistencies, duplicates, and inaccuracies.

Security and Compliance

Addressing identified security and compliance issues during a health check is crucial to maintaining the integrity of your Salesforce instance. By proactively identifying vulnerabilities and ensuring compliance, you protect sensitive data, preserve customer trust, and mitigate legal and financial risks.

When do you need to perform a Salesforce Org Health Assessment?

  • Encounter errors or performance issues that hinder your operations and revenue
  • Looking for a seamless transition from Classic to Lightning
  • Require assistance with meeting new security requirements or ensuring proper user setup
  • Need a comprehensive diagnosis to determine the actual state of your Salesforce platform

As your business continues to evolve, your Salesforce org should evolve too; running a Health Check is one way to improve your Salesforce org health. Still, you can also run the Salesforce Optimizer, build an Adoption Dashboard, and switching to the Salesforce Lightning experience will help you increase productivity and efficiency, improving the overall performance of your org.

Make sure you run a Health Check at the proper time and the proper way. To learn more about how to keep your Salesforce org healthy, register for our webinar

Organize Your Gmail Inbox with Google Apps Script

Managing a cluttered inbox can be overwhelming and time-consuming. Fortunately, Google Apps Script provides a powerful toolset that allows you to automate tasks within Gmail, making it easier to keep your inbox organized and streamlined. In this article, we will explore how to use Google Apps Script to organize your Gmail inbox efficiently.

Visit the Google Apps Script website, and create a new project by clicking on “New Project” from the main menu. This will open the Apps Script editor, where you can write and manage your scripts.

Label and Categorize Emails

The first step in organizing your inbox is to create labels and categorize your emails based on specific criteria. For example, you can create labels for “Project B,” “Project A,” “Important,” or any other custom categories you need. Use the following code to add labels to your emails:

				
					function categorizeEmails(){
let count = 100
const priorityAddresses = [
'important@example.com'
].map((address) => `from:${address}`).join(' OR ');

const labelName = "Important"; // Replace with your desired label name
const label = GmailApp.createLabel(labelName);

while (count > 0) {
const threads = GmailApp.search(`${priorityAddresses} -has:userlabels`, 0, 10)
count = threads.length
for(const thread of threads) {
thread.markImportant();
label.addToThread(thread);
}
}
}


Archive or Delete Old Emails

Having old and unnecessary emails in your inbox can lead to clutter. With Google Apps Script, you can automatically archive or delete emails that are older than a certain date. Here’s how:

				
					function archiveOldEmails() {
  const threads = GmailApp.search("in:inbox before:30d");
  for (const thread of threads) {
	thread.moveToArchive();
  }
}


					function deleteUnwantedMessages() {
let count = 100
const blockedAddresses = [
'spam1@example.com',
'spam2@example.com'
].map((address) => `from:${address}`).join(' OR ');
const searchQuery = `category:promotions OR category:social OR ${blockedAddresses}`;
while (count > 0) {
const threads = GmailApp.search(searchQuery, 0, 10);
count = threads.length
console.log(`Found ${count} unwanted threads`);
for(const thread of threads) {
console.log(`Moved to trash thread with id: ${thread.getId()}`)
thread.moveToTrash();
}
}
console.log("Deleting messages complete.");
}


Reply to Important Emails

It’s essential to respond promptly to crucial emails. With Google Apps Script, you can set up a script that automatically sends a reply to specific emails based on their sender or subject. Here’s a simple example:

				
					function autoReplyImportantEmails() {
  const importantSender = "important@example.com"; // Replace with the email address of the important sender
  const importantSubject = "Important Subject"; // Replace with the subject of important emails

  const threads = GmailApp.search(`is:unread from: ${importantSender} subject:${importantSubject}`);
  const replyMessage = "Thank you for your email. I will get back to you shortly.";

  for (const thread of threads) {
	threads[i].reply(replyMessage);
  }
}


Schedule Your Scripts

Once you have written your scripts, schedule them to run automatically at specific intervals. To do this, go to the Apps Script editor, click on the clock icon, and set up a time-driven trigger. You can choose to run the script daily, weekly, or at any custom frequency that suits your needs.

Conclusion

Organizing your Gmail inbox with Google Apps Script can significantly improve your productivity and reduce the time spent on email management. With the ability to label and categorize emails, archive or delete old messages, and automatically respond to important emails, you can maintain a clutter-free and efficiently organized inbox. Explore the power of Google Apps Script, and tailor your scripts to suit your unique email management requirements.


Read more about the latest tech trends in our blog.