How to identify problems in your code with the Salesforce CLI Scanner

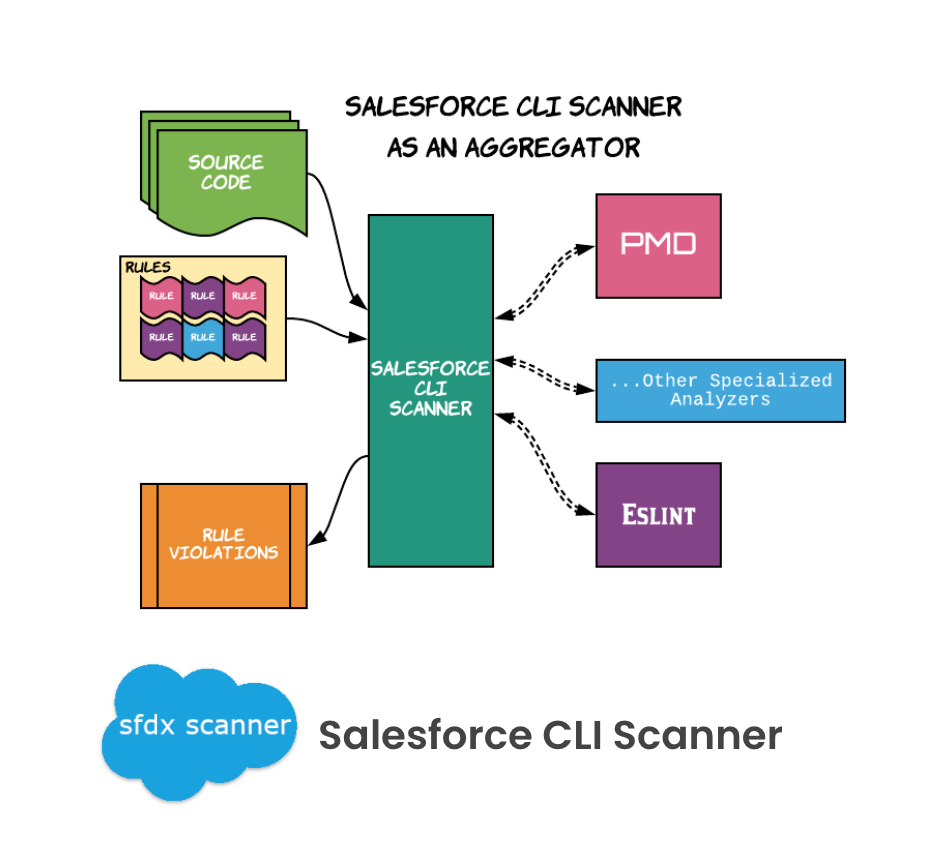
Ok, let see what the Salesforce CLI Scanner is and what it can do for us. The tool is a plugin that uses multiple code analysis engines in various languages (including Apex). It currently inspects your code using the PMD rule engine and ESLint, however, they have plans to add support for more rule engines in the future. 

This means that the tool will help you identify potential problems, from inconsistent naming to security vulnerabilities and alert you to these problems with easy to understand results. You can run the scanner on-command in the CLI, or integrate it into your CI/CD framework to enforce rules and expect high-quality code. And you can run it against every code change.

It’s like having a code review in real-time. Following some rules the Salesforce CLI Scanner can identify issues and show them to the developers as feedback to fix the code, saving a lot of time and money.

This tool can be used by ISVs and Salesforce developers to prepare for security review processes. It can improve code quality by identifying a variety of performance and security issues in the development stage. 

Another possible use is to integrate this tool with a CI/CD process to regularly monitor your code’s health.

Remember that the Salesforce CLI Scanner plugin works on all operating systems that Salesforce CLI supports. It has a one-step installation that is quite easy and fast, and if you are uncertain about the command-line commands, it has a built-in help (–help).

They have recently added new functionality that allows you to scan Salesforce Lightning Web Components using ESlint, and it’s amazing to have that.

These are some of the key features of Scanner v2.3, released in October 2020.

Static analysis

Static analysis, also called static code analysis, is a computer program method for debugging. It is done by examining the code without executing the program. The process provides an understanding of the code structure and can help ensure that the code adheres to best practices and doesn’t fall into common antipatterns and coding issues that will have a negative impact on the performance or quality of the code. Based on rules, the engine reports the suggestions for upgrading your code.

Of course, currently there are a lot of static analysis tools, but most of them work only with one or just a few sets of languages, and the most common in Salesforce packages is the use of a variety of components created in different languages. A single static analyzer is insufficient to take into account all the rules, patterns, best practices, etc. Working with multiple static analyzer tools can quickly become a headache.

To solve this, we recommend the Salesforce CLI Scanner plug-in. This plug-in shows the most relevant information to help Salesforce developers improve to the code while providing a unified experience. 

It has a single and easy installation process with an intuitive set of commands to interact with multiple rule engines. You can define a unified set of rules that are checked by their respective rule engines and also get a report that includes all issues identified by all the engines.

What is PMD?

PMD is a very powerful open-source static analyzer that supports many languages. Additionally, it has a large community of developers building rules for Apex. By default, Salesforce CLI Scanner supports code written in Apex, VisualForce, Java, JavaScript, and TypeScript but you can easily extend it to support any language.

Here at Oktana, we have a set of custom rules to improve our code quality and help everyone to have better-structured code.

What is ESlint?

ESlint is an open-source JavaScript linting utility for identifying and reporting on patterns, with the goal of making code more consistent and avoiding bugs. 

Because it’s very flexible in how it parses JavaScript, it can handle many use-cases related to Lightning Web Components. Additionally, with the built-in Eslint-typescript plugin, the Salesforce CLI Scanner can also analyze TypeScript out-of-the-box.

What does the Salesforce CLI Scanner do for me?

By combining two static scanners in one tool, the Salesforce CLI Scanner allows you to detect a wide variety of problems in your code.

Example Apex issues include:

  • Performance issues (e.g. running SOQL or SOSL queries inside loops).
  • Security issues (e.g. basic sharing violations, simplified CRUD/FLS checks, CSRF, and XSS vulnerabilities)
  • Not clear code (variable names, comments in classes and methods, avoid long, and complicated methods)
  • Error-prone code (e.g. empty try/catch/finally blocks)

Example issues with Lightning Web Components include:

  • Unreachable code
  • Unused variables
  • Invalid regular expressions
  • Stylistic preferences such as enforcing semi-colon at the end of a statement and expecting function names in camelcase

Catching these issues early has several advantages:

  • You can fix code issues immediately and rerun Salesforce CLI Scanner right away to confirm that the issues have been resolved, saving time.
  • Ensure the new developers are following the best practices, best patterns, and avoiding common issues.
  • You can shorten the security review processes. These processes are faster and easier when most issues are identified and fixed before the review even begins.

Different report formats

Salesforce CLI Scanner has an array of useful reporting formats for different uses:

  • Simple table-style reporting to get feedback on code you are actively writing
  • CSV reporting for spreadsheet-based filtering and analytics
  • JSON and XML reporting to feed into other tools for further processing
  • HTML reporting for readable, searchable results
  • JUnit-style test failures to use with a CI/CD setup

Conclusion

Salesforce CLI Scanner is a tool that is here to stay. It has a lot of  Salesforce engineers actively implementing new features to further improve it. 

An upcoming feature is the ability to detect and warn of external code dependencies that may have security vulnerabilities. They are also in the process of adding new rules to identify more security issues.

You can get started with Salesforce CLI Scanner within minutes by following this link to improve your code quality and save time.

What are you waiting for? Go ahead and give this amazing tool a try, and leave your comments about how your experience was!

Learn more from our team here, or check out our services.

Heroku: Simplify and improve your cloud infrastructure

Data plays an enormous role in the success of any organization. Collecting and quantifying pertinent information builds a stronger roadmap for growth. Because of this, companies are collecting and storing data to forecast future trends and develop action plans. That’s a lot of data to manage and most companies don’t have the right technology in place. This is where the cloud sweeps in to save the day. Cloud platforms enable companies to store large volumes of data to repurpose for business transactions. As a result, cloud infrastructure demand is growing for businesses of all sizes, as they have come to realize the massive benefits and potential of utilizing cloud components. Heroku is a first-class platform that helps developers scale more effectively.

What is Heroku?


Heroku is a platform as a service (PaaS) cloud that supports several programming languages and is part of the Salesforce Platform. Because it supports the most relevant programming languages used in the industry, it has become a popular tool for enhancing cloud infrastructure. Developers, teams, and businesses of all sizes use Heroku to deploy, manage, and scale apps. Using bi-directional synchronization, Heroku unifies the data in your Heroku data with your Salesforce CRM data. Additionally, Salesforce Trailhead was built and launched on Heroku. 

3 ways Heroku enhances cloud infrastructure:


  • Several Programming Languages: Initially, Heroku only supported Ruby on Rails. However, over the years it expanded to include other languages such as, Java, Node.js, Scala, Clojure, Python, PHP, and Go. The benefit here is the ability it provides users to create applications that are robust and versatile.


  • Rapid Delivery:  Developers are able to deploy their code to Heroku with a one-line command in the terminal. Having all the power of Amazon Web Services (AWS) in the background, but without having to take care of setting up its infrastructure. Heroku has it all covered for you!. Access to all of these resources and capabilities massively cuts down project time and allows developers to focus on creativity and higher-level work.


  • Scalable Functionality: Heroku allows developers to construct while not having to sacrifice impressive UI and effective application functionality. Heroku is able to accommodate spikes and dips in traffic without having to purchase more hardware. The system is able to cope with higher loads of users or more traffic reaching the system. 


As you can see, Heroku has many features that simplify and improve cloud infrastructure at a very granular level. By utilizing the Heroku platform, developers are able to build applications that are efficient, visually pleasing, and all at a fraction of the time and cost it would take to develop on other platforms. 

Oktana’s Experience 


Here at Oktana, we are avid users of the platform and always seek out the best technologies to leverage for our customers. We’ve used Heroku to develop a number of outstanding applications across several different industries. Among them, you can find a Leading Investment Firm, a Fintech Company, and MedZed

We’ve seen firsthand the kind of power Heroku brings to drastically improve application development. That’s why we’re extremely proud to announce that we’ve recently received a Specialization Badge for outstanding Heroku development from Salesforce! We’re super excited to be recognized for our expertise and it motivates us to develop even more applications with the platform. We think it’s a great tool and highly recommend it to developers who really want to extend cloud infrastructure to the next level.


How to set a tamper-proof Salesforce session cookie with Apex

Imagine we have a website in which we want the user session to persist for a specific period, even when the user closes and reopens the browser. 

Our goal is to have operations/logic for a particular user persist on the website. Whenever the user returns to the site within a given amount of time using a session cookie.

There are a multitude of ways to store the session data. In this article, we are focusing on client-side storage (cookies). Cookies are small pieces of data that are transmitted from the server to the client (generally done once.) Then when the user comes back to the site, the cookies are sent back to the server. This allows us to track a single user across multiple connections to our site. 

Why should I care about the expiration?

Being able to easily expire user sessions allows for extra security measures. In our case, if we wanted to add a new feature that allows us to sign out of all sessions in other locations (machines where the user has logged in), this (expire session cookie) would force those other locations to re-authenticate before gaining access to the account.

This is a good security approach for when a user’s cookie is stolen or his credentials are compromised. Upon changing his password all his sessions are invalidated. An attack using an old cookie cannot continue to wreak havoc on the user’s account.

Signing your session cookie

As we know, all data stored on the client-side could potentially be compromised as a user can maliciously tamper with it. And since we are not able to avoid it, we might provide the server with the feature to recognize this manipulation. 

This feature consists of a cryptographically signed cookie. Upon receiving the cookie from the client, verify that the signature matches what you are expecting. 

HMAC (Hash-based message authentication code) is a cryptographic construct that uses a hashing algorithm (SHA-1, SHA-256, SHA-3) to create a MAC (message authentication code) with a secret key. Salesforce provides us with a class named Crypto that contains methods for creating digests, message authentication codes, and signatures, as well as encrypting and decrypting information. Click here to see more about Crypto.

Let’s code!

We are going to create a global helper class for signing session cookies. That we will be able to re-use in any part of our project.

Session-Cookies-with-apex-1

Within this class, we are using other Salesforce helper classes such as Blob (Contains methods for the Blob primitive data type) and EncodingUtil (to encode and decode URL strings, and convert strings to hexadecimal format).

This allows us to do the following:

Session-Cookies-with-apex-2

We can then send that to the client that requested the page. Once the client visits the next page, their browser will send that same cookie back to use. 

Assuming we need to store the ‘session ID’, we would get this as result:

Session-Cookies-with-apex-3
Session-Cookies-with-apex-4

Note: 

All cookies created from Salesforce contain ‘apex__’ as a prefix and are encoded before being set for the page.  Learn more about cookies here

To retrieve and verify the data was not tampered with, we could do the following:

retrieve-and-verify-data-apex

If the MAC is verified, it means that the data was not tampered with by the user and we can continue our business logic. 

Real Secret Key

For extra security measures, we might set an auxiliary CustomSetting for storing AES secret keys. We will create a Secret__c CustomSetting with a field named Base64HmacKey__c.

Now, we are going to refactor our code to include this new approach:

  • Add a new variable to our helper class
new-variable-helper-class
  • Add a new function to get the secret key from the CustomSetting
CustomSetting
  • Lastly, modify the private variable named SECRET_KEY
secret-key

Now we have better handling of our secret key.

Encryption

When using client-side storage, it may be beneficial to encrypt the data to add an extra layer of security. Even when encrypting the data, you need to continue using a MAC.

Using just encryption will not protect you against decrypting bad data because an attacker decided to provide invalid data. Signing the cookie data with a MAC makes sure that the attacker is not able to mess with the ciphertext.

If you’ve made it this far, thanks for reading! Also, if you are interested in Salesforce development go and check our latest articles here.

How to Integrate Salesforce with Python

Today’s post is about, you guessed it, using Python and Salesforce together. Salesforce offers a few different REST API endpoints that allow us to interact with our org. They also offer a SOAP API, but we’re not going to use it today. In fact, we don’t need to worry about the endpoints at all. Thanks to a Python library called Simple-Salesforce.

Casinos are integrating salesforce with python to automate their sales processes. They see the benefits of being able to more effectively manage and track customer data, as well as improve the overall customer experience, which you can read more about at Olympia Casino review. Salesforce provides a wealth of capabilities for automating sales processes, and casinos see great potential in using this technology to improve efficiency and drive better results. By incorporating Python into their sales process, casinos can better analyze customer data and respond to customer inquiries more quickly. Additionally, the use of Salesforce automation tools allows casinos to more effectively manage customer relationships. Casinos are using Python because it is a fast, versatile programming language that can be used for automation and data analysis. Salesforce offers a variety of integrations with other software systems, so casinos can quickly build out custom applications. The integration enables casino operators to better track customer activity, optimize sales processes, and provide superior customer service.


We could do this all by hand with the built-in requests library. You would have to handle sessions, OAuth process and save tokens, deal with request headers, encoding and decoding JSON, creating configs to handle all the different endpoints, etc…

Elden Ring game developers integrate Salesforce with Python in order to increase efficiency and data analysis. The integration between the two platforms allows for quick and easy access to all of the game’s data such as caelid colosseum elden ring. This increased efficiency has helped the developers make better decisions about how to improve the game, which has resulted in a more immersive experience for players. Salesforce is an essential tool for managing customer data, and Python is a powerful programming language that can be used to automate complex tasks. By integrating Salesforce with Python, game developers are able to streamline their processes and improve efficiency. The integration allows the developers to manage tasks, profiles, leads, and more using Python programming. This integration also allows for data synchronization between Salesforce and the Elden Ring game’s database.

Simple-Salesforce Python Library

This is where the wonderful world of open source software comes to the rescue. A man named Nick Catalano created a library called simple-salesforce. From what I understand, he isn’t actively developing it anymore, but due to open source, the community has picked up adding features. It has about 50 contributors as of July 8, 2020. The lib is being actively developed, with new features added like bulk API support and formatted SOQL queries!


With a bit of the background out of the way, let’s start digging into the library and see what we can do with it. First, no better way to explain what simple-salesforce is than to quote the README itself:


Simple Salesforce is a basic Salesforce.com REST API client built for Python 3.3, 3.4, 3.5, and 3.6. The goal is to provide a very low-level interface to the REST Resource and APEX API, returning a dictionary of the API JSON response.

Simple Salesforce


In plain text this quote means Python 3.x is supported, REST requests are handled for us, and the data we want comes back as a native Python data type. Great! Just what we want.


Login Information


First up, we’ll need a few things from Salesforce. Three things to be exact. Our username (email), password, and security token. The username and password should be pretty easy to find in your profile settings in your Salesforce org, but where do we find the security token? We don’t really see it, rather we’ll need to reset it.


After clicking “Reset Security Token” , you should be sent an email containing your new token. Save this, we’ll need it in the next steps. That’s all we need from Salesforce to get up and running. Now that we have that, let’s start building our Python script and start playing with our org.


pip and pipenv

But first, a quick word about PIP. While working on this example, there was an update to simple-salesforce lib. Github has the current version and we need the format_soql method from it. But pip (PyPi) hasn’t been updated with the new version as of yet, July 2 2020. So, we’ll need to install it via it’s repo on Github.


pipenv install -e git+https://github.com/simple-salesforce/
simple-salesforce.git#egg=simple-salesforce

If you are using the demo repo I built, we won’t need to worry about the requirements or dependencies if using pipenv. The demo has a Pipfile that’s pulling from the repo already thanks to the magic of pipenv.

The code

Now, let’s write some code. First up, we’ll bring in the libs we’re going to use. The only one that is not part of the standard lib is simple-salesforce:

from simple_salesforce import Salesforce, format_soql

from pprint import pprint
import json

Simple enough, import simple-salesforce, pprint (pretty print), and json. pprint is only used to make the terminal output look better, so it’s not needed for the core examples. json is used to get the credentials from a .json file, which is what we’ll do next.

# open file holding our login information
# we have the login info in a separate file so we can
# add it to .gitignore to help prevent leaking the information
# environment variables could also work
with open("login.json", "r") as login_file:
    creds = json.load(login_file)

Keep credentials secret

If you were on a project working in a private repo and multiple people needed access to the login credentials, keeping login info in the script itself would be okay, not ideal but okay. The reason we’re doing it is because it’s good practice and it’s open to the public on Github. So hiding and not committing sensitive information is important. This goes for any language or code base.

With that disclaimer out of the way, I included an example login.json file called very creatively “EXAMPLE_login.json“. Let’s take a quick look at it.

{
    "login": {
        "username": "[email protected]",
        "password": "My-REALLY-amazing-password",
        "token": "kdjfghdgfFGJbDFgd36DFGHDfgh"
    }
}

Very simple json object only containing the three things we got from the last steps. You can just copy/paste the “EXAMPLE_login.json” and rename it to just “login.json“, then update it with your login information. You can do this in the file explorer or VSCode, but here’s a quick example to do it from the command line.

cp EXAMPLE_login.json login.json
vim login.json

Salesforce Object

With our new login information, we can create the salesforce object back in our python script.

sf = Salesforce(username=creds['login']['username'],
                password=creds['login']['password'],
                security_token=creds['login']['token'])

And that’s it! We now have an object that represents our org, and now we can start doing cool things like SOQL or DML. Next, since we have everything we need to start awesomeness, let’s try a simple SOQL query.

SOQL Query

# an example of running a simple SOQL query
SOQL = "SELECT Id, Email FROM Contact"
data = sf.query(SOQL)
for d in data['records']:
    pprint(f"{d['Id']} -- {d['Email']}")

We defined the query string to get the Id and Email from all the Contacts, called the query() method of our salesforce object, then looped through the returned records and display the results. A note to those new to Python, in the pprint() we use something called an f-string or format string. It makes it easier to embed variables in strings, much like the way Aura Components handle expressions with {!v.my_var}

SOQL is cool and all, but what about adding new data to our org? We can do that too, very easily. We’ll even try using the bulk api to insert 1,000 record. But first we need to create 1,000 records. This is going to be mock or fake data just for the sake of simplicity. We’ll also be testing on the Account object, so only thing required for new records is the Name field.

data = []
for i in range(0,1000):
    data.append({
        "Name": f"Bulk Test {i}"
    })

Now we have a list of dictionaries that represent our record data. Here we have a for loop filling a list with new items. We could also use list comprehension to replace these 5 lines of code with just one.

data = [{'Name': f"Bulk Test {i}"} for i in range(0, 1000)]

Bulk Insert

To bring these new records into Salesforce, we use the .insert() method for the object we want, coming from the salesforce object we created. Confused yet? Here’s the insert code, it should help make things more clear.

# insert the new account using the bulk api
x = sf.bulk.Account.insert(data, batch_size=10000, use_serial=True)
pprint(x)

Here, we’re telling our org we want to use the bulk api “sf.bulk“, then which record object we’re working with “.Account.“, and finally what we want to actually do “.insert()“. We could use any object too, doesn’t have to be just Account. Even custom objects work, so instead of where Account is, we can replace it with something like sf.bulk.MyCustomObj__c.insert(..... We can also specify the batch size, or to process in serial.

Bulk SOQL

If you visit your org and take a look at all Accounts, you should see 1,000 new accounts with names like “Bulk Test 42”. We can also try doing another SOQL query, this time we’ll use the bulk api for the query. We’ll also show how to use things such as “LIKE” in SOQL statements.

# now lets get those records so we can delete them
SOQL = format_soql("SELECT Id, Name FROM Account WHERE Name LIKE '{:like}%'", "Bulk Test")
the_accounts = sf.bulk.Account.query(SOQL)
pprint(the_accounts)

Simple-salesforce now comes with the handy little method called format_soql that allows us to do things such as LIKE. format_soql is also the reason we used the Github repo for pip instead of what’s on PyPi, the new method was just introduced in the last 2 weeks.

Now that we know we can insert and add new data and records to salesforce, let’s see about removing it. Looking at the README, seems like the delete() method needs a list of records containing the Id of the record to be deleted. The records need to be a key-value pairs or dictionary just like how the query was returned. We already have all the Id’s for our inserted record from the “bulk.query()

{'Id': '0013h00000EdP87AAF',
  'Name': 'Bulk Test 998',
  'attributes': {'type': 'Account',
                 'url': '/services/data/v42.0/sobjects/Account/0013h00000EdP87AAF'}}]

Looks like simple-salesforce also returns something called “attributes“. This just tells use which object we’re working with and which api endpoint we got the information from. For our example, and for the .delete() method, we only need the Ids. So let’s clean up and make a new list with only what we want.

account_ids = []
for a in the_accounts:
    account_ids.append({"Id": a["Id"]})
pprint(account_ids)

Here is another opportunity to practice list comprehension! See if you can get that for loop down to one line.

Bulk Delete

So now we have the list of Id’s, now we just simply call the delete() method and go refresh our org’s Account list.

data = sf.bulk.Account.delete(account_ids, batch_size=10000, use_serial=True)
pprint(data)

All the records we inserted are now gone!

Final Thoughts

In conclusion, let’s recap what we’ve learned. For one, Python is awesome. Second, integrating Salesforce in a Python project is very very simple. With only three pieces of information, we can create a native Python object representing our Salesforce org, do things with the object like SOQL and DML, and finally have access to multiple salesforce API such as bulk or search.

This is only scratching the surface. We can do much more and simple-salesforce also has methods for metadata and describe. From this basic example, we could bring in Salesforce data to Flask API’s we build or insert new data to Salesforce from a data scraping crawler we make in Python.

We can also harness the power of Python’s ecosystem of visualization and reporting such as Pandas or SciPy. Nothing stopping us from grabbing Salesforce data and running it through machine learning or neural networks using PyTorch or TensorFlow.

If you’ve made it this far, thanks for reading! Here I’ll link the demo repo containing all the code discussed in this post and a YouTube video of my presentation. Also, if you are interested in learning more about Python, you can check this article: How to do Time Series Analysis with Python & Pandas.

https://www.youtube.com/watch?v=rf1jx3jbL2M&feature=youtu.be

How to do Time Series Analysis with Python & Pandas

First steps on analyzing and stationarizing of time series data

A while ago I had the opportunity to work on building a sales forecaster as a POC. It was a challenging project with a cool MVP as an outcome. Through this post, I will share part of my journey and findings on analyzing the data I was provided.

Assumptions

I will assume you have previous knowledge of both Python and Pandas.

First things first…

This project started like every other data science project: familiarizing ourselves with the data we had in hand. I did this by importing the CSV file provided as a data source.

Once I had a clear idea of what kind of data we were dealing with, I proceeded with the initial exploration and usual transformations.

To simplify future manipulations over Pandas DataFrame, I made ‘fecha’ the index of the DataFrame. Since the records already came in the correct order, it was simple to perform this transformation and convert the DataFrame into a series with a ‘daily-level’ frequency, by resampling the entire DataFrame.

After completing the above transformations, the data was ready to be plotted. With the help of the Matplotlib library, I was able to display a graph of the quantity of product sold per day throughout the years.

So…what’s a time series and what makes it special?

From the initial data exploration, it was clear we were dealing with what is known as a time series. Time series is just a fancy way of saying we are dealing with data points indexed in time order.
Usually, when dealing with time series, we look for some special characteristics in our data to be able to make predictions based on it. Specifically, we look for a time series that is stationary.

Stationarity of a time series

We can say that a time series is stationary when its mean and variance are not a function of time (i.e. they are constant through time).
Stationarity is important because most of the statistical methods to perform analysis and forecasting work on the assumption that the statistical properties (mean, variance, correlation, etc.) of the series are constant in time.

How to test the stationarity of a time series?

Stationarity can be assessed in two ways:
● Visually inspect the data points and check how the statistical properties vary in time
● Perform a Dickey-Fuller test

Let us take a visual approach first and see how it goes:

By plotting the standard deviation and mean along with the original data points, we can see that both of them are somewhat constant in time. However, they seem to follow a cyclical behavior.

Although the visual approach can give us a clue, applying the Dicky-Fuller Test (DF-test) can provide a more precise way to measure the stationarity of our series.

Results of DF-test

I will not go through much detail on how the DF-test work, but let’s say all we need to care about is the numbers we see in “Test Statistic” and “Critical Values”. We always want the former to be less than the latter. And the lesser the value of Test Statistic the better.

Our series is stationary given that Test Statistic is less than all the Critical Values, though not by much.

Below you can see the code I used to evaluate the stationarity:

What if our time series was non-stationary?

There are some techniques one can apply to stationaries a time series. The two I am more familiar with are:
Transformation: apply transformation which penalizes higher values more than smaller values. These can be taking a log, square root, cube root, etc. This method helps in reducing the trend.
Differencing: take the difference of the observation at a particular instant with that at the previous point in time. This deals with both trend and seasonality, hence improving stationarity.

Pandas and NumPy provide you with very practical ways to apply these techniques.

For the sake of demonstration, I will apply a log transformation to the DataFrame.

Bonus track: We can even apply a smoothing technique over the transformed data set to remove the noise that may be present. A common smoothing technique is to subtract the Moving Average from the data set. This can be achieved as easy as:

Clearly, we can see that applying log transformation + moving average smoothing to our original series resulted in a better series; in terms of stationarity.

To apply differencing, Pandas shift() function can be used. In this case, first-order differencing was applied using the following code.

Let us perform a DF-test on this new resulting series.

With the log transformation and differencing the test statistic is significantly smaller than the critical values, therefore this series is too more stationary than the original series.

Wrapping up…

When we face a predictive task that involves a time series, we need to analyze said series and determine whether it is stationary or not. To determine the stationarity, we can either plot the data and visually inspect the mean and other statistical properties or perform a Dickey-Fuller Test and look at the Test Statistic and Critical Values. In case the series happens to be non-stationary, we can apply techniques such as transformation or differencing to stationarize the series.

After all this analysis and preparation, the next step in the project was to forecast with the time series, but that’s a topic for another post!

Learn more from our team here, or check out our custom development services

How we connected Salesforce and Slack

The Oktana team built a demo to share how Salesforce and Slack work together. Our team leader walks through how the team built a Node.js app on Heroku that connects to the Slack API and Sales Cloud. The app is capable of both reading and writing to Salesforce from Slack.

You can create and update Salesforce tasks without ever leaving Slack. If someone else updates or assigns a task to you in Salesforce you’ll get a notification alongside all your other Slack messages. Take a look and let us know if something like this might be a good fit for your company.

Hope you’ve found this full walkthrough useful and insightful. We are Salesforce platform experts and offer custom development to help you build your platform and solve the right problems. Our team has worked with different organizations and their projects. If you want to know more about our work, go check out our latest success stories.

App Development with Salesforce Technologies

Working together with our partners to bring ideas to life is one of the driving forces behind everything we do here at Oktana. That’s why when Huge approached us to help them with app development for Stanley Security; we leaped at the chance.

Stanley is a large security company specializing in commercial security systems. They needed a tool for their field sales team to use on the go that showcased their current product offerings. Also, they preferred to manage the process through the app, on either computers or tablets.

Huge has excellent skills in front-end development and was planning to develop the app and the UI/UX elements internally. But they needed a partner to help complete the backend work and sync everything up with Stanley’s Salesforce instance. That’s where the team at Oktana came in. Huge was able to focus on designing a front-end experience that would satisfy Stanley’s sales team. Meanwhile, Oktana could focus on a seamless experience on the back end.

How do the front and the back of this application work, and what did it take to make them play nicely? The front-end app was built utilizing React and Node.JS, managed with a Postgres database that Huge hosted on Heroku. For our backend development, we needed to make sure everything tied into the Postgres database correctly. To do that we utilized Heroku Connect to transfer between the front-end database and Salesforce. Additionally, we mapped all the data so that everything was stored where it needed to be on both ends of the application process. This application’s design was for interfacing with Stanley’s Salesforce organization, and it required a Salesforce login to access the app and all of its features. The login ensured that anyone using that app is a part of the sales team at Stanley. 

Now, beyond the basic connective functionality, we needed to complete all aspects of the sales cycle through this app. This included allowing the sales team to send emails for clients with sales details and other information. To make that happen, we built an email tool using Apex and Visualforce. Stanley also wanted to close sales within the app, so we built in Adobe Sign functionality. Sales contracts could be signed digitally, and Zuora payment systems facilitated immediate payment. The final step was to synch the new data with the Salesforce organization.

The key technologies used in this project include:

  • Salesforce
  • Heroku
  • Postgres
  • React
  • Node.JS
  • Heroku Connect
  • Apex
  • Visualforce
  • Adobe Sign
  • Zuora

This project allowed us to work collaboratively with another development team to build different parts of an app. We’ve been able to successfully demonstrate our skill and ability to understand other’s work and apply it to our goals.

We’re looking forward to working with both Huge and Stanley again in the future. If you have a project that we can help you with, please be sure to let us know!

Learn more from our team here, or check out our custom development services.

Building Demos and Prototypes at Oktana

Everyone at Oktana is the best of the best at what they do and the incredible people that make up the Demos and Proof of Concepts team lead by Gonzalo is the perfect example of that. Whether it’s a Salesforce, mobile, or web project the team works hard to make our client’s dreams and ideas and make them a reality. The needs of our clients always come first and as such the team has developed into an extremely agile machine that is capable of producing and iterating on projects quickly while responding to new and changing requests.

The Demos and Proof of Concepts team’s role are to help our clients work through the entire prototyping process. First, we bring on all stakeholders and map out what the client’s goals and vision for the project are. The team is extremely adaptable and capable of discussing tasks at a very high level regardless of how fleshed out the idea is. Once all these ideas are captured the design team here at Oktana gets to work on designing the prototype. The design process here is highly iterative as we want to make sure our work is aligning with all of our client needs.

Once the design has been completed, the assets are then passed on to the engineering team. The engineering team then takes pre-built templates and reworks them into a working prototype for the project at hand. They continue to iterate on the concept with the client to ensure that it meets their needs. Once this process is completed the client will either decide to move forward on the development of the full product or not. If they opt not to move forward all code is then scrapped and the team moves on to its next project.

The Demos and Proof of Concepts team does incredible work for our clients with very little notice. They’ve built demos and prototypes that have been used for presentations in front of thousands of people at major conferences. If you’re ever in need of a demo or prototype then our team is here for you.

If you are a Salesforce partner looking to partner with experts to help you provide the best custom app development solutions to your clients Contact us. Our team will give you more information about these services. 

Building A Better Einstein (Robot)

One of the coolest projects we’ve had the opportunity to work on this year was without a doubt the Einstein Voice robot that we built in partnership with our friends at Salesforce. If you attended or followed along with Dreamforce this year you know that Einstein Voice was a very big part of the show for Salesforce and in the lead up to the event, they knew that they needed something special to really highlight what could be done with Einstein Voice and that’s how the project began. How could everyone get wowed at Dreamforce? Our team at Oktana took up to the challenge of making that happen in collaboration with Salesforce.

Einstein and Einstein Together At Last

Salesforce had already played around with the idea of taking a toy Einstein and turning it into a robot but found it to be too difficult to repurpose an already built toy into something that fit their needs. Luckily, our project leads had actually been involved in puppeteering as a hobby and had a hunch that a puppet would be the perfect fit for a project like this. It could be custom made and be designed with movement in mind. After deciding to use a puppet it was time to find someone to build it and that’s when we found FurriFingers from the UK who were able to build Einstein and install the motors he needed for his eyebrows, mustache, and neck to come to life. The team at FurriFingers built the Einstein puppet in the UK and then he was flown to Uruguay to meet our team

Einstein is Starting to Come Together!

Once puppet Einstein was all put together it was finally time to bring him to life! First, we needed to find a way to control the motors which drive the different expressions Einstein can make and for that we opted to use an Arduino. Next, we needed to find something that would both control Einstein’s movement, sending commands to the Arduino, but also listen to voice commands and respond to them as a smart speaker does. For that, the decision was made to use a Raspberry Pi. The pairing of an Arduino and Raspberry Pi allowed us to do everything that was needed while also keeping things small enough to fit inside puppet Einstein. At this point, we paired the tools that our partners at Salesforce had developed for Einstein Voice with new tools built specifically for this project to allow puppet Einstein to understand your requests and get that data for you from your Salesforce instance while looking like he’s thinking and speaking to you.

Finally, Einstein was alive and ready to take the stage! But the long road from the UK to Uruguay and finally to Dreamforce wasn’t over yet because before heading to San Francisco he had a little layover in Hawaii. While there he got to show off his talents in front of a group at a smaller VP level Salesforce conference as a prelude to his bigger performance. Thankfully, everyone liked him so much that they offered him his own stage at Dreamforce! Now he had the chance to strut his stuff every 15 minutes in the Einstein park. Additionally, at Dreamforce, our project lead did a full presentation on this project so if you want to hear even more about how we brought Einstein to life be sure to check that out here.

You might be wondering, what’s Einstein up to now? Right now he’s living with the Einstein Voice team at Salesforce in San Francisco but that doesn’t mean we’ve seen the last of him. So, be on the lookout because he just might show up at the next Salesforce conference you attend.

See You Soon!

Interested in reading more success projects? We highly recommend visit our portfolio, monthly we share some of our best success customer stories.